Thursday, July 31, 2014

Larger Base (in progress) for Spinning Bike Wheel

One fault with the spinning bike wheel piece was that it was top-heavy. I filled the base with cement and the problem disappeared, but I've been wondering if I could balance the wheel weight with a wide base. I started coil-building a wide base, but as I built, I realized I didn't want a straight, level top.

The top of the new base, before and after I cut it at a slant for a gear.

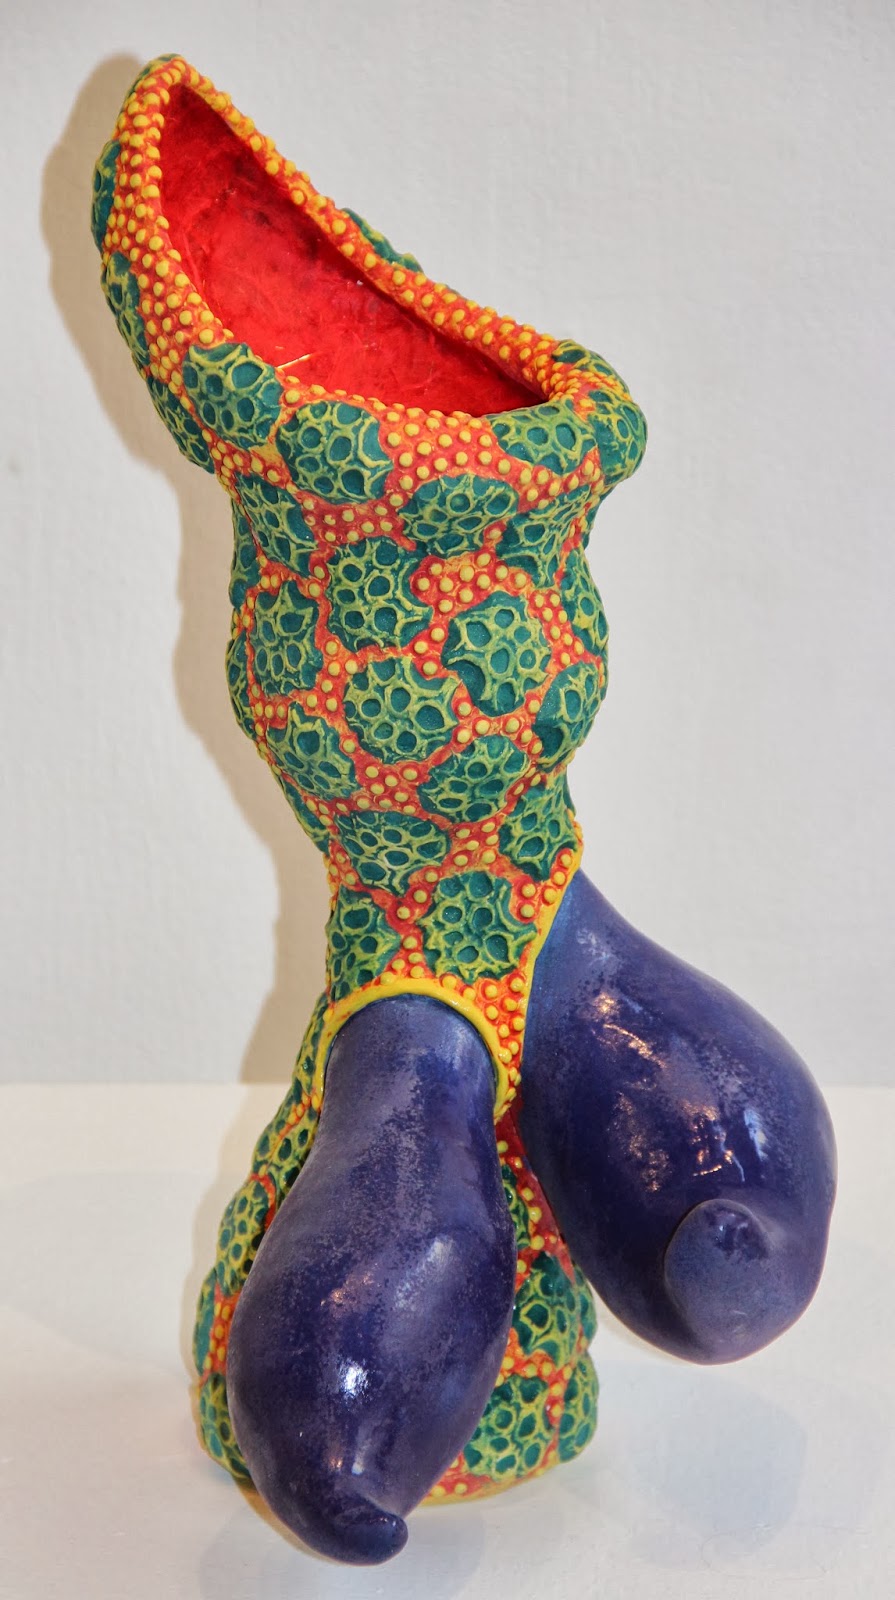
I leaned the form over at the top and bisected the top section from the base with an angled gear. The top section is highly textured with small jewel-like sprigs. The lower section has an impressed texture with sprigged decoration.

Attachment for one branch-like "stem" on the sculpture base, set in place (left) and lifted out of star shapes (right).

Thinking about using the bike parts as supports, I designed two branch- or stem-like pieces connected with bike parts. Both pieces are leftover from the SRAM Part Project from 2012. Both insert shallowly into the wall of the base. The irregularly shaped one (top) will have a bolt securing it to the ceramic braces on either side. The star shapes lock the bike part into a vertical position because the metal form has sections that rest inside the notches.

A second attachment for a branch-like "stem" on the other side of the sculpture base. In the picture a paintbrush is showing the location of the eventual bolt or rod.

Both "stems" will be removable for easier transportation of the sculpture. The second arm will be secured with an invisible bolt or rod inside the sculpture. The plastic bike piece will rest inside a cut-out in the wall of the sculpture.

One "stem" base in place while attaching sprigged gears.

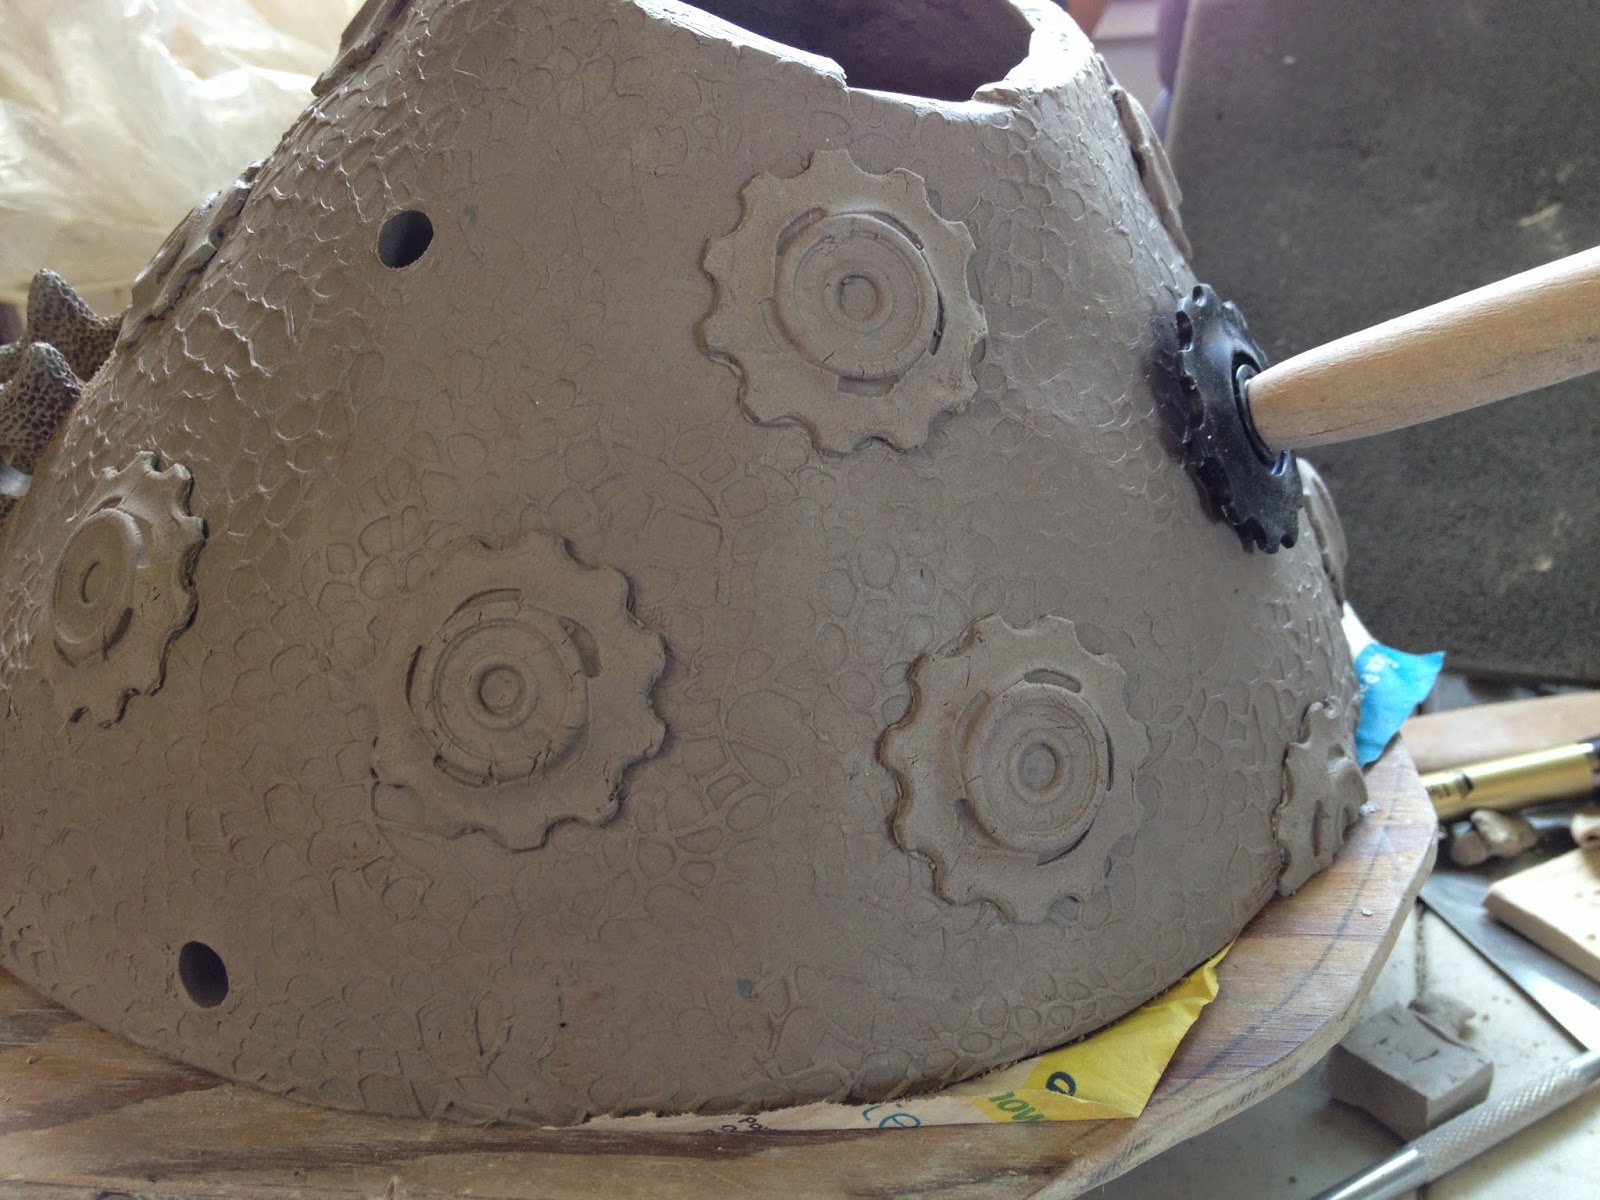
Last year I created some sprigs from a round plastic gear piece that is part of the rear derailleur (I had to look that up) on the back wheel of the bike. I decided to use the actual gears as well as the gear sprigs as surface decoration on the sculpture base. 

Placing the actual gear helped me arrange the sprigged gears.

The holes represent the placement of the plastic pieces. I only had one piece cleaned and ready to attach while I was building the base, so I held it in place with a hole cutter punch while I placed the clay gears.

The base is almost done (building).

After firing and glazing, I plan to increase the height (and weight) of the base by attaching a series of coils of bike chain underneath the bottom rim of the sculpture. Revolution Cycles (go buy all your bike stuff there, please) in Yakima is still saving me bike parts, the latest box was filled with chains.

There are so many chains my camera can't focus on all of them!

Monday, July 28, 2014

Finished Work from 2013

Last summer, before my sabbatical began, I built some pieces that never got finished. I built several pea pod forms at the Mini Maker Faire in Tieton. I did the pieces as a demonstration during the event, but never finished them because I got busy with my sabbatical work. They had one layer of underglazes applied when they were still wet. I finished applying the second and third coats this summer. 


I started another, larger pod in my home studio at the start of the summer. This too was partially underglazes at the time and finished this year.


Near the start of my sabbatical last year I build a simple form with some mechanical parts epoxied into one end and gear sprigs attached to the other. This piece was finished glazing in 2013 but I epoxied the metal parts in place this summer.


Most of the work done during my sabbatical incorporated bike parts or was designed as part of a wall installation. I only had a couple pieces that neither attached to the wall nor used actual bike parts. These pieces were not a priority for firing and finishing in the fall as the working deadline and my "Biomorph" show approached.


Friday, July 25, 2014

New Stacking Gear Piece

Another piece I worked on during my first week of throwing was a tall stacking piece similar to ones I made for my sabbatical and the first SRAM project. I've been fascinated with the twisting, tall form divided by gears. 

gear stack forms from sabbatical 2013/2014


I did a shorter, wider, and straighter version of this divided form for my first SRAM project. On that one I was more focused on added multiple bike parts. For the later pieces I was working almost directly from sketches

SRAM Gears (top section) from 2012

I started with this form this summer because the structure is fairly simple and I could throw the parts without a lot of planning. I wanted to get started building right away. Sometimes building without much of a plan allows me to think through some ideas, concretely. I suppose it is similar to an automatic writing exercise. The goal is to get started.

sculpture in progress with large gear in place

Speaking of writing, as I have been writing about my work this summer, for various applications, it has occurred to me that with these vertical pieces, I have slightly lost sight of my intent in incorporating the bike parts. The last sabbatical pieces I built ended up being about the aesthetics of including imagery and material recycled from bicycles. What these pieces did not do was use the bicycle parts as supports in the way some of the other pieces did.


these five forms all use the supports to literally support some part of the ceramic form


Two of the first SRAM pieces use metal rods from the bikes as literal supports for the whole form or to apparently support a section of the form. The pitcher plant forms from this year and the orange flower piece with the bike pedal parts both use the bike parts to lift up flower-like sections from a separate base.

sculpture in progress with large gear in place

This summer's stacking piece is more complex that the earlier tall pieces in that I added bulbs back onto the sides and also added a second "stem" coming from the base. While I was adding the bulbs, I made a mistake and attached one too high on the form. I decided to leave it and alter the bulb form to work around the gear. 

cut pod that overlaps the large gear

The bulb has a cutout section at the top on one side that will be attached after the entire form is glazed, fired and epoxied together. I haven't decided if I will camouflage the seam or leave it visible, kintsugi style.

gear in place on the wet base (notice the pod looks smooth across the top of the gear)

Of course I planned for the fit of the gears before and after firing and for making the strongest attachments between ceramic forms. The clay pieces will shrink but should still fit. Though the photo makes it look like the gear is a tight fit now, I believe I measured correctly accounting for shrinkage.

a gear stack piece made during my sabbatical, in progress in December 2013 

This week I unloaded the pieces from the kiln and stacked them up, but haven't had a chance to check gear fit. 

The top section doesn't fit quite right without the gear in place so I set it next to the piece.

There is still a lot of work to be done post-firing. I need to apply underglaze to all eight sections and reapply underglaze on at least five of the pieces after the second firing. Then I will spray on glaze and fire all the pieces again. After firing I can begin to put the forms together with the gears. 

The eight ceramic parts of the sculpture unstacked


Tuesday, July 22, 2014

Paper Layers

This weekend I spent several evenings applying mulberry and banana paper layers to the surface of some pieces. My family was out of town, so I watched about 25 episodes of The West Wing as a background to tediously ripping, glueing and sticking paper pieces on the sculptures. (Watching the show in 2014 was a little jarring. Maybe I'm just more sensitive to misogyny than I was back then--but also how can they refer to the Redskins 80 zillion times without commenting on the damn name?). 


Anyway, while I listened to the show, I put paper on about 11 pieces and finished one that I had been working on last year. The paper layer provides a contrasting surface texture and, in some cases, a contrasting color. The piece below was matte green on the outside. I think the red textured paper improves the piece. (I suppose the image is better, too.)


In some instances, the original color didn't look right or was streaky. I fired the orange and blue/green piece below about 3 times, adding layers of orange to the surface to cover up some blue streaks. Even though I reapplied the color and reglazed, the blue still showed through. This piece was started years ago, so on recent pieces I have been more careful about cleaning up my mistakes before firing. I applied the orange, yellow and tan layers of mulberry paper on the pod shapes. I might eventually add mulberry paper to the other orange sections as well. I haven't decided.


Some of the paper has fiber inclusions. Based on some research from yesterday, I think the paper is either banana or mango paper. A layer of Mod Podge (adhesive) over the top highlights the contrast between colored paper and the fibers, darkening each and sometimes emphasizing the glaze color that shows through the thin sections of paper.


The green and red pieces (above and below) are actually a wall-mounted set of forms that were supposed to be part of an installation.  I dropped one and broke it in half. The paper layer obfuscates the crack and repair--bet you can't tell which one was damaged (I can't).


One other piece had some damage to hide. The spiky blue parts (below left) had some minor cracks near the bottom. I patched them with epoxy and wood putty and was considering covering them with paper. I layered the inner spaces with red banana/mango paper and red and yellow mulberry paper, but didn't start on the blue. I didn't have blue banana paper--also I ran out of time. I could have tried some mulberry paper, but the mulberry paper is perhaps too plain or boring to cover large areas.


I may end up painting over the patched cracks on the spiky piece above so that the glazed and unglazed blue spikes can contrast against the paper textures inside. Last year I applied orange mulberry paper onto a large surface of another piece (above right) but besides being surprisingly soft, the surface is not particularly interesting.


I have collected my papers from a variety of sources over the years. Most of it I no longer remember buying. My parents gifted me a few rolls of red and green papers two years ago for Christmas. I used the red on the piece below, as well as a piece last year. Inside, as a contrast, I used orange paper so that the holes, which open up to the interior of the form, show a different color.


Unfortunately, I ran out of the orange paper. Nowhere in Yakima seems to sell handmade paper. Michael's, The Bindery, and Craft Warehouse all sell patterned card stock and other papers for scrapbooking (and stationary and drawing paper), but nothing thin, flexible and with a varied texture. I ended up searching online and I've ordered some paper to finish the interior of the box above and to use for future projects.


One of the strangest papers I already had is this Japanese lace paper with lots of holes. I applied it to a longish blue and yellow piece last year, but I didn't like it. This weekend I applied Mod Podge over the top and I am much happier with the look.


All the papers look different depending on whether the Mod Podge is applied just to stick the paper to the ceramic or as a layer covering the surface as well. I like both textures for different applications.


Sometimes I use the paper layer on the entire surface, sometimes for a contrast to the glazed surface. Occasionally, as in the piece above, I will apply just a tiny bit of paper to a piece. Here the red paper and Mod Podge is concentrated inside the "eyes." The rest of the surface of this piece is textured and layered with underglazes. The paper color provides a good contrast, though I've had a hard time taking a good image of this piece. (I think I tried about 6 times on two different occasions yesterday.)


One thing I haven't tried much is including a Mod Podge covered shiny surface as a contrast to the soft paper surface on the same piece. These little guys used to have red tips but they apparently bothered people, so I tried making them blue. What do you think, Josie?

Saturday, July 19, 2014

Measuring Shrinkage

I talk sometimes about measuring my work so that I can account for shrinkage during firing. Clay shrinks during the drying and firing process but metal and plastic bike parts do not shrink, obviously. I need to build my ceramic sculptures a bit larger than I intend them to be when fired. The same issue comes up when building lamps, water fountains, sinks and more lamps.

Bike gear set on top of a fired shrinkage tile. The clay impression of the bike gear is visibly smaller than the gear itself.

At school I tell students we have about 12-13% shrinkage from wet to glaze fired. We tested it quite a while ago, but my clay at home I haven't tested. I suppose I could look up Seattle Pottery's listed shrinkage rate, but I'm firing to a lower temperature and mixing old clay bodies together, so it's best to check shrinkage myself.

Shrinkage tile after firing

The easiest way I know to test shrinkage is to make a shrink tile. I rolled a slab out of my clay (in this case I am using Seamix with sand from Seattle Pottery) and cut it into a rectangle at least 12 centimeters long. I used a ruler and a needle tool to mark a 10 centimeter line in the clay. I labeled the tile with the clay name and punched a hole in case I want to hang the tile later. Then I let it dry slowly before firing to prevent warping. Shrinkage can still be measured accurately with a flexible ruler on a bent tile, but it's easier if the tile stays flat.

Shrinkage tile with ruler to compare measurements before and after
  
I marked each centimeter just in case I made a mistake on one of the marks. With more marks, I can check shrinkage for 10 centimeters or each centimeter individually. (For those of you who enjoy a math challenge, go ahead an use inches for your marks, but calculating shrinkage rates and double checking measurements is much easier in a base ten system.) After firing I remeasured the original line. The new length is 9.4 centimeters. I lost .6 centimeters during firing. My shrinkage rate is 6%.

Metal rod standing inside wet clay form. Notice the 6% gap.

Knowing the shrinkage rate is helpful to give me a sense of how much the clay changes. I could buy or make a shrink rule to help with measurements (we have one in the YVCC clay studio), but my usual approach is to guess and estimate. This week I decided to guess during building and then use the fired shrinkage tile and my ruler to check my guessed measurements. 

Measuring the bike rod against the shrinkage tile measurements.

I built a form into which I will insert a tall black metal rod (the part that holds up the seat on a bicycle). I measured the diameter of the rod using my shrinkage tile. The diameter was about 3.5 marks on the tile, which translates to 3.5 centimeters before firing. (I didn't bother to check the actual diameter of the rod because it doesn't exactly matter using this method.)

Measuring the wet clay opening with standard centimeters

Interestingly, the interior diameter I had built into the form using the highly precise art of guessing was almost exactly 3.5 centimeters. Go me!


Pressing a bike part into the wet clay

For the smaller attachments, I pressed the plastic piece into the wet clay to mark the location and general shape--in this case a circle with a little bit sticking out at the top. Then I measured the plastic on my shrinkage tile and used my ruler to mark the clay with the appropriately enlarged dimensions. The result was very similar to what would have happened if I had pressed the plastic into the clay and wiggled it around a bit (my method for the metal rod) or cut out around the plastic piece using a thick cutting tool.

Impression of the plastic bike part outlined with dashes marking the scaled up measurement 

Six percent shrinkage is almost insignificant at a small scale, but being able to measure correctly becomes more important at a larger scale, such as when I am planning for large gears to be inserted into the clay. I am drying the work slowly, again, since any warping during drying will obviously result in the measurements being inaccurate. After firing I can check the ceramic openings against the actual bicycle parts to make sure my process is efficient.

Round shrinkage tile with impression of bike gear (I made this to have a visual of the size change in relation to a larger bike gear.)