Tuesday, September 27, 2011

Materials & Influence

Paper and papermaking has been an interest of mine for almost as long as I have played with clay. In elementary school I owned a book of papermaking for kids. My friend Carrie and I experimented with most anything we could get our hands on to put in the blender with the paper pulp. At one point we had a large red plastic briefcase full of our paper experiments. The briefcase became slightly less appealing once we started experimenting with ingredients from the spice drawer. I seem to recall adding quite a bit more garlic powder than one usually expects to find (or smell) in their handmade paper.

In graduate school I gained access to a much more impressive venue for papermaking. UW-Madison had a papermill and occasionally Jim Escalante would teach papermaking classes. It wasn't the most popular medium and I often worked in the studio alone during the time I experimented with paper as a sculpture medium. I was accustomed to working with clay and, for sculpting, clay has some serious advantages over paper. Clay acts as its own support structure, for one. With paper pulp I needed to either form the wet paper over a mold and let it dry or build it onto a wire mesh structure.  Though I liked the texture I could achieve with paper (and I liked how light the paper was to transport) I wasn't as happy with the forms I could make.
detail of an installation of handmade paper and fabric sculptures (2005)

I returned to clay as my primary medium and the works for MFA show were exclusively made of clay with just a few pieces incorporating other media such as hair (and metal or fishing line for hanging or support).

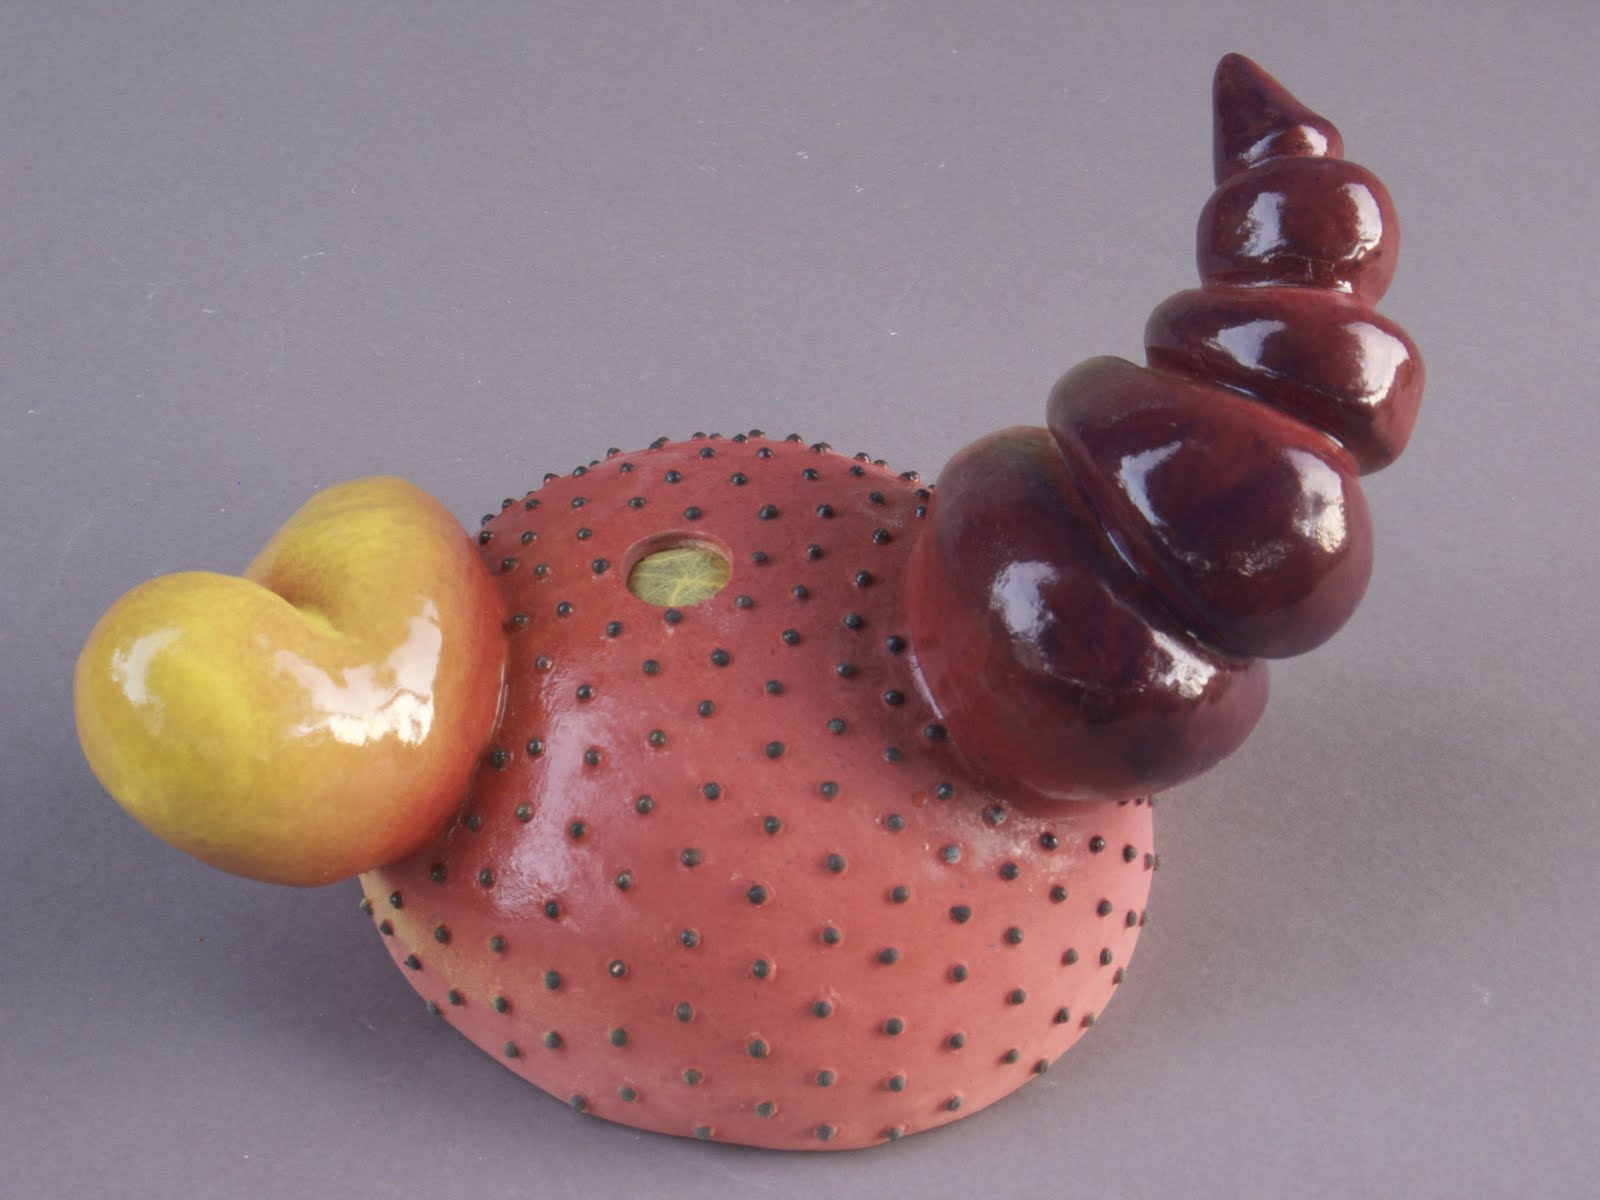
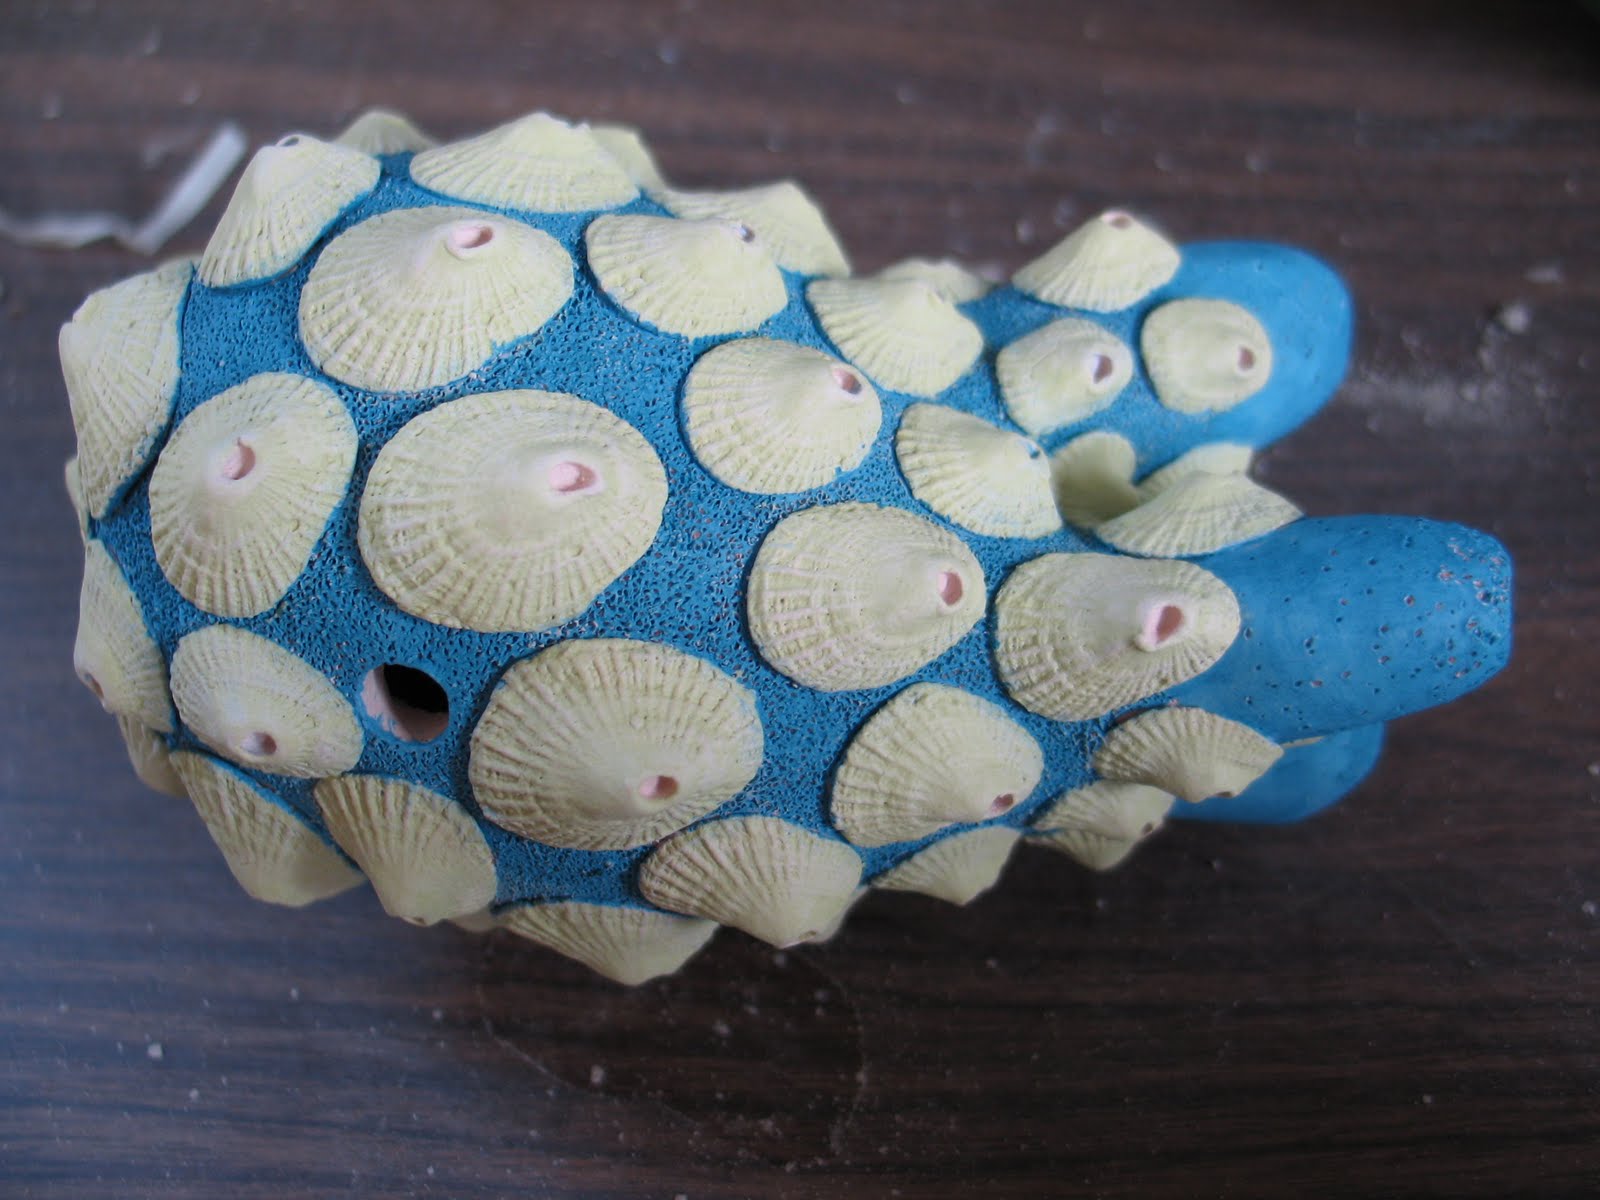
One of the things I like to explore in my ceramic work, however, is the contrasting of textures. I can achieve this contrast in clay itself by the use of different molds, textures, applied sprigs or burnishing techniques. I can use glaze to create contrasting smooth, shiny and matte or satin finishes as well. I have experimented minimally with incorporating other materials such as hair or mulberry paper. 

 high fire ceramic with synthetic hair (2006-MFA Exhibtion)

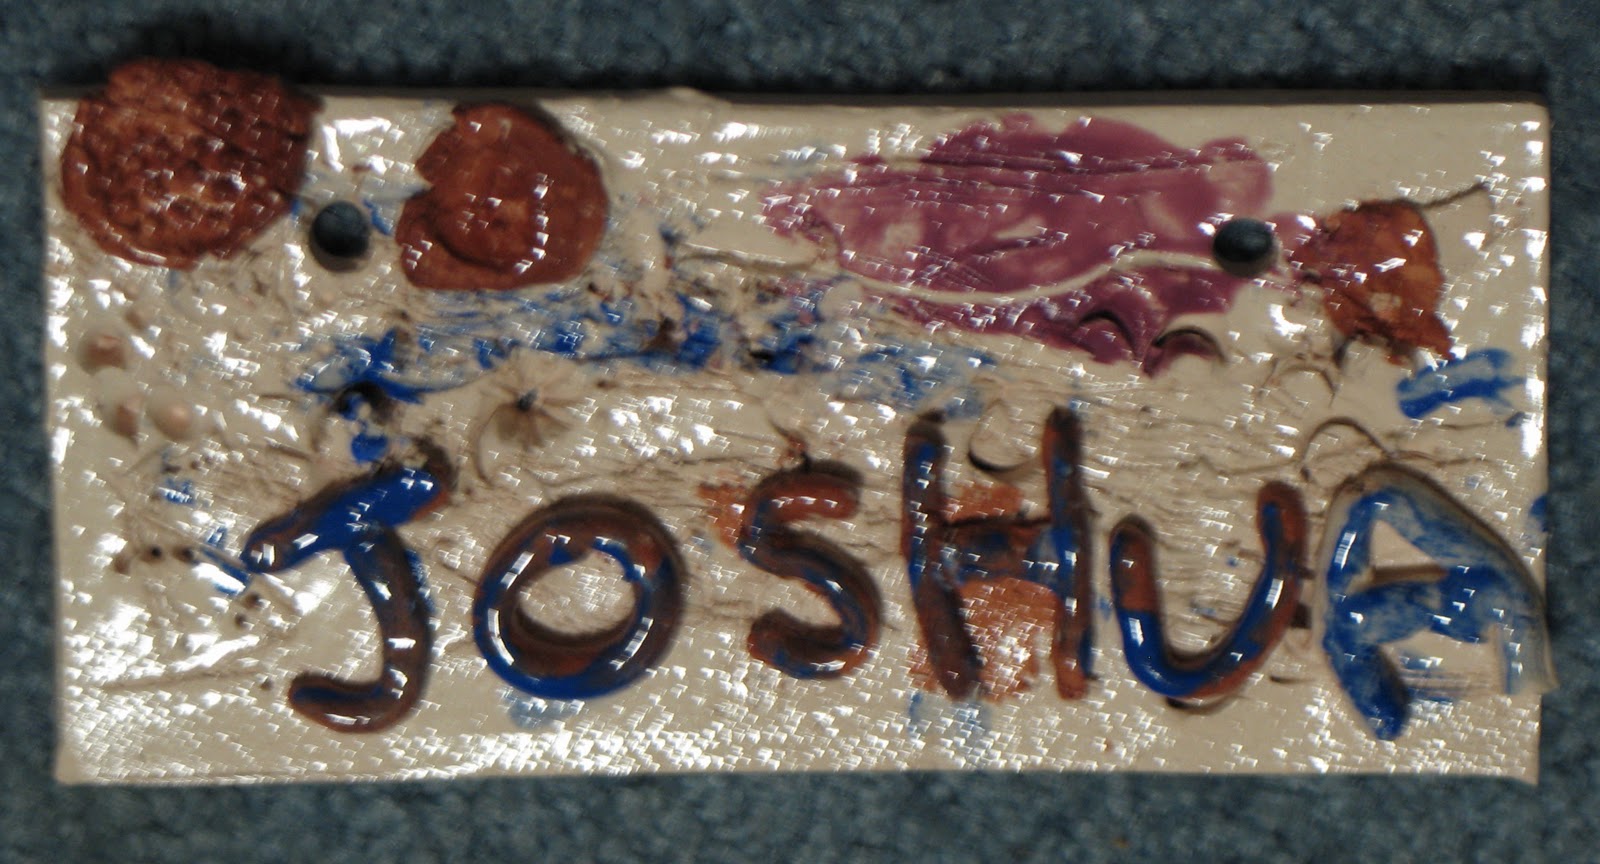
low fire ceramic with mulberry paper (2010)

I was pretty happy with the results of the mulberry paper and have decided to experiment with this material more this summer. the process is somewhat tedious (like much of my work) but I like the results.
In working this way, I was also reminded of my use of hair several years ago and, though I haven't allowed space to incorporate hair or other materials in much of my work this summer, I would like to keep this technique in mind for future work.

Besides my own work, I have had two recent outside reminders of incorporating mixed media. In the Spring I had a independent student who was working with polymer clay in a steampunk style. She incorporated clock gears, light bulbs and other machinery or pieces of metal into her work both before and after baking (polymer clay is baked to a much lower temperature than regular clay). A few years back I had a couple of students who incorporated crushed marbles into their fired clay. And just a few weeks ago I was looking at Renee Adams' work at the Tieton 10 x 10 x 10 exhibition and admiring her incorporation of polymer clay, flocking and other materials to create contrasting surface textures. 

Two other long time influences incorporate contrasting materials and have a tactile quality that I find appealing. I first saw Jason Briggs' work at an exhibition in my hometown, Whitewater, WI. He went to University of Wisconsin-Whitewater as an undergraduate and had work in an alumni show. Later I discovered that my parents owned a vessel he had made as an undergraduate. (The most interesting features of the vessel: an unusually textured glaze and an attached glass marble.) Briggs' work is highly textured. He incorporates real hair into his work but most amazing are the soft and contrasting textures he is able to achieve with the clay. His pieces sometimes look gross, particularly in photographs but in person they are simply intriguing. You want to look and touch. There is so much to see in each of his pieces. I took my daughter to see his work at the last NCECA (National Council on Education for the Ceramic Arts) convention and she just wanted to look and look. (I often think the opinions of the very young are more pure than adult reactions). 

Michael Barnes is a printmaker, but his subjects often seem to incorporate pieces that don't belong together. He seems to be making prints of sculptures made of mixed media. His lithographs have a soft, inviting texture that makes me want to touch the objects inside the images.


Sunday, September 25, 2011

Recent Work with Mulberry Paper

This morning I took images of the last of the work that I finished this summer. I still have a few pieces to finish from the summer, but I feel a sense of accomplishment to at least have finished what was finished.

Most of these pieces incorporate mulberry paper or other handmade papers.


Here I added paper to the body of the pieces to provide a textural and color contrast to the glazed end of the pod or seed.

Some of the pieces I photographed this morning were actually formed last year or before but I was unhappy with the glazed or underglazed surfaces and wanted to enhance them with the softer paper texture.


 I believe I actually completed this piece several years ago, possibly even before moving to Washington, but the colored seeds seem to "pop" more against the soft purple mulberry paper behind and below the pieces.


In this box the paper softens the sound and feel of the ceramics. I carried the paper over the top edge of the bottom piece. When you put the lid on, the ceramic edge sits on paper rather than clinking or scraping right on another ceramic edge.


This was originally made as a multi-part lidded box but for some reason the lid was permanently attached. (It's been too long; can't remember what happened.) The piece doesn't fit particularly well with the rest of my work. I was thinking of those baby toys where the child pushes a handle down and the balls in the container below spin. Since the piece was already damaged I decided to play with a different type of textured paper.


I blew this piece up last year. I forgot to include an air hole in a small hollow section near the top and it blew in the kiln. I only lost a small section of the top, so I decided to glaze the pieces and attempt a repair later. I epoxied the pieces together but the seam was visible and some of the color was off. I used two colors of mulberry paper in part because I was trying to create a contrast between the shiny ball on the inside at the top and the body of the piece. I also didn't have enough green paper on hand. I attempted to highlight the shadows and the underglaze spray from the original by putting green under the spines and yellow above. I am not entirely happy with the result and I consider this piece only partially complete.

I still have a few pieces I am waiting to finish. I saw waiting, but truthfully this first week of classes was so busy I didn't have a spare moment until today. These pieces are the uninjured pieces that would be okay without the paper but I think would be enhanced with the paper. I guess I was afraid to start on them until I worked out some of the kinks with the broken, cracked and maimed pieces from last year.


This piece from last year looks find on the end but is a little dull when viewed from the side. I believe I always intended to try paper on this piece.

Last year was the first time I started experimenting with mulberry paper. I only made a few pieces but I was pretty happy with the results. I sold one of the two small pieces below.

Saturday, September 24, 2011

Pre-School clay project (after firing)

The pre-school clay projects finished firing last weekend and I was able to get them back to the kids on Monday.

I was fortunate to leave work early so that I could bring the pieces to the kids during pre-school and before most of the kids had left for the day. The kids were sitting in circle when I arrived with the box and their teacher handed out the projects, showing off the finished pieces.

The night before my daughter helped me put ribbons or raffia through the holes in the top so we could hand the name plates.

I decided to spray a gloss overglaze to all of the plates before firing because I guessed the kids would appreciate the shiny surface. The dark underglazes became quite dark after firing but they look better in person than in my photos, since I didn't spend much time messing with lighting and glare.


These pieces have a spray of gloss glaze over the top and are ready to be loaded into the kiln. Texture details show up better when you can't see the underglaze. 

Regardless, the project was fun and would be fun to do again with students. It would be interesting to see how older students would do with a similar project or even how these same students would do with a second project. 

Wednesday, September 21, 2011

Independent Clay Blog Project

                                              
This quarter every student in Independent Clay (ART 299) will keep a blog about his or her Independent Clay experience. The blog will provide a written and visual record of students' experience and growth throughout the quarter. It will provide a flexible way to maintain communication between myself and my students. I believe maintaining the blog will also encourage students to think about their goals, inspiration and working methods throughout the quarter.


This first week I am asking students to set up a blog. In the first post, students will introduce themselves and discuss what they expect from this quarter. Some students may be planning to complete a particular project or practice a particular technique. A quarterly goal may be to complete a particular quantity or type of work in the next 10 weeks. A student may also wish to receive direction from the instructor on a particular process, like firing, glaze formulation or more advanced clay techniques.

In the blog posts for this class, I am interested in learning what my students are thinking and what they expect and hope to do in this class. I am not particularly concerned with style or formatting of the posts. In some ways the blog posts function more like journals or e-mails with a casual, conversational tone. This isn't a writing class (I don't expect perfect grammar or punctuation or even sentence structure); we are using writing as the vehicle for discussions about art.


In the spirit of the project, here is a first blog post of my own in which I will discuss my own goals for Fall 2011.


Rachel's First Independent Clay Blog Post

As the instructor, I have goals for how the quarter will progress in the school clay studio. I also have goals for my own work this quarter, though WA state law requires that my own work be created off campus (so you won't see it in the YVCC studio).

My YVCC studio goals are to work towards a greater equity between hand-building and wheel throwing techniques in the classroom. Often the beginning hand-building students are greatly out numbered by the beginning throwing students. Sometimes this disparity allows the smaller class to create less ambitious work. It appears that they look around and don't see much work from their classmates and start to think less is expected of them. This year both beginning classes are large. I hope that having more hand-builders will allow those students to be inspired and challenged by each other and to try more ambitious projects or techniques.

Having independent students in the studio helps both groups of beginning students learn the studio etiquette and, more importantly, they see the impressive things the higher level students can do and are challenged to try for larger or more complex pieces themselves.

As I write this the week before school starts, I don't have any ART 299 students signed up, so it is hard to know what goals I might have for them because I don't know who to expect. One broad goal I have for my ART 299 students is for them to think a little more critically about what they are making and why. Why they use certain techniques or materials, why they consistently return to certain forms (or not) and where their ideas come from.


In my own work, one simple goal is to spend at least an hour in my home studio each week. This usually means squeezing in an hour after I leave YVCC and before I pick up my daughter or an hour during a weekend nap time (her nap, not mine).

I have several pieces that, as of this writing, are not complete. I hope to have them finished and ready to photograph before October. I have a few older pieces that need repair and at least one 2-part piece that needs to be put together and epoxied. After that I will need to photograph the work and update my inventory. Most of the work created this summer has yet to be named or priced.

This winter I will be exhibiting work in a clay show at Larson Gallery. One work I intend to show is an installation of several separate pieces. I need to find some quiet, uninterrupted time to determine an arrangement of these pieces and to determine whether I need to create any new pieces.

Though finishing my summer work and preparing my winter work seems like it might eat up all my home studio time, I also have a few new projects I wish to try this fall, time permitting. I have been reading From Mud to Music by Barry Hall and I would like to try making some of the instruments he discusses. I have a vague idea about making instruments in a clay class, but I want to try some things on my own before I test them out on students.

Monday, September 19, 2011

Writing as a Generative Process

Classes started today at YVCC. Last week while I was updating syllabi and trying to determine whether I have work study support in the studio this year, I was also been thinking about changes and improvements I can make in my classes this coming quarter. I finally got around to reading some course evaluations I gave my students last year and I got some good suggestions from them.

I plan to have my independent clay students keep a blog about their quarter's experience in clay. I suspect some of them will not be thrilled about the writing element in a clay class, but I have a background in writing as well as art and I think that an essential skill for an artist (or anybody) is to be able to talk intelligently about their work. 

One of the things I have noticed about keeping this blog regularly--even for the short amount of time I have been keeping it regularly--is how helpful the writing process is for how I think about my work. As my mother likes to remind me, "writing is a generative process." 

As I sit down to write, I don't have a fully formulated plan. I keep a notebook handy in the studio and jot down a few ideas as they come to me. When I sit down to write, I pick the most interesting or promising idea and start to write about it. I often don't know where I am headed when I begin to write. A few times I have found myself on a tangent or in a slightly different place that where I expected to be when I began writing. A few times I have made a connection in writing that I hadn't really thought about before writing it down.

The fact that I end up writing something I wasn't expecting when I started is what makes the whole process interesting. Keeping the blog has reminded me of sharing a studio in college. Obviously one doesn't script a whole conversation ahead of time. Conversations with a studio-mate or conversations in a more formal critique move you from one understanding to another. In some ways having a conversation with a blog is like talking to a very neutral studio-mate. 

I also like Blogger's save and edit features. I try to step away from my blog before posting it because, as is happening right now, I might get distracted in the middle of writing. I can get the basic ideas down and return later (say, when my daughter isn't trying to talk to me about her owies) and read the post through to be sure that I didn't muddle my phrasing.

But a blog also doesn't require formality expected in a classroom setting or an artist's statement. Blog authors can use slang and incomplete sentences as it suits their style, just as long as it makes sense. One of my favorite examples of this relaxed (and funny) style of writing is the Books I Done Read blog. 

Another advantage of a blog is that the writing can be sparse and the images plentiful. The Larson Gallery Guild blog uses a lot of images combined with writing (and the images and writing come from a variety of sources). Other artists' blogs use almost no writing and focus entirely on images of work. One of my favorite blogs that relies heavily on images hasn't been updated recently, but Hyperbole and a Half has excellent stuff if you search past posts. 

I believe that keeping a blog will force my independent students to formulate more thoughtful ideas about their work. I hope that it will also encourage discussions between the independent students. Of course it will allow me insight into what students are doing, thinking and talking about. 

My independent students keep different studio hours or work outside of the studio. I can force conversations by holding a required critique, but the discussions end up being somewhat formal and are hard to schedule.

Of course I also like the idea of having students present their work regularly and perhaps even interact with people who are not in the class. Several local artists keep blogs of their work. Fostering a discussion or connection between students and artists could be a good experience for all.

Thursday, September 15, 2011

Summer's New Work (finished)

I finished quite a few pieces in the last few weeks. I've just updated my website with photos of this work.

Visit www.racheldorn.com to see my newest work (and older work, too).

My website says I finished 39 pictures of finished work from this summer. A few pieces were only finished this summer but formed last summer or fall. I still have some pieces in the finishing stages and that have not yet been photographed but I will post them when they are finished (hopefully the next week or so.

A piece that was built last summer but I didn't like the surface.


Tuesday, September 13, 2011

Taking Slides

The summer work is done and the studio is almost clean. So I've spent the bulk of the last two days "taking slides" of my work.

This used to entail special film and special lights and sending the special film away for processing and paying for said processing and then tossing out the inevitable bad slides and feeling a little sad about the cost and the effort.

Eventually real slides meant endless hours at a slide recorder when everyone started asking for a CD of .jpgs or .tiffs in application materials rather than a carousel or set of slides. I bridged this gap in my early career. In college and afterwards almost all applications required physical slides. When I applied to graduate school, some schools wanted digital but I remember sending off several bulky slide carousels too. I vaguely remember giving at least one talk on my work using a slide carousel.
By the time I finished graduate school, no one was asking for physical slides anymore and Kodak had stopped making carousels.

I haven't actually made or used a slide in years. But "taking slides"sounds better (and is quicker) than saying I am "taking digital images of my artwork for use in job and exhibition applications."  When I used to take actual slides, it was clear I was talking about making something to record and promote my artwork. Now I'm as likely to fill my digital camera's memory card with pictures of my daughter as with pictures of my artwork; there isn't a physical distinction between the two types of images.

Anyway, "slides" is what I've been doing this week.


When I am taking slides (er, making images), I find it is sometimes hard to judge the quality of the image at immediately. I get into a rhythm and take a bunch of images but I have to come back to the computer (and often the printer) before I can "see" if the images work. I also find that time and distance helps. I am better able to judge the quality of the images I took last year than this. Similar to judging the quality of the work itself, judging the quality of the slides right after making the work is difficult because the actual image competes with the image in my head, my feelings about the process and my hopes for the piece.

Looking back at last year's images, I realize that several are quite dark and have a blue-ish background rather than grey. This year (so far) I don't have that problem, but I don't remember changing anything about the process of setting up, lighting or taking the images.

My method isn't necessarily an official or approved method for taking slides. It certainly wasn't how I was taught, but, then, I am not a film camera and freedom from processing fees means I can quickly delete or retake images that don't work out.

In college I learned to use tungsten lights and a depth of field with a long exposure and one of those cords on the camera that allows you to click without moving the camera. We had a diffuser light of some sort and lights on stands. Slides were taking in a room specifically devoted to taking slides (and maybe storage, too. In graduate school we adopted a small room that was slightly less dusty than the rest of the clay studio. We built our own diffuser out of a light hanging from an extension cord with a cardboard box around it and a filter over the opening. If I recall correctly, the filter was the kind used in a heater. We covered the windows with paper and tried to get the lights far enough back that they wouldn't create shadows.

At my home studio, or, rather, outside of it, I hang my big roll of grey photo paper from an old clothes rack (came with the house, don't know why) with plastic clamps and drape it over my daughter's art table. I do this early in the morning so I can use the daylight just after dawn when shadows are more diffuse. I set a long depth of field and adjust the light meter as the sun comes up.

I don't think this method is orthodox but neither can I have a permanently dedicated "slide" area in my studio or home. Also, tungsten lights get really hot and unpleasant and my only real enemy outside in the morning is the wind. The wind almost won a small object from my "slide" table when it blew the grey paper and rolled the piece to the edge. Luckily I was standing there and caught it before it fell.

I took 135 images of 48 objects this morning and yesterday morning. A few were retakes of work completed last year or before. Taking advantage of dawn's early light means that by the time my daughter wakes up I've already accomplished something for the day!

Thursday, September 8, 2011

Pre-School Clay Project Results


completed nameplates from pre-school class

Today was the clay project with my daughter's pre-school class. I think it went pretty well. All the kids made name plates, which was more than my minimal goal for the day (make something) and you can read almost all the names--even the one you can't read has a legible name buried under the extravagant decoration.

I got there a few minutes early and started setting up the table. I had brought what felt like a lot of things: paper for them to work on, brushes, slip cups, tools and stamps, pre-made letters, a box of letter stamps and two balls of clay for each kid.  While I was setting these interesting new things out on the table, the class came in from outside playtime and had a difficult time staying in formation as they were told to wash their hands and sit down for circle time. Can you blame them? 

Once they were all washed and sitting "criss cross applesauce," I sat with them in the circle and told them about clay. I asked if they'd used play-doh before and told them that, like play-doh, clay can be squishy.  Then I told them it can be kind of hard like my pre-made slabs (I think the cardboard I put under each one absorbed more water out of each slab than I'd anticipated) or even very hard and strong after firing; I showed them that I couldn't push a stamp or another tool into a piece of fired clay.

Then I told them that you can stick clay to clay with just pressure. I had my daughter help by telling them what you need to do to stick clay together. "Scratch and add water!" and got them to repeat it before I let them go over to the table. 

At the table I showed them the tools they could use and the water cups and brushes and the pre-made coil letters or letter stamps they could use to write their names. I was surprised by how patient the kids were. They waited while I told them and even a moment or two after I was done. I think their teacher has trained them not to start before her "okay."

It was fun to watch the kids work. There were nine there today and two adult helpers besides myself and the teacher. One is a part-time teacher or volunteer (not sure which) and and the other is the father of one of the kids. The kids obviously enjoyed the project, some more so than others. One boy wasn't feeling well and another finished quickly and seemed to be wondering what he was supposed to do next, while some others added layers of stamps and squished clay until told to stop.

One boy, with help from the assistant teacher wrote his name using stamps then proceeded to completely cover over his name with coil letters when she had moved on. Though I know the older kids know how to spell their names, it was interesting to see that almost all of them needed some help with order or which end to start from. Carter and James both started with the C and J at the right side of their plate but oriented so that when the plate was turned around, the letters faced the correct direction.

Alison started to spell her name SA and Jonathan had a W as his second letter. Joshua at one point had written HSAJ.  It seemed sometimes like the kids just liked the shape of certain of the coil letters. This was certainly true with this name plate: 

Derek's name is stamped in underneath all the other letters

An interesting phenomena could be observed if you were just watching the name plates from the start of the project to the end. As the teacher came around the table, helping one kid after another, the extra letters magically disappeared and the order somehow rearranged itself so that even long names were correctly ordered by the time she swept past. Interestingly, the teacher didn't appear to take over the project, just to whisper hints in the kids ears until JWNAOTN was remade into JONATHAN and CTR expanded into CARTER.

After the letters seemed under control, I brought out a few jars of underglaze. I asked the teacher first because depending on one's tolerance, there was already quite a lot going on at the table, but she seemed comfortable with a bit more. I opened two jars on each end of the table and asked the kids not to switch the brushes (to avoid muddy jars of identically mixed color). Eventually some of the kids asked to use the colors on the other end of the table. The girls were not seated together, but they clearly preferred purple and pink to black.

 The underglaze in Molly's flowers is very thick. It should be interesting to see after firing

Riley used all of the types of tools: stamps, cookie cutters, even a flower arranging "frog" to make little holes

Alison shaped her own A but had already attached the pre-made letter

You can tell by the color contrasting letters that these boys painted the raised surfaces and then were done with the project. They were the first to leave the table.

 I think Gabriel shaped some of his own letters

James has stamped-in letter underneath the coil letters

The boys seemed to prefer black. 

Carter shaped his own "C" out of a coil of clay

Jonathan seemed very excited that his mom would like his project

The ones who stayed at the table longer used more underglaze and kept adding things to the surface after they'd used color. Riley, Alison and Joshua had to remove a bit of clay once their pieces got so thick I was was worried they would explode in the kiln. I had thought I could get away with not telling them that "rule" about clay.

 Joshua collected most of the letters in his name without teacher help and really liked pushing tools into the wet clay

It was interesting to see how the kids focused on different aspects of the project. Some liked pushing things into clay and testing what shapes each tool would make. Others liked adding clay or letter shapes to the clay. Some spent time shaping the ball of wet clay apart from the name plate decorations and others got into using the underglaze. I'm not sure a similar project with adults is all that different. Some work exactly as directed, others get focused on trying all options or looking for new approaches.

I think my basic plan for the day worked as planned. The best last-minute thing I did to prepare for this project was to make the coiled letters so kids could just grab the ones they need. Some of the kids could have made their own letters but I'm not sure if all of them could. I didn't anticipate them being used as decorations themselves, however.

I did bring extra slabs of clay that I never ended up using, which made the inclusion of the cookie cutters a little odd. As it turned out I wasn't sure there was sufficient room on the table. If this were a regular project the kids could have used them. They were obviously skilled and well behaved enough to handle more variety and more methods.

I now plan to fire the dried name plates and spray or paint a clear glaze over the top. I drilled holes (or enlarged the kids' holes) in the nameplates before I laid them out in the studio to dry so that after firing they can be hung with ribbon or string.

Tuesday, September 6, 2011

Pre-school clay project (planning)

My daughter's day care encourages parents to share their skills or interests with the students, so I volunteered to visit her class this week and do a clay project with the kids.

Earlier this summer I did some projects with my daughter in the clay studio. In the summer the studio is set up for use and I have more energy at 5pm than during the year. The studio is also a nice place to be on a sunny summer afternoon. Add some kids music on the newly repaired CD player and we're ready to go.

We tried several projects, some a bit too hard for her, others just about right with some strategic help from Mom. She tried throwing on the wheel but at this age it is really just squishing clay on the wheel.  she likes it but it wears me out watching her.

Making a pineapple pot in a plastic-lined sand castle toy was just a bit too hard for her. I made the mistake of having very wet slip that day. She liked painting it on the clay and eventually I had to take the slip away because the pineapple pot was quickly turning into pineapple mush. I ended up sneaking in the supporting corner pieces under the guise of making her check each side. This project required a bit too much dexterity and power in her fingertips. After the pot dried a bit she was happy to decorate it with scratching tools and slab cutouts and stamps.

sand castle pineapple pot

A project that went surprisingly well was making a slab cylinder over a toilet paper tube. I've used this basic method with college students and with older kids. A few years ago I had an adult student make a beautiful "functional" sculpture out of many different sized clay tubes, all made using this same method.

My daughter liked rolling the paper around the tube and then rolling the clay around the paper. I rolled out the slab but she was able to handle it and even score and slip it together. The toilet paper tube inside the clay meant she could press on the sides for decoration (without collapsing the clay) and later she was able to trace around the clay tube and cut out the circular slabs to make the base and top.

slab cylinder


The project I plan to do with her class is a little more simple. I don't want the kids to be frustrated waiting for me (or their teacher) to help and I don't know if all the kids are at the same level as my daughter. We are going to make decorative name plates. I will bring in a small slab for each kid on a piece of cardboard (so it doesn't bend) and they will be able to attach clay letters to spell their names and decorate the slabs.

I plan to sit with the kids first at circle time and talk to them about what clay is and how we attach clay pieces together. My daughter already can tell me that you need to scratch the clay and add water when to stick pieces together. The way she can repeat this mantra gives me hope that the rest of the class will catch on quickly. If not, I can remind them and at the very worst, I can attach the pieces at home or we can glue them on after firing.

At the table each kid will have a slab of clay to decorate and a ball of clay to pull apart. They will share (thick) slip, scratching tools, stamps and larger shaped cookie cutters. I was originally going to bring in slabs of clay for each kid to cut with letter-shaped cookie cutters. However, after a trial run I realized that some of the letters don't come out of the cookie cutters. Cs and Ls and Es are fine but As and Rs come apart or just stay stuck. I plan to prepare some letters ahead of time (either with the cookie cutters or with coils) so they can choose them instead.

prototype name plate

If things go well I can show the kids how to make coil letters or they can use cookie cutters and extra pre-rolled slabs to cut out thick letters. If the kids are struggling they can pick from pre-cut or pre-rolled letters. If things are disastrous, we can scrap the whole name thing and they can just decorate slabs of clay. I suspect the kids will still enjoy this.

I haven't entirely decided whether to add color. I plan to bring grey and red clays. I am considering bringing a few colors of underglaze, too. I know that some pre-schoolers aim for brown in all their color mixing endeavors. I'm not sure the parents would appreciate muddy blobs of color lovingly made by kids who want to display them in the house. Limiting the available colors might help tone down the mess and give them something that looks good in the end.

I will take the work home to fire and return it to the kids afterwards. I also like the idea of spraying each piece with a glossy overglaze so the kids have shiny pieces to display. I plan to cut holes in the slabs so they can be hung with a ribbon or string.

I also hope I will have a chance to take pictures of what they kids are doing. It might be too chaotic for me to take many but perhaps someone else will help or I might even have a chance to set up the video camera--though that might not be legal in a pre-school. At least I'll be able to photograph the end results.

I do plan to be as organized as possible going in. The kids will have a good time regardless, but it will be easier for them to successfully put their name on if they I have my stuff in order.

Thursday, September 1, 2011

Underglazing and Glazing Process

This series of images follows one of my pieces from unglazed bisqueware through the process of applying underglaze, firing again, layering underglaze and finally glazing and firing for the final time.

 the whole piece, unglazed

close up detail

first layer of underglaze

detail

excess blue wiped and brushed away from edges of sprigs


two colors of underglaze after bisque firing

 detail with purple layered on blue background


layered and wiped away underglaze on background layer 

 second underglaze layer on sprigs


 layered and wiped away underglaze on sprigs

 cinnamon detail inside sprigs


 wet glaze detail


glazed and ready for firing


 entire piece after glaze firing


finished detail