Showing posts with label family project. Show all posts

Sunday, January 12, 2020

Harry Potter Party

Butterbeer, with colors of Ravenclaw, Slytherin, and Hufflepuff

A while back, my daughter had a Harry Potter themed party. I'm a pretty big Harry Potter fan, and so is she. She's gone as both Hermione and Luna for different Halloweens. This summer we went to London on a trip and did at least 4 different Harry Potter activities (with which my husband was very patient).

The entrance to Platform 9 & 3/4

My daughter and I worked together on the decorations, party favors, and stuff for the party, but really she did the vast majority of the actual work. She made signs for the various parts of the house to identify them as Harry Potter themed. The porch was Platform 9 & 3/4. She has a little shopping cart that she redesigned as the trolley going through the wall.
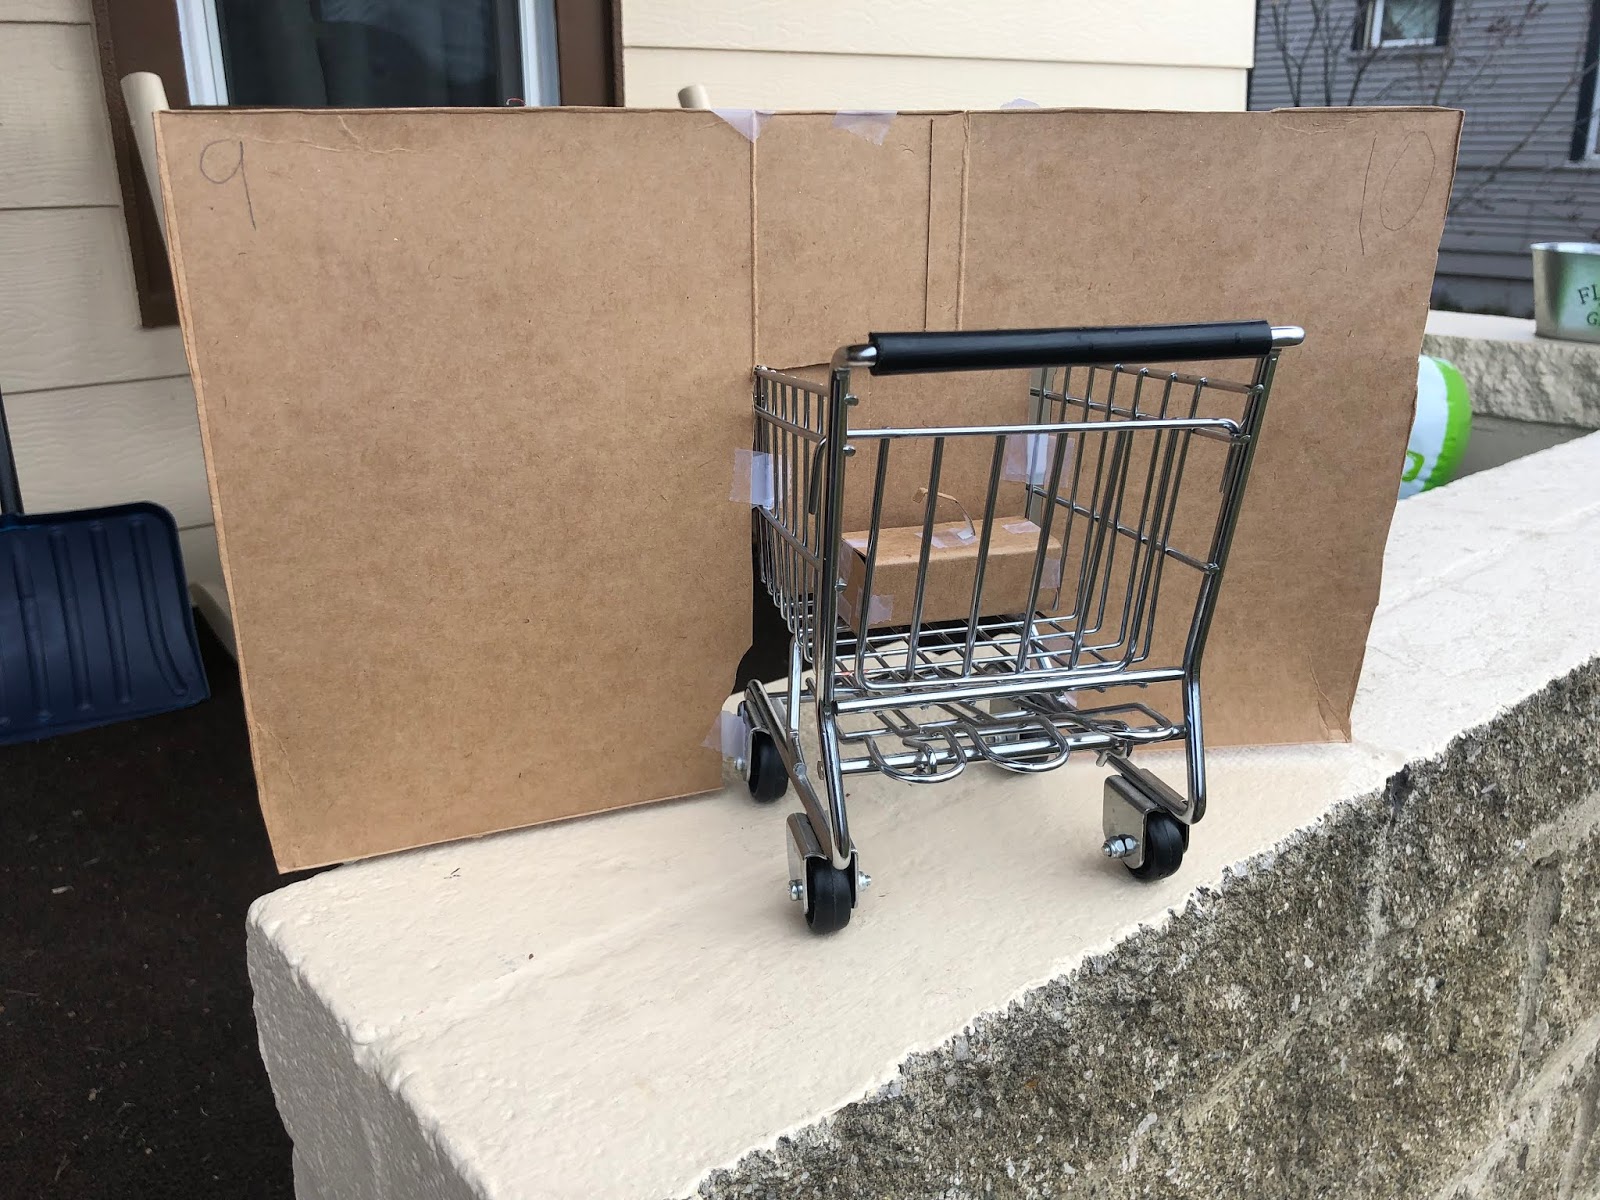
She was going to draw bricks on the wall but ran out of time.
There were lots of things for the guests, including chocolate frogs at Honeydukes' Sweet Shop and Butterbeer. The idea was that the kids would all decorate the chocolate frog boxes, but kids have better things to do at a party, apparently, so they mostly didn't get decorated.

Honeydukes and the undecorated chocolate frog boxes

We made the boxes and the chocolate frogs. We bought a chocolate frog mold, and melted chocolate chips into it. We dyed marshmallow fluff in yellow (for Hufflepuff), blue (for Ravenclaw), green (for Slytherin), and red (for Gryffindor). The chocolate frogs were pretty tasty, though also a bit messy. 

A half-eaten chocolate frog and butterbeer (discovered after the party)

The Butterbeer could be picked up at The Three Broomsticks (kitchen). We experimented with several recipes online, but we discovered that vanilla cream soda was the best tasting and least complicated. At first we added butter extract, but it didn't make a demonstrable difference in the flavor.

The 3 Broomsticks, Est. 1452 Hogsmeade

We bought tiny glass mugs from the dollar store and I drew the labels. My daughter colored them and we Mod Podged them on the mugs. We put food coloring in the bottom of the cups and let it dry. The internet suggested that we could add ice and no-one would notice the food coloring, but the internet was wrong. I compromised by spraying a bit of whipped cream in the bottom, then pouring the cream soda on top. The effect was great for color and foam, but the cups were tiny and they tended to overflow as the soda fizzed and combined with the whipped cream.
Cream soda, food coloring, and whipped cream


The color worked well and the kids could get sorted into two houses (via Butterbeer and via the chocolate frog). Later they played "quidditch" in the lawn, which basically consisted of Daddy hiding the "snitch" and the kids all running around and screaming til someone found it.

Butterbeer cups with dry food coloring in the base

The tiny Butterbeer cups were a good idea, given that we overdid all the other sugar by 1000. Besides Butterbeer and chocolate frogs, we had cookies and cupcakes

niffler cupcakes

Viera's Bakery in Yakima made us hedgehog cupcakes, which we converted to nifflers by hiding chocolate coins in the paper cupcake liners.

The Magical Menagerie (Pygmy Puffs and Nifflers now in stock)

The Xylophone was converted to the Magical Menagerie, but we couldn't quite decide if the Niffler's belonged there or in The Three Broomsticks or at Honeydukes'. 

Niffler drawing by Meghan Flynn

Somehow the child already had 3 (non-cupcake) nifflers and a hedging, and a number of her other stuffed animals appear to be pygmy puffs. My talented colleague Meghan Flynn (buy her art), gifted Alison a niffler drawing to add to the team.

Olivander's wand shop in a jar

We made each kid a wand (which was a ton of fun, really), but hot gluing pencils. I really enjoyed dropping the hot glue into shapes on paper, then peeling them up and using them to sculpt shapes on the end of the wands. 

Olivander's wand table

We painted some of the wands with glow-in-the-dark acrylic and the kids seemed to like them.

Our Harry Potter library

Besides the signs around the house, we collected all our Harry Potter books in one place. Besides the series and the plays, we have one illustrated copy (book 3), a cookbook, and several books I bought in the hiatus between Half-Blood Prince and Deathly Hallows. 


The Rookery (the Lovegood's House) Keep of the dirigible plums!

My daughter is a big fan of Luna Lovegood (and nifflers, obviously), so she wanted to make quibblers and spectrespecs, too. We tried to get cookies in the shape of spectrespecs, but weren't able to do so.


The girl spend a lot of time making quibblers (with the help of a photocopier). Each quibbler had a pocket with foam. The goal was that kids would trace and cut out spectrespecs and glue them onto plastic glasses, but we underestimated the time and overestimated the general attention span of the group as a whole, so none actually were finished.

The Quibbler, Birthday Issue by X Lovegood 

Alison designed a dot-to-dot and runes to decode inside. 

The runes on the right say Happy Birthday if you flip the magazine upside down

I'm guessing very few people got all the Harry Potter references in the party, since most of the kids had not read the whole series--and some had, shockingly, not read any. 

Grimmauld /Grim Old Place "Shh Don't wake anything up" (like the cats sleeping inside)

I asked Alison to keep people out of a couple of rooms in the house, so she labeled them as Nocturn Alley and Grimmauld Place. Which entertained me and worked in combination with the closed doors to keep the kids out. 

At the start of the flight we decorated the bottoms, but eventually we embraced a simpler aesthetic.

Since the chocolate frogs were tons of fun and we never got to decorate any, we made more for the family for Christmas. We made the chocolates and put them in a plastic bag, but apparently the pressure of the plane broke the chocolate and caused the colored marshmallow to squeeze out during the flight, so they didn't work particularly well.

Chocolate frog box from London

We decorated them together during our flight (about 6.5 hours) Initially we were referencing the official chocolate frog box, but as the flight continued, we just made our own designs, including an "Invisible Chocolate Frog" for the baby (since we were short one frog, and babies done eat chocolate).

Decorated and put together chocolate frog boxes from Christmas

The invisible frog box would have been a lot funnier ("fat free, 0 calories, gluten free") if all the other boxes had really had chocolate frogs inside, but the result was still kinda fun.
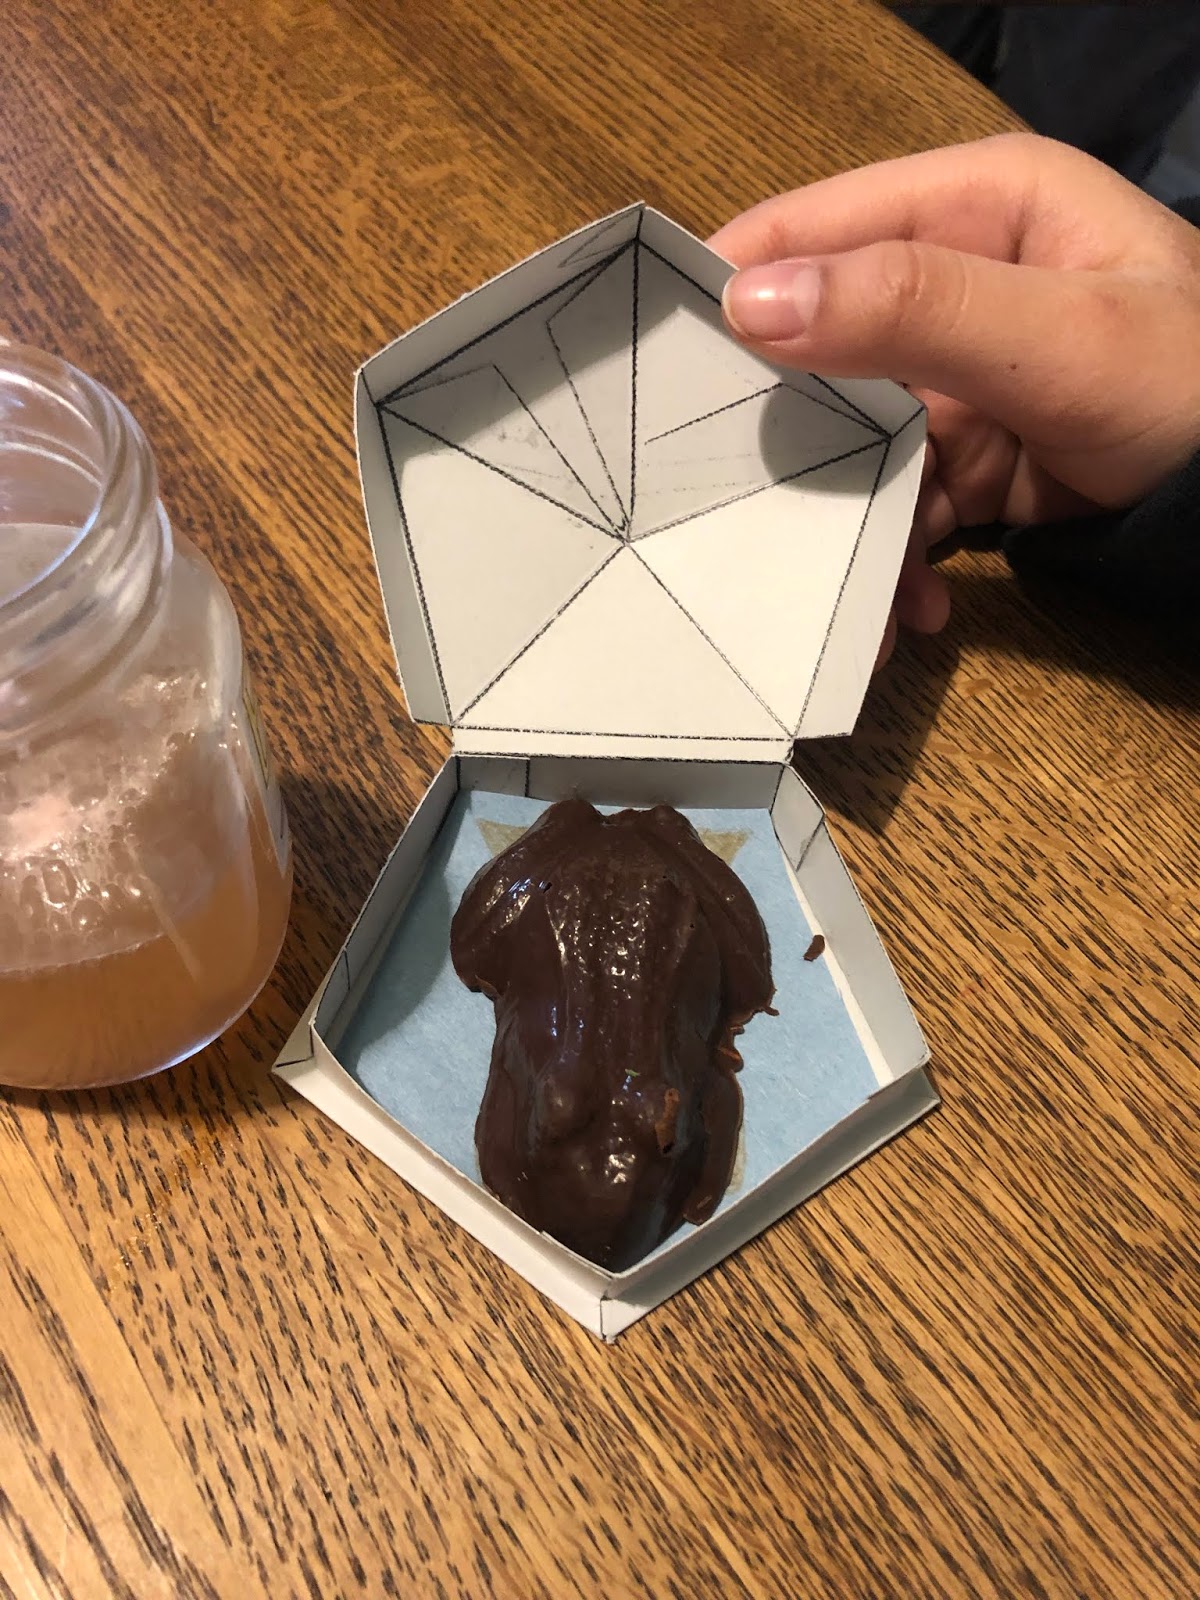
The birthday chocolate frog boxes had chocolate frog cards with a place for kids to draw their own wizard (or for marshmallow goo to stick)

Thursday, December 19, 2019

Paint & Floor in Clay Studio (Remodel)


Our cat explores the new floor this morning
My home studio is starting to come together.The walls have been painted, the windows installed, and the floor is (almost) entirely done.

New windows installed after walls were painted

My husband has been doing nearly all the work. In October I shared pictures of the ridiculous wall-carpeted room before and after Sean started ripping out the carpet. In November he had completed the removal of carpet and gluey walls, and was just about finished with the drywall.


The new window, new walls, and outlets with the bare floor (and work table)

The main goal of this project was to remove the carpet from the studio. When Sean started talking about going back to work after his summer sabbatical, I asked him if he would delay a bit longer so he could renovate my studio. The carpet looked ridiculous, but I was more concerned about safety in the studio. Clay dust contains silica, which is a breathing hazard; prolonged exposure can lead to silicosis and damage to the lungs. Vacuuming without a specialized filter (on an expensive vacuum) causes the dust to become airborne and thus more likely to be inhaled.

a new window from the outside and our inexpensive shop vac 

I have since spoken with a chemical hazards specialist about the L&I risks from silica exposure in the clay studio at work and I was pleasantly surprised by his assessment that our studio is much safer than I feared. I do strive to keep both studios clean and I emphasize cleaning up the wet clay before it can become dry (and later airborne) and recycling clay and cleaning in ways that both minimize creation of clay dust and exposure. Based on the work assessment, I suspect that my studio was safer than I feared.

The ceiling fan was removed to paint the ceiling. When Sean reinstalled it, he fixed the squeak that had been plaguing me for more than 10 summers in the studio. 

The studio remodel had some other advantages, of course. The paint, flooring and new windows all look better than the carpet, carpet and old windows. Taking the carpet off revealed walls that were just covered in glue. Taking the gluey walls off revealed insulation that had developed mold in some places. Removing the insulation allowed us to replace the insulation with a higher quality insulation. 

the drips inside the old window (the window is lying against a large rock near our back fence)
The wall insulation wasn't the only insulation improvement. The new windows are better insulated. They can also be opened, an improvement over the past windows, which were just two pieces of glass with sealant dripping down the inside.

Sean replacing the seal on the first exterior door.

Sean is fairly detail oriented, so besides replacing the insulation and windows, he has also replaced the seals on the exterior doors. This room has a separate heating system and is not connected to the main house furnace or air conditioning. With the new insulation, windows and door seals, the room is a much more stable temperature than it ever had been. Sean also replaced the old thermostat with a new one that is easier to use.

New USB outlet and thermostat

Sean rewired the space with more (and more convenient) outlets. The outlets are now spaced at higher and lower heights all around the room to allow for easier access for plugging in my pottery wheel, Dremel, phone, speakers, and anything else that needs a plug. Some of the outlets also have USB ports, which obviously weren't an option when this room was built.


my blue wall behind the existing cabinets

I wanted to have some fun with the color, so after Sean painted the three largest walls a neutral color ("ginger root"), I picked out a deep blue color ("Adriatic sea") for the third wall. This wall is much smaller, with cabinets and a door reducing the surface dimensions, but I really love this bright contrasting color. Sean also painted the back of one exterior door with this color, which amuses me greatly.

the blue door seems to lead to a mysterious location, or storage

The floor we chose is designed to be easy to clean, particularly compared to old carpet. The floor is vinyl planks that are glued down. Sean had me lay them out so the pattern matches fairly well. He installed them. Part of the thought is that the vinyl will be slightly more comfortable to stand on than cement.

gluing down the floor panels

We have some baseboard trim waiting in the garage to be stained and installed. Once that is installed, the cabinets need some touch-up painting and the countertops need to be replaced. Then we can replace some of the furniture and bring stuff back into the room from storage. Right now all my stuff is crammed into closets and other spaces in the basement, making it tough to snag the cats when they run down there to hide.


Kitty contemplating the lack of hiding spots and the fact that we covered up her secret exits (the plastic covered windows)


Monday, November 11, 2019

Progress on the "New" Studio

If you've finished stripping the floor but aren't ready to install the new one yet, park your motorcycle inside, obviously.

While I've been teaching and grading and keeping on top of union stuff, my husband has (mostly) been chugging along on my studio remodel. About a month ago, all the carpet had been ripped out, taking the walls with it and Sean had just pulled out the moldy insulation and ground down the glue on the cement floor. We had also removed the old frameless windows.

Plastic sheeting windows in place while we wait for the new ones.

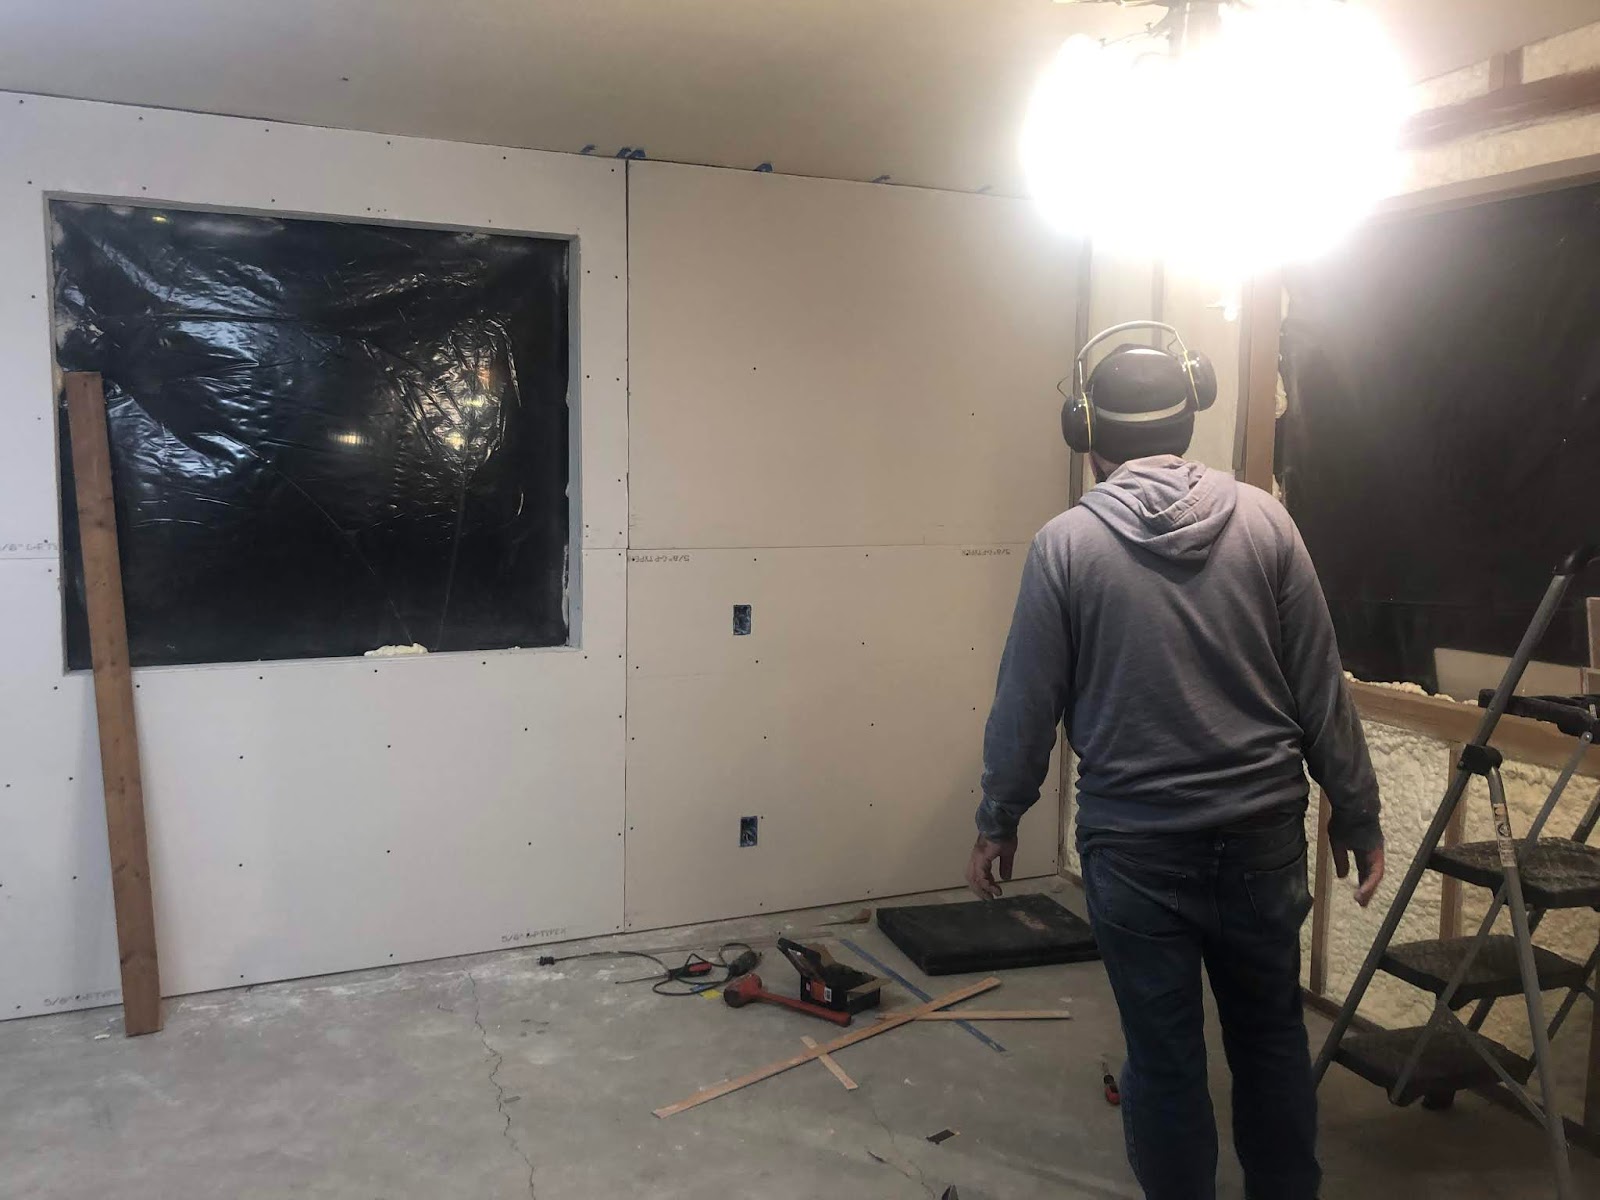
A few weeks ago, he hired someone to come insulate the whole room with spray foam. Sean then put up all the drywall almost entire by himself. I had to help him get the drywall home, which was some serious work, with just 2 of us to move 5 sheets of 12 x 4 and 7 sheets of 8 x 4 drywall. At the store, an employee helped us, but at home it was just the two of us. The errand took us so long that it was nearly dinner time. We parked our large load of drywall in the parking lot at Costco while we ran in to get a chicken. From the long checkout line, we called our daughter who was at home to have her start getting the rest of dinner ready. It was pretty great to get home to warm bread, a veggie tray, a set table, drinks, and mashed potatoes (the microwave kind). She's finally at the age where she can do that kind of help.

the foam insulation before drywall

After dinner we had to move the drywall from the truck to the garage. I had just watched a training video for work about lifting safely, so I insisted on using a strap to lift the drywall. It was much easier than trying to pinch the drywall or bend down and lift it from the bottom. Sean seemed to think I was ridiculous for wanting to use a strap, but my training video at work had informed me that I had the right to get help at "work" to keep my body safe. I recently read that women have a significant disadvantage physically when using a pinch grip. I read this in "Invisible Women" which is a really excellent book. This section was focused on modifications that workplaces can made in pursuit of equity. Modified lifting techniques can prevent injuries for female employees while still allowing them to do the work.

lotsa drywall
Incredibly, Sean managed to do nearly all the rest of the drywall moving and lifting mostly on his own. That first night, after dinner, I carried the first large piece in with him. When I got home from school the next day, another piece was already installed above the first. Apparently, after cutting out the window hole to make the piece lighter, he had gotten help from our daughter and her friend.

the first four sheets of drywall, installed

On the third day, when I got home, he immediately called me into the clay studio to lift another piece of drywall and the day after that, he called me at work asking when I'd be home. Since I wasn't ready to leave yet, he stood on the sidewalk and asked for help from passersby. I think he managed to ask in a creepy way ("Hey, wanna make $5?" instead of "Excuse me, I need some help lifting a piece of drywall"), so after the first two said no, he had to wait for the neighbor to get home and help. By the end of the week, he had gotten help from three different neighbors, myself, and some children.

all the drywall installed
The last pieces of drywall took a lot of work, because the ceiling is not level and because he was working around a fan and some built-in cupboards. He had to sandwich in a bunch of narrow pieces and was doing some fairly precision measurements and cuts at the end. He was mostly disappointed that he'd have to patch so many seams.

I had my daughter take this image. I love that the upward angle is so abrupt. You can see the round cut for the fan and the triangular drywall piece needed to fill in above the main drywall piece.

He came up with a pretty neat method, I thought, for cutting out the openings for the outlets and switches. He and our daughter measured the location and height of the outlets from the floor, then marked them on the floor so that after the drywall was up, he could cut out the openings. This way if the drywall shifted to one side a bit, he wouldn't have a too-large or off-set opening for the outlets. There are 13 outlets, as well as three sets of switches and a thermostat and a fan he needed to accommodate in the walls.


markings on the cement floor to align the outlet cuts

Sean got all the drywall up in about a week. I thought it went surprisingly fast. But he was dreading doing the seams, so he decided to have a painful but non-life-threatening injury that kept him in bed or at the hospital for nearly 2 weeks. It seemed like an excessive approach to avoid this one task, but I guess he really didn't want to do the seams.

one wall done, getting ready to do the cuts for the next one

I could tell he was feeling better when I came home from work one day to find the seams started, the floor vacuumed, and some laundry folded. He had been nearly unable to move for a full week and most of two weekends. He started feeling better on Monday of last week and has been feeling much better now for a full week. He indicated it was a bit difficult to go from lying in bed all week to working for a full day. He has nearly completed the seams now. The local schools had half-days this week, so our daughter helped with the seams, too. 

drywall with holes and seams patched and part of the ceiling seam started

The last part he hasn't quite done is the top corner where the textured ceiling meets the smooth walls. I don't really like textured walls, so I asked to keep them smooth when we paint them, but this creates a challenge of how to connect the two surfaces. He can't use the tape that goes on the seams, so he put some of the drywall "mud" into a plastic baggie and was trying to use it like a piping bag for icing to fill in the gap. It kinda worked.
sanding the highest angular seam with a long handled sander

It looks to me like he'll be done with the drywall seams and sanding this week and be ready to paint, but he was getting discouraged because of how dull the work is and how long it has taken. Besides the week and a half break for heath reasons, he also has been working on a project to make an electric scooter and has helped some friends out with car maintenance. I think he even made a set of soccer goals in there somewhere.


the other side of the room, after drywall, before seams

Sunday, October 6, 2019

Somebody's Getting A "New" Studio!


My home studio and wheel after Sean took out basically every other object.

My home studio was seriously weird. It had been since the day we first looked at the house. When someone came to visit the house for the first time, I liked to bring them back so they could laugh at the carpet on the walls, the carpet on all three doors, the carpet on the exterior of one door, the carpet on the cabinets doors, and the carpet on every exterior vertical surface of the wheeled shelving unit/counter, including the doors and back. Two different patterns of carpet at that!

The studio after he took out the carpet and walls, too.

But soon the studio itself will no longer be bizarrely attired. Since I can't get in the studio until next summer anyway, I asked my husband if he would rip out all the carpet for me. And that's exactly what he did. And now he's spent the last two and a half weeks ripping out carpet, insulation, windows, and glue, and updating wiring. He started the entire project last year, when he ripped the carpet off the main door. He restored the second door in the spring, and the last one was done over the summer.

Two of the studio doors after the carpet had been removed this summer.

The first big task was to empty the space. I usually have a lot of tools, work, pieces in progress, clay, packing materials and just "stuff" in that space. The space is both where I make work and where I store work related stuff. When I first moved into the room (in 2007) I used my art fair booth furniture as the studio furniture. Since then I've added a wheel, stool, and wedging table, but I've mostly kept the portable art fair furniture and the furniture that came with the room.

The open carpeted door is visible on the far right side of this image.

Under the tables and on top of the shelves I've stored boxes, bubble wrap, etc for packing and shipping work. Since ceramics generally needs to be double boxed for shipping, I've been reluctant to get rid of any boxes, though my husband thinks this is ridiculous. As I've made more and more work, I've stored some of it in the house and some in the studio. Generally, though, the studio stuff is mostly work in progress, something I want to fix or change, or something I want to remind myself of next time I'm working in the studio.

Under the table storage for packing materials and boxes and my daughter's pedestal/table in the foreground.

Over the years, my daughter has taken over more space in the room, too. A low pedestal is basically her work space and she has annexed progressively larger storage spaces in my room for paint, clay projects, and other "art" stuff. In summer the room also tends to collect balls, frisbees, jump ropes and water toys. In the fall it collects leaves, mostly, but in the winter it collects a variety of detritus, including sculpture back from shows that I don't want to put away because it is too cold in the studio.

What the studio sometimes looks like after the winter--I can see boxes that weren't quite unpacked after work came home from a show, a broken prototype gift, a broken child's water toy, and some kid's paints.

Once my husband indicated he really would take on this project, I moved most of the ceramic objects out of the room on my own. I spent a few hours on a Wednesday evening moving stuff, then took a break. I was very surprised, when I came home from work the next day, to find that Sean has moved nearly all the rest of the stuff out of the studio himself. All those bookshelves and books and chairs and clay and tools and sculptures in progress and other stuff is currently jam packed into a couple of basement rooms and cupboard spaces, and other nooks and crannies around the stairway and downstairs. He did decided unilaterally that I didn't need all the boxes and packing materials.

My husband partway through cleaning out the space.

The tables, pedestals, wedging table, and some shelves are now in the trailer (our portable storage shed), or stacked in the back patio. The large beast of a rolling cupboard/cabinet/countertop thing has found a new home in someone else's life. It was useful in that it was sturdy and had drawers and other storage space as well as an easy to clean countertop, but the entire thing was covered in carpet all the way around. 

The backside of the strange carpeted counter/cabinet.
The things is on wheels, though it is so large I can't imagine rolling it around regularly. For a while I thought it was built-in, since the carpet and countertop match the wall and doors and the other built-in countertop. When we pulled it away from the wall, we discovered that even the whole back of this monster is carpeted. The carpeting wraps snugly around the top, bottom, and sides of each of the doors and drawers, evidencing the attention to detail, but strange taste of the previous owner.

The carpeted cabinet was too heavy to take out of the studio without help.

The carpeting is snugly glued over all these surfaces. At first Sean was going to remove the carpet, but as soon as he realized how much work that would entail, we both agreed that it wasn't worth keeping. The thing is a tank, though, solid and quite heavy. It's a decent, if ugly, pieces of furniture. Someone bought it and hopefully whoever has it now appreciates its bizarre utility. 

The walls and carpet after removal.

Basically every step of the process has unearthed more trouble, as, I think, home projects are wont to do. The carpet was glued snugly to both the walls and the cement floor, so the walls themselves had to be ripped out down to the framing. There had been some water damage from the roof years ago, so some of the insulation was moldy. Sean removed all the insulation and is working on the molded area. Both large windows had sealant that had leaked down the inside of the glass, so we removed the windows. The floor glue also had to be removed.

The gluey floor after carpet removal;

Sean spent two days grinding the glue off the floor last weekend. Unfortunately we didn't realized until he'd been going for a while that dust was coming into the house from under the door. By the time we realized, there was a fine layer of dust on every surface in the laundry room, basement hall, kitchen, and dining room and a bit in the living room. I rushed myself and my daughter out of the house, since we weren't wearing respirators, and the next day I washed the entire kitchen and dining room floor on my hands and knees because I didn't trust the vacuum (airborne dust) and the mop didn't clean well.

The freshly cleaned cement floor.

As strange as the two different carpets and the carpeted walls, etc was, this project isn't primarily about looks. Carpet isn't really recommended for a clay studio as the primary safety hazard is clay dust. Clay that ends up on the floor needs to be washed away or it ends up becoming airborne silica dust that can be inhaled and cause lung damage. The irony here is that in trying to make the clay studio safety, we temporarily made the house less safe.

Testing the wiring--and there's a lot of it.

The insulation guy is coming this week, but the wiring has proven to be more of a problem than Sean initially realized. It's another one of those jobs that starts as one thing and then grows and grows. The first thing was moving the outlets from floor level to a more accessible height and switching out old two prong outlets for grounded ones (and usb outlets). This was fairly straightforward and will make the space a lot nicer. It also made us realize how much we'd like more outlets in other parts of the house.

USB outlets because this is the 21st century

The next step was trying to update the porch light to a timer, something Sean been meaning to do. In doing so, he discovered some wiring that needed to be updated and decided to replace the odd low voltage wiring with regular wiring for that room. Overall, the end result is that things are safer and more reasonable in that room. The wiring is safer, the dust prevention will be better, and new windows and insulation will keep the space warmer in winter (maybe I'll actually put away work that comes back from a show).

The old low voltage switches.

We've ordered windows and flooring and are waiting for both to arrive. The room has been semi-open then, for quite a while while, other stuff is being worked on. The open windows are probably good news as far as ventilation goes, and we have what is essentially an exterior locking door between the house and the clay studio, so security isn't really an issue, but the recent cold weather has made it pretty chilly.  The cats, though, think it is great fun to jump through the windows right now.

New outlets and no windows, plus my daughter helping.

We had been thinking of various options for the walls, but I think we're going to end up with painted drywall because it is relatively cheap and simple. Sean suggested that I needed to spend some time thinking about how I wanted to arrange things in the space. I didn't understand what he meant at first, other than that we had sold the carpeted cabinet monster. After he pointed out that my furniture in there was mostly designed to be easy to pack up from an art fair, I realized that, having not done an art fair in years, that's probably not the most important feature of my studio furniture anymore.

The view from the other side of the room, with the fan/light down.

Over the next few weeks, as the room comes back together, I'll have to think about what I'd actually choose to have in the brand new space. I hadn't thought that way in quite a while. As of right now, the only things that have a guaranteed spot in the new space are my wheel and my wedging table and I've got a while before the space will be ready anyway.

Let's take a moment to remember this gorgeous pattern and color.