Teaching Mom to Throw
Last week my mom visited from Wisconsin. On Friday I taught her to throw. Oddly, she'd never thrown clay before, though she has been involved in art through me and through
Whitewater Arts Alliance for years. She's helped me install and set up my sales booth, pack and unpack, write my artist statement (all the less-fun stuff). She's even blown glass in Japan and cast bronze but somehow I never showed her how to throw pottery on the wheel.
So, we rectified the situation last week. She said she enjoyed it and she took to it well.
It was unusual teaching just one person and also strange teaching my mother. I found myself automatically saying all the things I say quarter after quarter to groups of students I've just met, but it felt odd to say these things to my mom. On the one hand, what I was saying was what she needed to know, but on the other hand, I guess I have turned the directions into a bit of a performance. I felt like I should just be talking to my mom normally, but the introduction to throwing directions no longer feel like normal speech to me.
In my "speech" I explain how body weight and leverage work. I explain that we call the step "pulling up the walls" but really we are squeezing the walls as our hands move up. I explain why it is important to keep your hands on the back right corner of the wheel (between 3 and 5 o'clock on the wheel head) so that your body weight stays braced and stable. All of this is important and true, it's just that I've become so efficient at saying it all that I felt like it was a rehearsed speech instead of one-on-one directions.
 |
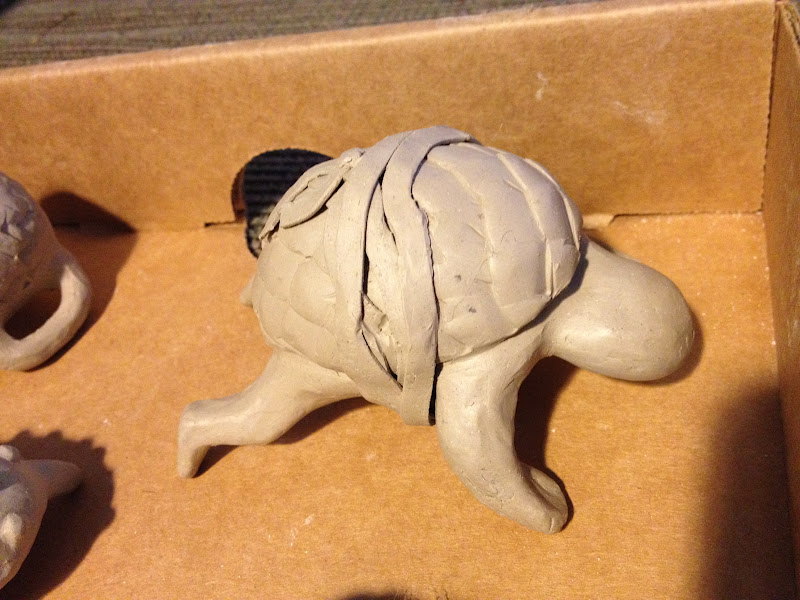
| Mom's first trimmed bowl |
Despite my not-quite-discomfort at the way the directions came out, my mom was able to throw three decent bowls and trim one. We could have spent more time in the studio, but lunch and a search for really good chocolate ate up part of our afternoon and I was tired. Though it was nice to show my mom how to throw and it was fun to see her throwing, teaching throwing still feels a bit like work and I haven't quite gotten into the studio enough this summer to feel like I want to teach throwing again. Odd, since I've been done with classes for a while, but what with cleaning the studio, trying to adjust to Apple's move from
MobileMe to iCloud and a series of meetings over the last couple weeks, I seem to just be digging out of all these "chores."
Learning Fused Glass
For our other activity this weekend, my mom and I took on the roles of students together at
Sharon Strong's Glass Fusing Workshop for Larson Gallery (I linked to Sharon's website, but I don't think the glass on the site is a great representation of the work she does--the work in person is better). The workshop was scheduled for all day Saturday and we were to learn to fuse glass. The description of the workshop indicated that we would each make 2 tiles, though the process ended up being so quick that most people made at least two before lunch. I made five total. Mom made four.
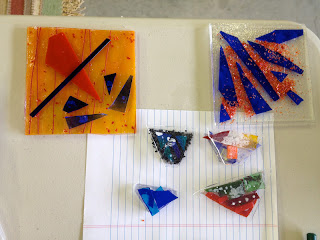
My first pieces. The two on the top were based on bugs (or fish).
 |
This one was really just a random arrangement of scraps as I was cleaning my mat.
|
I finished four pieces before lunch. The last was based on this ad from a Yakima magazine. I like the texture of the net over the fingers gripping the fish. I replicated the net with black stringers. I will be curious to see whether the stringers stay put as the glass melts.There are three layers of glass on top of the two based layer (clear-clear-green-clear with green-orange) and the stringers are on top of the orange or the clear with green layer). Will these melt and slump? I don't know, the workshop didn't address these sorts of questions.
 |
| Mom's first three pieces. Apparently she was feeling explosive. |
Though I enjoyed the process of cutting and placing the glass and designing the tiles, I was disappointed that the workshop ended up being more of a "make-and-take" than an educational introduction to the process of working with glass. The instructor provided flat squares of glass on which to make our tiles and lots of colored pieces of glass, stringers (long thin strands of glass) and frit (tiny bits or grains of colored glass--you can see them at the back of the photo below). Sharon also provided tools for scoring and breaking glass. We got to take a lot of stuff home, including the scoring tools and pliers and we got to make a lot of pieces which we will pick up after they are fired. She even indicated she might have jewelry findings for the jewelry pieces when we pick them up. Generous.
 |
| My mom arranging her fourth tile design. The tools to her right were used to score and break the colored glass pieces in front of her. Stringers are visible on the mat to her left, colored frits in jars to her right. |
Unfortunately Sharon's instructions tended to tell us what to do or how to do it without explaining why. The woman next to me got instruction on correcting her method for scoring the glass and we were told to use a thick and a thin sheet of glass as the base for our design but we weren't told why we needed both pieces of glass. We were told that the thin sheet of glass shrinks more than the thick, but since we could stack them in either order, I'm not sure why both were required. What would happen if we used only the thick sheet? What if we used two thin sheets (I suspect it would shrink more)? Why couldn't we use two thick sheets?
 |
| A view of the interior of the kiln after we loaded some of our work. |
After lunch we worked on jewelry. At first I was excited, but I found the process frustrating. We were told to start with a rectangle or flat topped triangle. We were to cut a thick clear glass piece and a slightly larger thin piece in the same shape. We were to arrange up to 5 layers of glass on top of the thick sheet and then glue the thin sheet on top of the whole stack. As you can see below, the results look terrible at this stage, but the glue will burn out and presumably the layered arrangement will look better later. More on this later.
 |
| My finished jewelry pieces and the two tiles that didn't make it into the kiln in the first round. |
My mom and I had trouble understanding why we were doing what we were doing, which made it harder to make "good" designs--or at least to have any confidence in our design choices. The instructor wanted us to add lots of pieces and especially to use dichroic glass. Since I wasn't overly excited about the dichroic glass, I didn't know how to use it. Mom was frustrated at this point because our teetering towers of tiny glass bits seemed unstable and unorganized. Later she said she didn't particularly like the look of the example piece and this may have been why we didn't like the jewelry part of the class.
 |
| Mom arranging one of her jewelry pieces. She has some cut pieces of colored glass and some black frit in a pile. I like the random arrangement of glass triangles. Wonder if we could fire that? We may never know. |
Though I had to ask several times, I finally got a partial answer to my question of why we needed a clear glass layer over the top of our precarious stack. Apparently its function was to make the piece smooth. Since I have a lot of rough and irregular jewelry, I guess I don't see the value of the smooth top layer. My "earrings" below don't have a top layer. It would have been difficult to balance a top layer over these irregularly stacked pieces. Sharon had some pieces in her own examples that didn't have the top layer, which makes me even more surprised that she seemed to require it for her students. I think that my experience of the afternoon part of the workshop suffered from the disconnect between the instructor's vision and student's vision. I was attempting to make the jewelry look like the tiles, Sharon wanted us to make jewelry that looked like her sample piece.

I've never been great about following directions in art making if they aren't explained to me. I get an idea, think I can do it and I want to try it. For better or worse, this tendency has been reinforced in me by a pattern of success where others think the idea will fail. My high school art teacher told me my teapot wouldn't work because it was too thin. I disagreed and proved that my way would work. The teapot helped me win an art scholarship. My college clay professor didn't believe my plan for a wall installation of 100 pieces would work, so I did it anyway and the installation was a big success in my senior show. I sold the whole wall and then some and was asked to do the installation twice more. In college was told I couldn't double major, present my senior show and graduate in 4 years if I spent my junior year abroad. I double majored and completed the college honors program, had a successful senior show in the spring, graduated with honors and spent 10 months studying in Seto, Japan. All this is to say that it was difficult for me to be told that we had to make the jewelry this way but without much reason behind the directions.
As a kid I used to make jewelry from pieces of
friendly plastic. I would cut the flat strips of colored plastic, layer them on top of one another and melt them at low heat. I see a lot of similarity in process and design possibilities between this fused glass and the friendly plastic pieces. The jewelry I made back then was much more similar to the tiles we made at the beginning of the day than the jewelry we made at the end.
 |
Mom's jewelry pieces and two tiles that didn't make it in the kiln yet.
|
After the jewelry making session, Sharon Strong took the workshop participants through her home to view her glass and her collection of other art by herself and other artists. The tour was interesting. Sharon's home was designed by her brother and was impressive in its use of glass bricks and cutouts between spaces. All around her home she has stained glass, fused glass, collages, paintings, ceramics, sculptures, woven baskets and other art. It was interesting to see the work she makes, including slumped and "woven" looking glass and the space where she works (since we were working on folding tables in her garage for the workshop). Her own work seems to exhibit a tendency to "break the rules" or try things that were beyond the scope of the workshop. Since I had seen this work before, I think it further contributed to my surprise that the workshop was more rigid.
 |
| our work space |
I still have some unanswered questions about the fused glass process. I will pick up the finished work tomorrow so maybe some of my questions will be answered then. Sharon had a few example pieces that might give us some idea what to expect as results, but it would have been nice to either see more examples or get more explanation of what happens and why. When my mom and I got home, I looked up some information on
glass fusing and learned a bit more about the types of glass, temperatures, etc.
One interesting bit of information was on "
scum" or "devitrification" that can happen when glass is dirty. This was particularly interesting in light of the partial explanation we had received earlier in the day. Sharon had told us to wash off the marker guidelines we drew on the glass to guide our cuts. We asked what would happen if we didn't wash of the marker lines but Sharon indicated she didn't know. As you can see below I was too curious about what would happen to wash the marker lines off of every piece. I did wash some, though for most I didn't use the marker and just free-handed my cuts. According to my fused glass research, oil from scoring the glass can contribute to the "scum" or devitrification on the glass that occurs during firing. When I read this I realized that maybe all the glass should be washed after cutting since every time we scored it we left oil along the edge. Maybe Sharon's habit of washing the marker lines means that her glass is also cleaned of the scum-causing oil. Or maybe not. Perhaps I will know tomorrow when I see my scummy marker-line edged jewelry.

Or perhaps all this not-knowing will eat away at me and I will have to buy my own glass and try the process in my own clay kiln at home so that I can teach myself about about devitrification and coefficients of expansion and annealing.
Though I wasn't completely happy with the second half of the workshop, I did enjoy the first part. It was fun to put together the tiles and I am excited to see the results. I hope that Sharon considers the sorts of questions that the participants asked at this workshop so that if she does this again she can have more thorough answers. I don't know if she has done workshops like this before, but I would guess she probably has not. I am also scheduled to take a workshop next month. I am curious to see how that instructor structures the "class."