Showing posts with label new building. Show all posts

Thursday, May 26, 2016

Raku Firing During Class in the New Building

Today was our second class raku firing in our new building. We have a new counter lift system to lift the top-hat off the kiln base. The kiln base is all new bricks this year, though we haven't yet replaced the insulation in the top hat itself.

Wax on the bottoms of cool pieces loaded into a hot kiln starts to burn before the kiln is relit. (image by Dave R.)

Students in my functional pottery, intermediate and advanced wheel and independent study classes met starting today at 9am for the firing. We set up the kiln top on the new winch lift system and put in some glazed pieces.
A spot next to the top hat on the kiln helps dry a pot that was glazed after the deadline.

Our kiln runs on propane tanks and a Venturi burner. We heat the work up to about 1800 degrees in an hour or so. Then when the glaze is molten, the pots are lifted out of the kiln with tongs and placed in buckets of combustibles.
Hot pots coming out of the kiln look black on the outside because the matte glaze doesn't melt. 

Our new space is fairly small, but well protected from the wind and isolated from the main classroom by two sets of doors that help keep the smoke smell contained. We fired, maybe five or six loads of work today, including a few pieces that were refired after less nice results.

Hot pots put into the buckets instantly ignite the combustible materials inside. Students are ready to add more paper on top for even reduction.

We also had a few students try horse-hair raku, where the horse hair is applied to the unglazed surface of a hot pot. The horse hair burns black lines in place on the pot. I think next time we raku, I will prepare the students a little more clearly on how the horse hair process works before they are staring at a hot pot.

Applying horsehair to a small bowl like this takes precision and planning.

As for the glazed, pieces, after the pieces are placed into the reduction buckets filled with shredded paper or leaves, we place a lid on top and let the pieces cool and smoke. The lack of oxygen and the heavy smoke affects the surface of the glaze and the unglazed surfaces of the pots.

Reduction buckets are left to smoke and cool in between firings.

This time we used maple leaves and shredded paper for most pieces. The largest piece was so hot that we had trouble keeping the flames contained inside our reduction bucket. 

Pulling a fired pot out of a bucket sometimes causes the paper to relight.

The reduction atmosphere inside the kiln and in the reduction bucket gave us some pretty good results with at least one of our matte copper glazes. These glazes can look like they have oil spills or flamelike colors on their surfaces.

Our classroom's "Hawaiian Copper Blue"

The matte copper glazes can also be combined with clear gloss glazes to add some shine to the surface. 
This piece has been fired about four different time with glaze added at least twice.

Students who used wax resist to keep glaze from some surfaces of their pots ended up with deep black areas where the smoke was absorbed into the bare clay. 
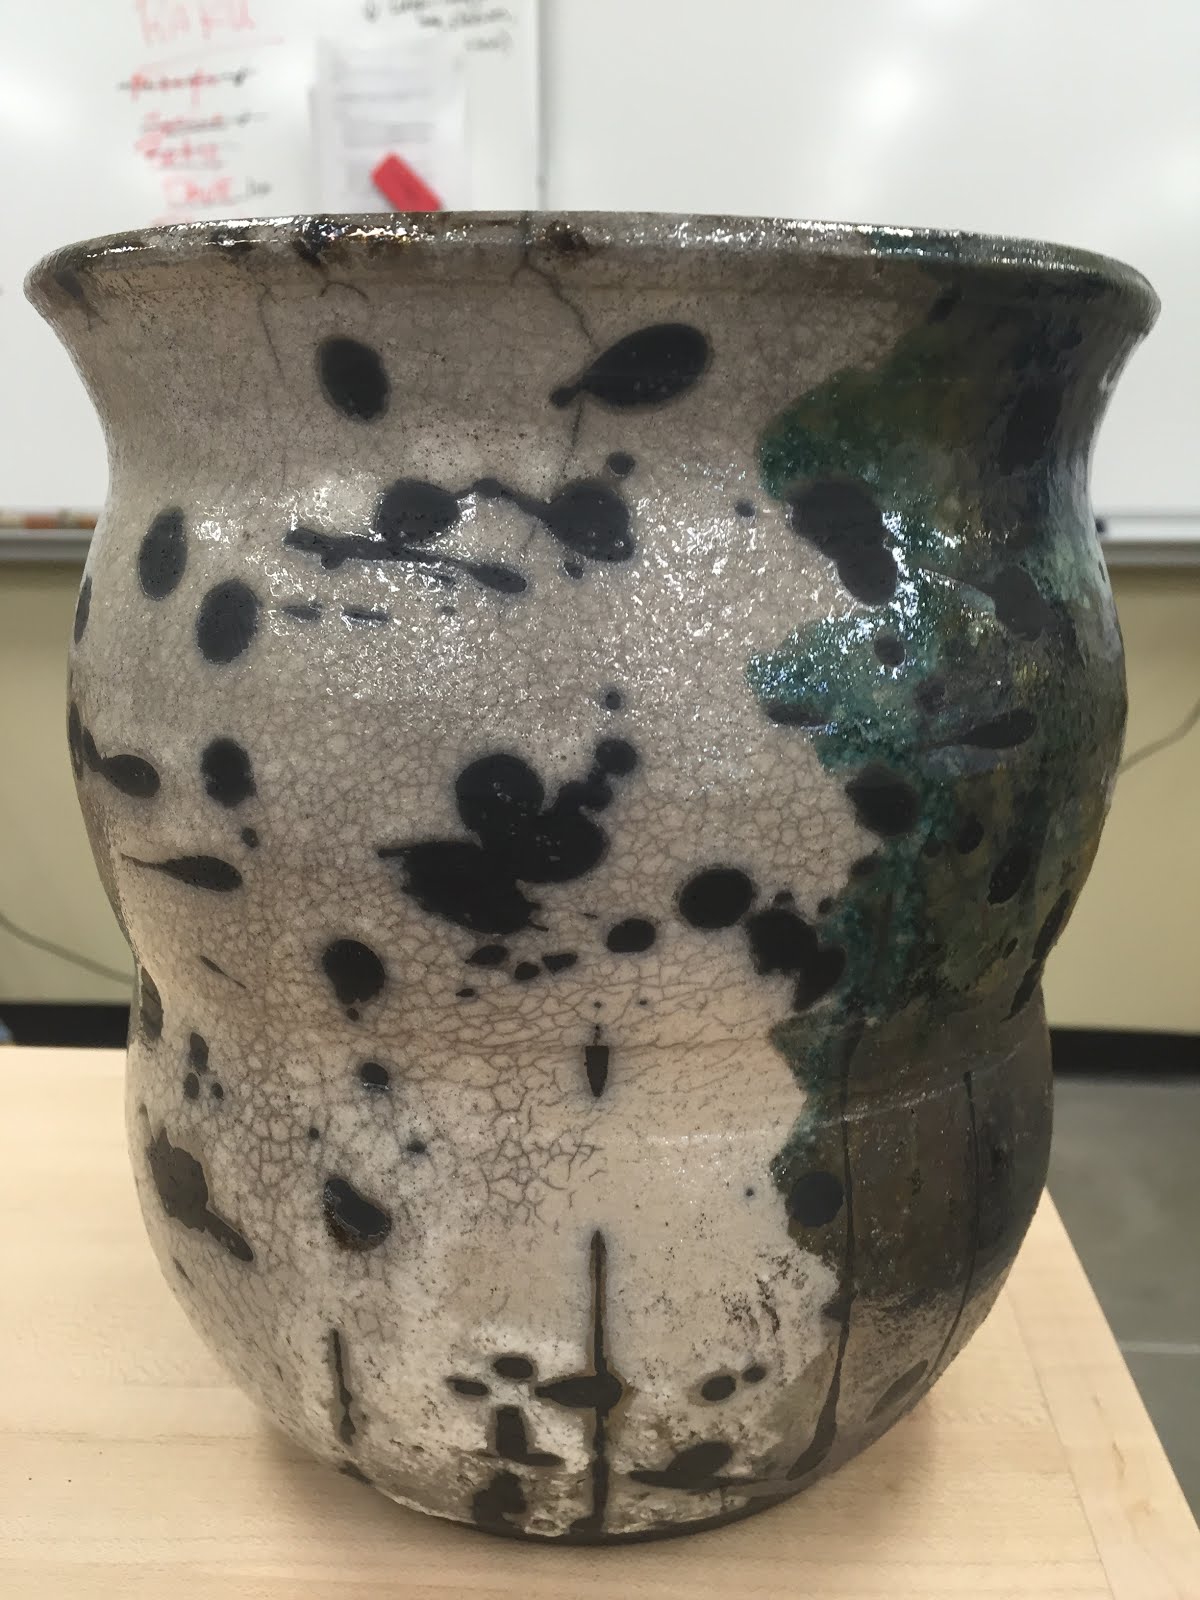
The white side is a White Crackle Raku glaze with wax resist dots, the green is our classroom's "Texas Twister" copper glaze.

Our most unusual results came from a fairly thick coat of a glossy copper glaze with maple leaves heavily packed on top. 

This glaze benefited from heavy reduction with leaves. The underside is a brighter blue green color.

Saturday, December 5, 2015

Holiday Shows & The End of the Quarter

Happy Holiday Season
If you'd like to see (and buy) some of my work, come visit one of my galleries this month. I have some functional work and a few small pieces at Oak Hollow Gallery in Yakima. The holiday show at Oak Hollow features a range of artists and mostly small or functional works and some holiday themed pieces.

some of the work I took to Oak Hollow

I also have some sculptural work at the CORE holiday show in Seattle. The CORE show is open through December 19. 
the CORE Gallery show (with my work barely visible on the right)

This is my last month with the gallery as I am not planning to continue in 2016. It was nice to be a member of the gallery, but I've decided that it wasn't worth the time and energy to stay with the gallery. Additionally, I wasn't able to spend much time in the studio this summer and therefore I wasn't comfortable with what kind of show I would have been able to put together.

some work I took to Seattle

This summer my energies were divided between my studio, the throwing workshop I participated in at Archie Bray in Montana, and getting the new studio ready at school. This spring and summer I anticipate being able to carve out a bit more studio time than last year.

the entrance of the new building in the evening

At school were really are settling into the new building. Next week is finals week, marking the end of our first quarter in the building. I am happy to say that all of our kilns, equipment, and venting are now fully functioning. We had a surprise visit from the fire department before Thanksgiving, but there wasn't an un-contained fire; just an alarm from a sensor in the kiln room while we were firing the gas kiln.

fire fighters checking out the kiln room last week

Sunday, October 18, 2015

Showing Videos in the New Space

We've just completed the fourth week of classes in our new Palmer-Martin building and I am mostly loving the new space.

On Friday, I showed a video at the start of my clay class. It was a compilation of Icheon Masters throwing, carving and decorating their ceramic work:


The neat thing about showing the video this quarter is that I was able to get it ready quickly and show it, on the large screen, with audible sound, as the students walked in to class. The students noticed the video and most of them walked over on their own and sat down to watch and discuss the video. Since the audio is just music, the students were able to discuss what was going on in the video while it was playing. It was a casual atmosphere and energizing to see the Icheon artists working. Additionally, students who were working in the space but not technically coming for class, were able to see the video without interrupting their own work (or keep working without being interrupted by the video.

In the old space, showing an online video at the start of class would have entailed about 8 steps and probably a total of 20 minutes of setup on my part:

Step 1: Get the Projector. I would have walked over to the Media Center (upstairs in the library) to get a projector before my first class or in the 10 minutes between my classes. I would have taken the elevator to the ground floor and pushed the little cart through five sets of doors and across the absolute bumpiest sidewalk on campus.(If I rushed, one particular bump would send the remote flying off the cart and, if I wasn't careful, threaten to send the projector off, too. I broke two water bottles by dropping them off the cart while I was trying to move it between classes or on my way off campus for the day.

Step 2: Plug in the Projector. I would have rolled the cart to the middle of the design studio, unrolled the plug, climbed under a table and plugged in the projector. Often I would need to move a second table so that the plug could reach directly to the wall socket. Sometimes, if I could find one with the right prongs, I would use an extension cord to read an alternate plug.

Step 3: Turn on the Projector and Computer. I still have to do this.

Step 4: Move the Screen. While I waited for the computer to warm up, I had to line up the screen with the projector. This classroom had no permanent screen attached to a wall, so I would pull down the screen on the back of the portable chalkboard (on wheels) and roll it to a place where the projected image would hit it straight on.

Step 5: Adjust the Projector Level. Usually, but not always, the projector feet needed to be adjusted or something needed to be stuck under them so that they would be level and high enough for the image to show on the screen. We kept little bits of illustration board specifically for this purpose. Erasers worked, too.

Step 6: Log in. I still need to log in to the computer in my classroom, but I can do this ahead of time if I plan well. I can't log in to a computer before it is plugged in. Often I also needed to fiddle with the connection between the projector and the computer because they didn't always communicate with each other on the first try.

Step 7: Light. Turning off the lights was actually easier in the old studio, but if there was still too much sunlight coming in from the windows I had about six semi-broken blinds that would need to be lowered and twisted closed. We now have three blinds that are easy to close, but the projector and screen are both far enough away that blind adjustment has so far been unnecessary.

Step 8: Collect the students. All of this is taking place in the design studio which is next to my clay classroom. The projector and screen won't fit in the clay studio so I have to invite my students to come next door. Sometimes I have to call them in more than once. Obviously they cannot watch from their wheels and must decide to come in or stay.

Post-Video Step 1-4: Shut Down, Unplug, Store and Return. Of course, after a video I would then have to shut down the computer and projector, rewrap the cord and wheel the whole cart into an office or storage room, since Media Services didn't want me to leave the cart in an unsecured separate room, but also didn't want me to leave the cart in the clay studio during class. After class I had to wheel the beastly thing back across the sidewalk of doom, back through six sets of doors (an extra doorway now, between where I stored the thing and where I used the thing) and up the elevator.

I suppose this means the new studio saves me about half an hour each time I show a video in class, counting travel time. I'm glad it does, but I'm also looking forward to the time when my time savings are not counteracted by the time I spend trying to fix or track down the things that worked just fine in the old space (kilns with erroneous gas lines, kilns with missing plugs, and mixers that still don't attach to electricity).

Pedagogically, the new projector, computer and screen mean that I can show student videos I wouldn't have tried to share during class last year.

Saturday, June 20, 2015

New Building Photos

I finally got myself into the new building with a camera. (Too bad all my iPhone pictures look blurry lately). So here, finally, are some pictures of the new clay studio (I didn't get pictures of the other studios, yet). 

throwing space in the main studio

The main room is divided into two main sections with a throwing side and a hand-building side. The throwing side consists of 16 student wheels, plus an ADA wheel and a teacher's station wheel. All but the ADA wheel are Thomas Stuarts. The hand-building side has 5 or 6 work tables and lots of space to move around. In the old studio we had 16 wheels, plus one that didn't have a pedal, about 4 work tables, plus one that usually was over taken by kiln-related items or metalsmithing scraps.

studio from the teacher's perspective

The major improvement in the new studio space is the space! I am so accustomed to walking over students, asking them to stand up so I can pass, or rearranging shelves, boxes, etc, so that students have (temporary) room to work). The new studio boasts increased counter space by the wheels and an entire damp closet in which students can store their work, not to mention the simple fact of room to walk around, through and past work stations.

teacher "station" at the front of the hand-building space (incomplete wedging tables along back wall)

The teaching options are also greatly increased. First of all, there is a teaching station in the studio, complete with computer, AV and whiteboards where students can actually see them. I said my goodbyes to the projector cart in the Media Center and plan never to roll it on its tiny wheels across the cracked and uneven path to Palmer Hall where I then have to move my class to a different room in order to access a portable screen on which to project a partially visible Powerpoint. I am also looking forward to having internet access in the classroom where I can show a whole class an image on the spur of the moment.

glaze room with ventilation, sinks, (small) drawers and shelving

One of the reasons the room feels so much larger is that the glazing room has moved to a separate space. The glazes, underglazes, dry materials, spray booth and two sinks are all going to be kept in a glazing room. The old operating procedure was to store the glazes under a table next to the wheels. When they were pulled out, the students glazing inevitably got in the way of the students throwing, and vice versa.
washer dryer and (small) mixer in the clay storage and recycling room

Clay storage, mixing, laundry and kilns are also housed in spaces separated out from the main work space. This not only increases ease of navigation and use of the classroom space, but it should cut down on noise, heat, distractions and even dust in the main studio space. 

the indoor kiln room (old gas kiln and new electric kilns)

The kilns are in a separate room with plenty of space. The main problem for the last month in the Palmer Hall studio has been the inability of the air conditioning to keep up when any of the kilns are running, or even cooling down. In the new space there is a door between the work space and the kilns, not to mention the fact that the AC and heating are likely to be more reliable in a new building, as opposed to a building which has been in its current state for 20 years at least. 

the outside kiln yard with a pit and a disassembled raku kiln

I'm not entirely sure how old Palmer Hall is, but I believe it may have been the art building since the 1980s. I have been in it for 9 years and when I came to YVCC in 2006, there had already been one attempt made to replace the building. Before it was an art building, moreover, it was a library, which makes some sense out of the odd arrangement in the very middle of the building, which has been used for storage, office space and a teeny tiny bathroom.

YVCC Campus circa ? (16th Ave is on the bottom/right, Nob Hill is top/right)


When I was in the Facilities Operations office this week, waiting to discuss kiln placement, I noticed this picture on the wall. It is of the campus long ago, but unfortunately didn't include a date. If you look closely, you'll notice Palmer Hall, Prior Hall, Larson Gallery and earlier versions of what I'd guess are the HUB and Sherar Gym.

Wednesday, June 17, 2015

Moving the Kiln

In the new building, Palmer-Martin Hall, the clay studio will be mostly equipped with new stuff: new wheels, new kilns, a new clay mixer, but the gas kiln is fairly new itself--at least, it was brand new when we started planning Palmer-Martin Hall 10 years ago. So the gas kiln will be the same in the new building. 

The kiln in the old studio, after the tracks were removed. Notice the carts are in the  way even now.

I was in the studio this week, waiting for someone, while facilities folks were moving the kiln. Moving it is quite an operation, since the kiln is so big. All the furniture in the studio has to be moved back out of the way and then the middle section of the door frame has to be removed.

The kiln slowly leaving the Palmer Hall and its home for the last 6 years.

 This is a car kiln with the bottom section and front wall on rollers that come out on a track. This part of the kiln was rolled out separately and parked for a time in by some benches outside Palmer Hall, while the rest of the kiln was navigated out the doorway.

The kiln car enjoying some time in the sun.

The kiln then had to be raised up onto the truck with a fork lift (and fork lift extenders) before it could be driven across campus to the new building.

The kiln getting loaded for its short ride.

I missed seeing the kiln brought into the new building, but I did get to visit today to discuss its orientation. I am looking forward to opening the kiln door without first moving several carts out of the way. By the look of the new kiln room, one could feasibly be loading all three kilns at once without knocking into one another. This was basically impossible in the old studio.

The kiln, its new friends, (and detritus) in the new building.


Saturday, June 13, 2015

Packing and Moving to Palmer Martin

I put a moving sign on the gas kiln once we unloaded the last batch of work on Wednesday.

This week I am officially done teaching in the Palmer Hall. This is the round building in the center of campus where I have taught art classes since I came to Yakima in 2006. The building has been an art building since, the 80s, I believe, but was a library before that. We move into the new Palmer Martin building over the summer and begin teaching there in the fall.

Palmer Martin (from the campus bridge), image from BORA Architecture

The opening reception for the new building was held June 2. The new space looks great and most of the rooms are completely built and mostly furnished. Of course, I forgot to bring a camera when I visited the building, so pictures will have to arrive on this blog later this summer, when I have a key. 

The mural in the art hallway, picture from the Yakima Herald article about the new building
People who came to the ribbon cutting ceremony on June 2 were able to see the classrooms mostly set up, though the art studios are missing some equipment still. I visited the space again on Friday to check on things that might be missing or things that seem to have changed a little over the course of the ten years since we started planning the project (planning began before I had ever heard of Yakima).

the studio, in the midst of packing for the move

The new clay studio, especially, is massive. My first impression of the clay studio in Palmer Hall was that it was bright and clean and not bad for a school and art program of this size. The new studio retains the bright and clean feeling and increases the size considerably, while also greatly improving on the setup.

boxes and buckets packed and ready to move to Palmer Martin

The major problem with the studio in Palmer Hall is that there isn't really enough space to get around when everyone is working. During throwing classes, I sometimes have to literally climb over wheels to get to the other side of the class. When students are glazing and throwing at the same time, the problem just gets worse. In the new building, the glazing room is almost entirely separate from the wheels. 

ware cart blocking the gas kiln tracks (bottom left)

We have a similar issue near the kilns. We have rolling carts on which we put our work to be fired, but we have to roll them into another part of the studio if we have the gas kiln open. If students are working when we open the kiln, they have to stand up so we can roll the carts past them. In the new space, theoretically, students can work undisturbed in the studio while kilns are loaded and unloaded, while students glaze, and while I move from one student to another.

Tuesday, September 16, 2014

Making Sure They Remember Class Content a Year Later

I know most kids have been back at school for at least a week or two, but summer is just now coming to a close for me. Yakima Valley Community College has a week of convocation activities to get us back in the school mode and to introduce us to changes and initiatives for the new year. Next week fall classes commence.

glazing. the point at which I stopped for the weekend
I have spent this week watching enrollments in art department classes (apparently I find this more interesting than glazing) to make sure my new adjunct faculty have enough students registered for their classes. The art program has mostly full classes, though there is still plenty of room in our evening Art Appreciation class if you're looking for a few credits or an interesting class.

glazing. boring.
I am getting excited about welcoming new faculty to YVCC art. This fall we have a new full-time instructor and two new adjunct instructors. In fact, almost two thirds of our classes will be taught by faculty who have been at YVCC less than a year. These new faculty are coming to us from Seattle, Idaho and Tennessee and should bring new perspectives and new ideas to the program.

Palmer Martin Replacement building on Nob Hill Boulevard

I am also excited about the coming transition to the new Palmer-Martin replacement building.  The building, on the corner of 16th Ave and Nob Hill Boulevard, will be ready for us to begin moving in at soon as spring, though we don't plan to offer classes in the new spaces until fall of 2015. Already the view of campus coming from the East is markedly different than it was a year ago.

The entry of the new building
As usual at this time of year, my thoughts are beginning to shift from concerns and ideas about my personal work and my home studio to thoughts about my classes and that inevitably leads to thoughts about curriculum changes I might want to make. Typically I also have a few panic dreams around this time in which I have arrived at the first day of class with no syllabi, no idea what I am teaching or, in one case, no pottery wheels. In that last dream the students had to throw pottery on spinning dinner plates. I'm not sure how well that would work.

could we at least get one of these wheels?

While I lay awake at night, unable to sleep because of the fear of missing course materials and pottery wheels, I think about how I can better prepare my students to do well in my classes. The thing I probably worry about most (when I am awake) is how to keep a class interesting and fun while also making it rigorous and ensuring that students learn something or improve their skills.

I don't honestly worry much about pottery class. There the equation is rather simple. I tell my students every quarter: if you practice throwing pottery a lot, you will get a lot better at throwing. If you rarely practice, you won't improve much. I suppose the general idea isn't that much different in an Art Appreciation class, but studying effectively is harder to visualize than throwing pottery effectively. Your notes don't physically collapse when you make a mistake or miss an important concept like your clay does if you position your fingers incorrectly.

um. really, this is the best falling pot image I could find. I guess I'll have to take some pictures myself--without ghosts.

I believe many of my fellow educators worry about their classes and how to best challenge and support students. We have so many interrelated goals for a given class and want to squeeze all our excitement about the topic into just 10 weeks of lessons.

It is difficult, too, to know just how successful a class has been. One metric is the test scores and assignment grades. That tells me something about how well students understood and were able to explain the concepts of the class. There are instructor evaluations that sometimes tell me what students liked or didn't like in the class, but just as often tell me that students didn't like the parking options or filling in bubble surveys.


However, occasionally, I hear about my classes in another way. Last week I ran into a student who had taken my Art Appreciation class a year or two ago. We talked a little and the student told me that she found my class hard, harder than she expected, but that she still remembered a lot of what she learned in my class. Yep, that's basically my goal. My class should be challenging but you should learn stuff. So this week my short term goal is to make improvements in my classes that will encourage students to be challenged and learn stuff. Also I need to clean my office.

If you didn't get to the Larson Gallery on Saturday for the Many Waters (Artists from Walla Walla) opening, you missed this big pink guy. Sad for you.