Friday, July 27, 2012

Sloooow and Distracted Progress

In keeping with my summer so far, my progress this week has been slow and I have allowed myself to be distracted by various obligations and curiosities. I finished a couple pieces late last week and on the weekend. Unfortunately they aren't pieces that have many bike parts, so maybe I shouldn't have spent so much time with them.


I also played around this week on the wheel. Monday I threw a bunch of pieces, both parts for sculpture (that I hope to start today after I do some unrelated and nagging paperwork) and for some functional pieces I wanted to try. I ordered some new clay at the start of the summer but hadn't yet gotten around to testing for maturity at cone 04. I made a couple plates, a berry bowl and a set of mugs with false bottoms that rattle or open to reveal a separate open section. I saw a similar open-bottomed mug online--or maybe a student shared it with me--that was designed to hold a cookie in the open section below the tea vessel. I'm not sure the result is ergonomic, but I wanted to try it. 


After the first cookie mug, I realized that for a right handed drinker, the handle should probably be to the left of the opening or the cookie (or crumbs) would fall out on the drinker's lap as he or she lifts the mug to drink. Maybe the left-handed cookie mug can be part of a sociological experiment in my kitchen involving tea, cookies and messy laps. We can look for those who subconsciously realize that cookies will fall on their laps and adjust accordingly and those who discover the flaw only when the cookie falls.


I also spent an inordinate amount of time working on a multi-layer vessel which is intended to function as a cosmetics holder in my bathroom. I feel silly for the amount of design that went into the project (which looks like a scented wax burner) but if it works, several hours of studio work will be soon outweighed by the pleasures of eschewing a daily rain of broken powder and projectile mascara when I open the medicine cabinet.


I also under-glazed too much this week. The glazing process can expand or shrink to fit the time allotted. I should really just underglaze 30 minutes a day during the year, so I can stop wasting hours on this mindless task during my summer studio time. I might have to lock up the glazes, though, because the alluring idea of getting some glazing done always tricks me into spending more time than I initially planned; I sit down for 20 minutes between tasks and suddenly its two hours later and all I've done is laundry and under-glazing.


Before it got too hot, I took several nice walks with my daughter to look at flowers (and other detritus). I keep seeing forms that make me want to work in the studio (but I somehow keep lacking the motivation to actually get them done).


Monday, July 23, 2012

Combining Clay with Bike Parts


I just unloaded a set of work from the kiln including some small under glazed pieces and some large bisques pieces. I can't attach the bike parts yet since everything still requires at least one more firing with glaze, but I can set them together to test shrinkage and fit. I was pretty close on my measurements for the most part and there are just a few bits I need to remake. 

This project is proving to be quite a different cognitive puzzle than I am used to. I would say the planning for one or two pieces is proving to be more difficult than all the work I did last summer. The challenge is to incorporate 25 bike parts--or, as I perceive them, colored metal forms that won't shrink--into my grey/white soft and shrinking clay. The pieces have to be "integrated" into the design concept before I finish the wet building and forming with the clay. If they are to fit precisely, I need to measure the metal pieces in the wet clay, but being accurate is a little tricky, since I am trying to fit round or irregular forms that will shrink around 10%. If I were mathematically inclined, I might actually calculate the percentage, but I've never been a big fan of precise measurements in clay. Even when I do measure, I have a terrible tendency to alter the surface after the measurement has been made. Then the altered surface is no longer whatever shape it started as. 

work in progress
After forming the wet clay, it needs to dry and be fired, both of which cause shrinkage. Last night, after I had finished the firing, but before I had opened and unloaded the kiln, I dreamt the main piece had blown up because the piece next to it was too wet. I always have things-exploding-in-the-kiln dreams, but this one was particularly scary considering how much planning and work had gone into it.

Speaking of math, proportionally, I feel like I have accomplished less this summer than last year at this time. I truly believe this is due, in part, to the bike parts and the new difficulties of working them into my pieces. I even had to draw myself a map/diagram of where the pieces were to go. The good news is my map seems decently accurate.

my sketch for the exterior and top/interior view of this form

Today, not entirely trusting the map, I pulled the piece out of the kiln and arranged the bike parts more or less how I planned them to be. Most of the pieces fit relatively well. I made a measurement error on an inset piece that was to hold something at the top interior bowl shape. This I can remake. I can't arrange all the pieces now because some need to defy gravity. (the yellow and red shiny circles will be spread around the large bottom bulbous shape.

you can see 10 bike parts. two rare invisible from this angle and several aren't arranged because of gravity

naked sculpture with a layout of (most of) the bike parts

I can easily account for 21 pieces on this form. I have a couple other plans that may or may not work well. I do plan to make at least one more version of the SRAM bike parts piece, so I will not attach my limited bike parts until both pieces have been fired and glazed. 

 two options for the attachments on this part of the sculpture. This part of the sculpture attaches to the larger form with a bike part as a hinge or joint

two options for the metal parts on this smaller form

I made a few other pieces that incorporate some bike parts. The pieces above were made just a bit before I had completed the bigger 25-piece plan. The piece below has gone through a first round underglaze firing. The bike part between the upper and lower forms does not fit as well as it should. This was my first attempt and I erred too small so the bike part is loose. The metal is also less well integrated on this first attempt

Thursday, July 19, 2012

Collage Workshop

This past weekend I went to a collage workshop at Larson Gallery with Joan CawleyCrane. I originally signed up for the workshop because I teach collage techniques in my Design classes and I wanted to observe someone else's approach to teaching the techniques. To be honest, I'm not sure I ever took a class that focused strictly on collage techniques more than in passing.

This workshop was quite good. I was impressed with the instructor, particularly on the second day. I have to admit that my view of the first day was considerably clouded by a persistent migraine that had awoken me hours before the class and that I wasn't able to get rid of until after class ended. I was aware enough to recognize that the class was well run but I wasn't able to actually enjoy it on Saturday. After class I took a nap and it wasn't until after I woke up, feeling much better, that I was actually able to count up some of the useful information I had taken from the class. Saturday night I had 5 specific items on that list. By the end of Sunday I could add half a dozen more specific bits of knowledge or techniques to use in my own classes.

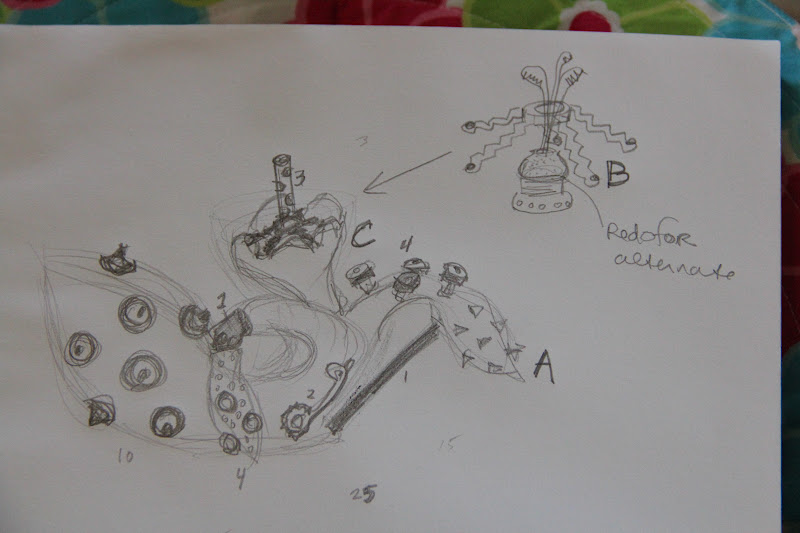
first freebie-bag collage plan

Our first activity on Saturday morning was one of those first usable bits. We were given a bag with limited paper materials (and a glue stick) and were asked to make an arrangement. We were limited in materials and were not allowed to cut the materials. We arranged and shared and then scrapped our first attempt (we were allowed to take digital images or else the visuals for this blog post would be very limited. We then made a new arrangement, still not folding or attaching. This we shared, discussed and then a third new piece was made using mostly the same materials.

second freebie-bag collage plan

third freebie-bag collage plan
fourth freebie-bag collage plan
my first finished collage (more or less) based on #3


It wasn't until the first three or four rounds were done that we were allowed to actually "make" something by cutting, gluing and attaching the materials. The instructor also gave a thorough introduction to glues and gluing. I didn't anticipate that a thorough introduction to adhesives would be something I would rate as a highlight of the workshop. I guess that just shows how little I knew about adhesives. Imagine how excited my Design students will be when I share this extensive information with them! 


a second finished collage made using my daughter's cutout (black foam "person")

In the afternoon we started again with materials that we had brought in. But honestly, I don't remember much of Saturday afternoon. I finished my first piece and started a second. In the second we weren't give much direction and I felt a little lost in being allowed any materials I had, so I kept to my original freebie-bag materials and added a foam piece my daughter had cut out the day before. It is easier to feel comfortable making a fool of yourself in your random little design if your goal is to please a 4 year old.

On Sunday I woke up without a migraine and was conscious, upon entering the gallery, that I was processing information in a way totally different from the day before. I made a point of apologizing to the instructor for my less-than-human functionality the day before and asked for her to re-explain a project she mentioned the day before. (I had caught about 20% of the story on Saturday.) Joan laughed at me, saying I looked much better today and explained the story.

my pieces from day 2: adhesive sample board, second small collage and large content collage (unfinished)

After a lengthy introduction to various new materials and techniques, including sewing and using hot wax, we made a sample board for our various glues and attachment techniques (mine is above on the left), we started on a larger project with some actual content. What was most interesting to me here is the way the instructor helped move the class from composition to content. I was unable to finish mine during class (and I haven't worked on it since), but I enjoyed working through a composition problem (in 2-D) and I enjoyed observing how the instructor helped direct me (and the other students) through this process. 


Taking this class provided me with an excellent chance to observe an instructor who, in many ways, has a very similar teaching style to my own. Joan had several approaches that were improvements on my own tactics. She also did a few things I would try not do to in my classes, though they may be fit for a 2-day workshop. She introduced me to some more subtle and flexible techniques and also improved my knowledge of adhesives. It was also useful, I think, to be in the position of novice (or at least not expert) student. Not only did I get to see the class from the point of view of a student, on Saturday afternoon, because of the headache and excessive use of painkillers, I was able to view the class as a student who was having trouble focusing and staying awake.

Friday, July 13, 2012

Bulbs Redux

Earlier this summer I drove down to Columbia Basin Community College in Kennewick, WA to see the Esvelt Gallery. I drove down to see the gallery because I thought I was having a show there this coming winter (2013). As it turned out, I misunderstood an earlier e-mail conversation and the show is not scheduled until 2014. (When I finally realized my mistake, a huge weight was lifted and I felt like I had plenty of time to finish the work.)

I wanted to visit the gallery to see the space, meet the gallery director and get a sense of what work she expected from me. Incidentally, my meeting with Mary Dryburgh, the gallery director, went very well and I was happy to discover that I appreciated the way she thought about the gallery and the exhibition. It is hard to identify just what it was about our meeting (not just the fact that the show is another year in the future) but I left feeling energized and excited about the show.

Mary was already familiar with my stand-alone sculpture, my main work, but after connecting me with the other artist, Laura Ahola-Young, I was inspired to want to plan an installation for the exhibition. Laura sent me a picture of one of her watercolor and ink paintings. I was struck by how similar some of her imagery was to forms I have used repeatedly for years. One of her works, "Homeostasis" has a grid of bulbous outlined forms across the entire canvas. These bulbous forms looked a lot like an outline of the bulbous forms I have used in my "Ericano" installations. 

"Homeostasis" by Laura Ahola-Young

"Ericano" (detail) by Rachel Dorn

The first of these installations I did for my senior show at the end of my senior year in college. The galleries at Coe College were rectangular, white and clean with no windows. This installation of 100 bulbs hanging on the wall took up the majority of the short wall to the left as people walked in. My undergraduate professor was at first skeptical that the installation would work, but he later showed me how to make my first plaster mold and I was able to complete the whole set. The pieces below were raku fired, hand-built or press-molded and originally just about 10 (if I recall correctly) had added surface texture. I sold the pieces individually, then someone bought the whole wall and I needed to make extras. 


I later did another version of the installation on my dad's office wall at work and much later on my parents' wall at home, the latter, at least, being completed in graduate school included a variety of firing methods and much more surface decoration. In about 2003 I made a smaller installation of pieces that came off the wall and "evolved" onto a pedestal. This piece was eventually installed hanging in a window (quite an engineering undertaking for me, at the time, to figure out how to hang them without a visible support) at Higher Fire Gallery in Madison, Wisconsin.


So now that I have seen the paintings of my colleague, I want to revisit this bulb installation. I have been working on some of the pieces this summer. Some are in the kiln now, some are drying. None are fired. I figure I have over a year to make 100 bulbs. Last time I set out to make 100, I had only a month or two.

bulb in kiln with SRAM bike parts sprigs

bulb in kiln with glass bits (before firing)

more SRAM bike parts


shell sprigs


Wednesday, July 11, 2012

Summer Studio Progress

I have been working in the studio the last few weeks, though I feel like progress is coming at a painfully slow pace. I've been in to EfCom at least 5 times this summer trying to work on my computer. Fixing one thing seems to lead to another thing going wrong, and another and another. 

It's already July and I don't feel like I accomplished much of anything in the clay studio during June. I'm still finishing my first few pieces this week! (Usually I work on about 5 pieces over 2 weeks.) I have been under-glazing some of my daily mini-sculpture project pieces from this spring. 

I have also started some larger pieces, as I mentioned. Below is the first one "finished". I have been working on the brain-stretching puzzle of how to incorporate my SRAM bike parts into my work. The piece below will be finished with about 5 bike parts. The sprigs on the top are "cast" from bike parts. The main challenges I face in completing the SRAM bike parts project are to account for shrinkage and to incorporate 25 different parts. Several of the pieces I have been working on this week are meant to be tests for shrinkage and fit and attachments (epoxies, etc) and to provide a test version of these mixed media forms. I don't know what will go wrong, but I have a feeling something might. I want to test the attachments at full scale before I begin the final piece so I know what might go wrong.


I've done a little testing. This mini-sculpture (before firing) uses some random parts we had around the house. I tried to incorporate extra space for the metal pieces to account for shrinkage. It will also be a small test for glaze and epoxy.


sprigs made from SRAM parts

Before the bike part project came along, I was already planning to experiment with mixed media, specifically glass. The small piece below incorporates a glaze drip from a high temperature kiln. The piece with the blue bits incorporates broken beer bottle glass. I've already fired the smaller piece. The glass didn't change much. I expect the shard glass to melt into less sharp edges.


Pre-School Project
One other small project that has taken a bit of time is my pre-school class project. Last summer I visited my daughter's class to "do" a clay project with them. It was so much fun, I want to do it again this year, but I want to do a different project. After discussing possibilities with my daughter, we decided that noisemakers or rattles would be easiest and most fun. We haven't set a date yet, but we have plans. 

my test bell project

I will throw a bunch of small forms like these below. They are open at the bottom and may be closed or open at the top. They are pretty quick to throw off the hump. The kids can pick one or we can give them to them. 

bell tops just thrown
The kids can then make and attach a bottom (and top as needed) and drop in a bunch of small balls of clay. They then close the piece (my daughter's version below had an open top through which she dropped little balls of clay after she had attached a bottom slab) and decorate the shape. I'll keep the clay pretty wet so they can stamp into it or add shapes. My daughter wants me to let the kids make sprig molds, but I don't think it will work. Since I won't be able to get the sprigs fired before their project, they won't be able to use them and won't understand why they were made. I might have some sprigs available for them to use and explain how they were made. Last summer their teachers helped with the project at the table and they could help with the sprigs too.

My daughter's bell

After the bells are made and decorated (I'll also brings underglazes for color application) I'll remind the kids to poke a hole in them, take them home and fire them for the kids. They won't rattle while we are doing the project (wet clay doesn't) but they will when I return them.

Another option we considered for the kids project, attaching handles and decorating mugs. But this is more work for me and much more of a kit-project than a project where they kids actually learn something interesting. Besides, noisemakers are more fun to use.

Tuesday, July 3, 2012

Bike Parts, Sculpture and Cyborgs

Yesterday I received bike parts for my SRAM pART Project sculpture. I plan to make work for a show in New York this coming fall. The exhibition will be of sculpture and collage made by artists using bike parts and other media. The finished works will be shown, judged and auctioned with proceeds benefiting World Bicycle Relief, a charity that helps get bikes to people in underdeveloped countries to try to connect them to education, health care and other opportunities. 

Though I sort of fell into the project, agreeing to it before I really knew what it was, it sounds like a good cause and an interesting premise for the project. I am further intrigued because the project requirements are a big push in a direction I wanted to inch towards in my work, namely, incorporation of mixed media. The exhibition requires that sculptures be in any media but they must include a minimum of 25 SRAM parts (provided by SRAM pART Project). The exhibition does not limit artistic expression, subject, intent or even technique and we can modify the bike parts provided.


I agreed to participate last week and the parts are already here. Though it appears someone was trying to eat the box, the parts all seem to be in good shape. A few are used or refurbished but most seem brand new. Unfortunately each part was packed in as many layers of plastic as could be managed. Each piece was individually bagged and taped shut and every four pieces were bagged in another bag. For a group focused on a social justice cause, they don't appear particularly worried about sustainability as it relates to excessive packaging.


About half an hour later, I finally was able to extricate all the pieces from their plastic wraps. The prospectus said they would send 100 pieces. I haven't counted, but it sure is a lot of stuff to work with. There appear to be four of most items, which include parts for gears, shifters, handles, frame and other unidentifiable (to me) bits. There are a few smaller items, like the circles in yellow and red at the bottom right of the picture, of which I have more than 4 in a variety of colors. There are a lot of possibilities, but I was surprised how large some of the pieces are, given that we are limited to 20" in any direction for sculpture.


I immediately made some sprigs off of some of the parts so that I can fire them and use the sprigs in my sculpture. I have a few ideas and plans, but I believe I need to do some firing and testing first. I stayed up late last night just thinking about how I could incorporate 25 (or more) pieces and still maintain my own approach to the project--I don't want to just piece these items together on their own in an assemblage, there would be no point in having me involved in the project if the work were somehow very different in execution from "my work." 

The conceptual problem I am encountering is that I often use organic, soft, swelling forms and repetitive textures. I can only get so repetitive if I only have four of ever item (hence the sprigs) and hard mechanical forms aren't soft and organic. I am thinking steampunk and science fiction in my approach here, modifying my familiar organic forms with mechanical machine parts. I recently finished listening to Cinder by Marissa Meyer. The story is a loose retelling of Cinderella, but what I really enjoyed was the descriptions of the science fiction society of the future and the use of machinery and technology in humans. The title character is a cyborg with a too-small mechanical foot and a variety of other well-described bodily alterations. In my SRAM project, I am thinking cyborg sea vegetation. I'll post on my progress as soon as I make some.