wedged clay is nearly ready for bagging (after days of work)
Over the years I've tried to recycle clay regularly in my studio, but I haven't been particularly consistent. In 2014, I paid a studio assistant to help me clean and recycle clay in the studio, but I haven't done so since.
step 1: drying semi-dry clay chunks in the sun
My Usual Approach to Recycling Clay at Home:
My more typical approach to recycling clay is to recycle in small batches several times a month. I keep a slake bucket going in the studio. I add bone dry clay and throwing scraps to water. The bone dry clay slakes in the water and becomes wet clay again. After I have accumulated enough wet clay, I scoop it out of the water and let it dry in trays or shape it into arches to dry a bit faster.
step 2: breaking up dry clay into smaller pieces
After the wet clay has dried sufficiently, I wedge it in small batches at my wedging table and then either build with it or store it in bags for later use. This method is tedious, takes up precious studio space with drying, slaking, and drying clay again, and also tends to result in mottled or marbled clays if I try to mix more than one type of clay together. If I don't mix clays, I have to keep separate slaking bins and drying trays for each clay type I use.
step 3: spreading out dry clay in the pool; step 4: wetting dry clay
Recycling Clay at School:
At YVC we have an large mixer and a pugmill we used to recycle clay. These tools make mixing much less physically demanding and much faster, but fit into a large studio better than a home studio. A mixer processes fairly large batches of clay; a pug mill processes smaller batches on a regular schedule. I can't use a mixer at home without investing more space and appropriate ventilation. I also don't (usually) need to recycle much at a time. I wouldn't mind having a pugmill for recycling, but the cheapest I've seen is about $2300 and a pugmill takes up a significant amount of space relative to my small studio.
step 5: mixing slaked clay (and making sure all clay is slaked)
The Problem:
By the start of this summer, I realized I had let my dry studio clay collection get a little out of hand. It was taking up too much space in my studio, and I didn't really know what I had where. I started brainstorming options other than recycling all of it by hand. I considered a pugmill to be too expensive and couldn't really donate the clay to YVC because much of my clay is low fire and would cause problems in the studio, even if kept separate. I considered just tossing it out, but that seems wasteful--even if new clay isn't that expensive and would save me time.
step 6: mixing wet clay pieces into slaked clay slurry
The Solution:
While laying in bed one night, I got thinking of how we walked on clay to "recycle" it at the school studio in Japan. At the time I thought it was a bit silly, because we were clearly walking on store-bought and well-prepared clay and the use of our feet wasn't really an improvement over the use of our hands. But in my current studio, the problem was recycling a bunch of different clays and a pretty big quantity of clay overall. That I have so many clays is silly, but they've accumulated over the decade. I've bought clay at Clay Art Center in Tacoma (when my mother-in-law has lived nearby), and at Seattle Pottery Supply (again, when my mother-in-law lived close), and at Archie Bray when I took a workshop there. I've used low fire clay and mid fire clay for different projects (The Archie Bray workshop required cone 6 clay when I'd been using low fire), and people have donated clay to me. The total adds up to at least 8 different clays, as far as I can tell, including low fire, porcelain, stoneware, groggy, and red clays.
the clay slurry is fairly even but too wet
Getting Ready:
The longer I thought about it, the more fun a large scale, messy, foot-wedging solution appeared. And, I could take care of all the clay in one fell swoop. So, I collected all the various bags and containers of bone dry or mostly dry clay from around the studio, set the slightly wet clay out in the sun to dry, and proceeded to break apart the dry clay with a hammer. It took about 3 days to collect and dry all the semi-dry clay from around the studio. My family laughed at me as I found more and more partial bags of clay in various nooks and crannies.
leftover hand-wedged clay with marbling of different clays (and that pesky porcelain chunk near the top)
Once all the clay was bone dry and had been smashed into smaller pieces, I got out my daughter's kiddy pool and spread the dry clay around it. I added water over the top of the bone dry clay and left it to slake for the day. By afternoon, most of the clay was slaked. I mixed it up a bit and made sure the dry clumps were covered with water. By evening, all the clay was slaked. My daughter was excited to get in, so I let her walk in the slaked clay. By walking in it, she was able to further smash some of the clumps of clay that were still semi-solid. I had some wet, but not wet enough clay leftover from previous recycling attempts (this clay was marbled from different clays mixed together, but not well), so I cut that up and buried it into the slurry to be mixed the next day.
step 7: wedging the slightly dried slurry with the power of many (little) feet
The Fun Part:
The next day I invited some friends and their kids over to our house to walk in the clay. The kids had fun and got very messy, and maybe wedged some of the clay in the process, too. I had a bucket of water and several large sponges ready to deal with their dirty hands and feet. I didn't quite anticipate how dirty their bellies and hair would get, but the bucket worked fairly well for that, too.
bonus step when kids are helping: a bath in the water bucket
As the kids lost interest, I got into the pool and used my own feet to wedge. At this point I stopped taking pictures because cleaning off the kids had completely dirtied my hands. The kids are all pretty small, so they didn't have the weight, strength, or balance to systematically foot wedge the clay. My friend and I were able to walk around the pool systematically, making sure all of the clay was worked evenly. My other friend scooped clay from the sides of the pool and piled them in the middle. This was a particularly helpful part of the process that I hadn't considered, because it mixed clay from different areas of the pool together more thoroughly.
step 8: foot wedging the clay again after it has dried for several hours
The Finishing Work:
The clay was still pretty wet and sticky at this point, so after my friends departed, I left the clay outside in the sun until evening. In the evening, my daughter went out to stand on the clay and I noticed she no longer sunk into the clay. The consistency was much improved, though a bit wet, still, underneath the surface. We ended up scoping the clay from the sides of the pool and piling them in the middle. My daughter needed to jump to make a dent in the surface, but I could stomp on the middle pile and mix the bottom clay and the surface clay. We smoothed the surface of the mound and left it overnight.
step 9: piling up the clay to mix the different layers together
In the morning I was able to cut off large blocks of clay, shape them a bit and bag them. I made up four bags of clay, not quite as full as when they come from the clay supply companies. I figure I bagged a little under 100lbs (4 bags of not quite 25lbs). The middle and bottom of the clay mound was still too wet by afternoon. In the evening my daughter and I foot wedged again and so far this morning I have bagged close to another 100lbs.
step 10: using gravity to wedge on the cement sidewalk
The process is exhausting, particularly when it is hot outside. Everytime I have foot wedged, I have ended up drenched in sweat. Today's pile of clay is harder on the outside than inside and has more air pockets than the top layers did, so I have taken to wedging the ~25lb chunks on the cement ground where I can let gravity do most of the work. I took a break after just two rounds of this type of wedging because it is exhausting and I didn't want to hurt my back by lifting 25lbs over and over again with poor posture.
step 11: cleaning up the mess on the patio, cleaning out the pool, and cleaning all the tools and buckets. this step has not yet been completed
I am almost done with all the clay I had to recycle. The first 4 bags were fairly even in consistency and how well mixed the clay was. I can't see any marbling of clay colors in the first 4-6 bags, but there are some sections that are drier from being more exposed to the outdoor air. In the last few bags I can see some marbling where the clays didn't mix as thoroughly and there are some air pockets as I cut the clay off of the center mount. The consistency is still probably better than mixing multiple clays together by hand. Hand-wedging (or gravity wedging) the last bags of clay probably makes them good enough for hand-building--if not throwing. Overall, this food wedging process is time consuming, tiring, and makes a huge mess, but I think the result (and certainly the speed of getting all that clay done at once) is an improvement over wedging by hand. And, of course, I saved myself $3000 by not buying a pugmill.
This week's major project was a mental break from more thoughtful sculpting. This project is about a year delayed, since my Aunt asked me to start on it last summer. I'm making these textured, and eventually colorful pod sculptures for her.
textureless pod form
The pod sculptures are wheel thrown, then altered with five or six spines down their length. They have a hole on the bottom for a rod so they can be "planted" in a very large vase.
sketches from last year for this project
The sketches are from last year and though the sketches show mostly just striped texture down the I always knew I was planning on more texture between the ridges.
sprig texture with plain (incomplete) background
After I added the ridges and smoothed them in place, I pressed clay into a sprig mold (over and over again) and attached the sprigs in between the ridges.
time-lapse video of placing sprigs
This particular sprig (see the link for a definition/demo of sprigs) was made from a plastic food toy. I have since had my daughter do some research and we discovered that the toy was a pineapple.
At first we thought the sprig came from peas, but upon closer inspection, the pineapple looks like a closer fit.
On the first pod, I attached the largest version of the sprig or an almost round smaller version, but on the second sculpture, I accidentally ended up with some single round sections. I added them in between the larger forms and liked the more varied sizes that resulted.
close up of pineapple sprigs of various sizes
After the accidental discovery, I started pressing more varied shapes from the one sprig mold.
sprigs waiting to be attached
I was happy with the resulting forms, but I have a difficult time saying no to texture, so I tried out a new ball stylus tool and then went overboard.
time-lapse of ball stylus texture application
I recently saw a call for an upcoming exhibition called "Pour it On." After I started using the ball stylus to overdo the background texture on the pineapple pod, I thought of this call and how my abstract sculpture usually ends up fitting into the overall category of "pouring on" the texture and color.
bottom end of the pod
I spent several days on the surfaces of the pods, though the forms took very little time. I textured the lower end opening with the ball stylus, but wanted to change the texture on the top end.
top end of pod, partially textured
I left a hole in the middle of the top because I am thinking about having the support rod go all the way through the center of the form.
I took this video with my phone. It should be horizontal, but I don't know how to change the orientation!
I took several time-lapse videos of my process. It was tricky to get a video of the needle tool texturing because both times, though I held the camera horizontal, the video ended up vertical. It's also tough to hold the camera and use the needle tool at the same time.
three pods complete
I've finished four of the pods, but I think I want to make at least five. I'm hoping to get these in a bisque kiln early next week and throw the last couple forms next week too.
A Google image search for "Russia" brings up maps and Saint Basil's Cathedral in Moscow. What more beautiful way to represent the country visually than with this beautiful building?
One of my goals this summer is to create more protest bulbs. So while I've been waiting on other things to dry and fire, I've been brainstorming, forming, and decorating the bulbs. I've got plenty of ideas of what topics I want to cover, but its been more difficult to come up with imagery to address those topics.
my jar of inspiration imagery (from spring)
It is important to me that the bulbs be clear in their references, but I don't want to replicate memes. I do want impactful imagery, but I want to leave some room for the viewer to interpret that imagery themselves. The bulbs I created in the spring did this, at least to some extent, with imagery that referenced contemporary problems, but didn't necessarily proscribe a partisan solution or interpretation.
The original idea for the bulbs was, firmly, a reaction to the problems I see as resulting from the current administration. However, thinking critically about these problems over an extended time and with a view to incorporating image references in my work, my view naturally has expanded to some broader issues and to some fundamental questions about contemporary American society that go beyond the current administration.
There are systemic issues in our culture and our institutions that predate the current administration and predate my entire life. Awareness of some of these issues seems to have increased in the last few decades, but those decades have coincided with my adult life, making personal awareness difficult to extricate from national awareness. Some of the most important issues that I think of when considering the problems of contemporary society include police violence against people of color, institutional racism, the influence of money in politics, and the increasing gap between the very rich and the rest of the population.
Flint (haven't figured out how I'm going to show the water is polluted rather than just water)
The current administration has brought out into the open racism and misogyny in ways that were more hidden in the recent past. It has also directed our attention to questions of corruption. These are real issues and I want to address them in my work. I also think it can be too easy, particularly in representing issues in imagery and in small pieces, to focus on the straight-forward and extreme events and to direct these images to a partisan audience.
protest march
The work I am making now could easily become meme-like because of its scale and because my conception of the bulbs as individual pieces working together in a larger group. Like memes on the internet, the bulbs are not meant to have a correct order and can be mixed and rearranged. Though I think it would be interesting to explore the language of memes in this format, that is not what I want to do right now.
Protest Bulbs at Larson Gallery (July 2017)
On the fourth of July, NPR tweeted the Declaration of Independence. Later that day or the next, I saw several articles about how people reacted to the tweets: specifically, some people apparently didn't recognize the source of the 140 character fragments and assumed that the references to the various things the king did in 1776 were contemporary references to the current president.
Declaration of Independence and bulbs in progress
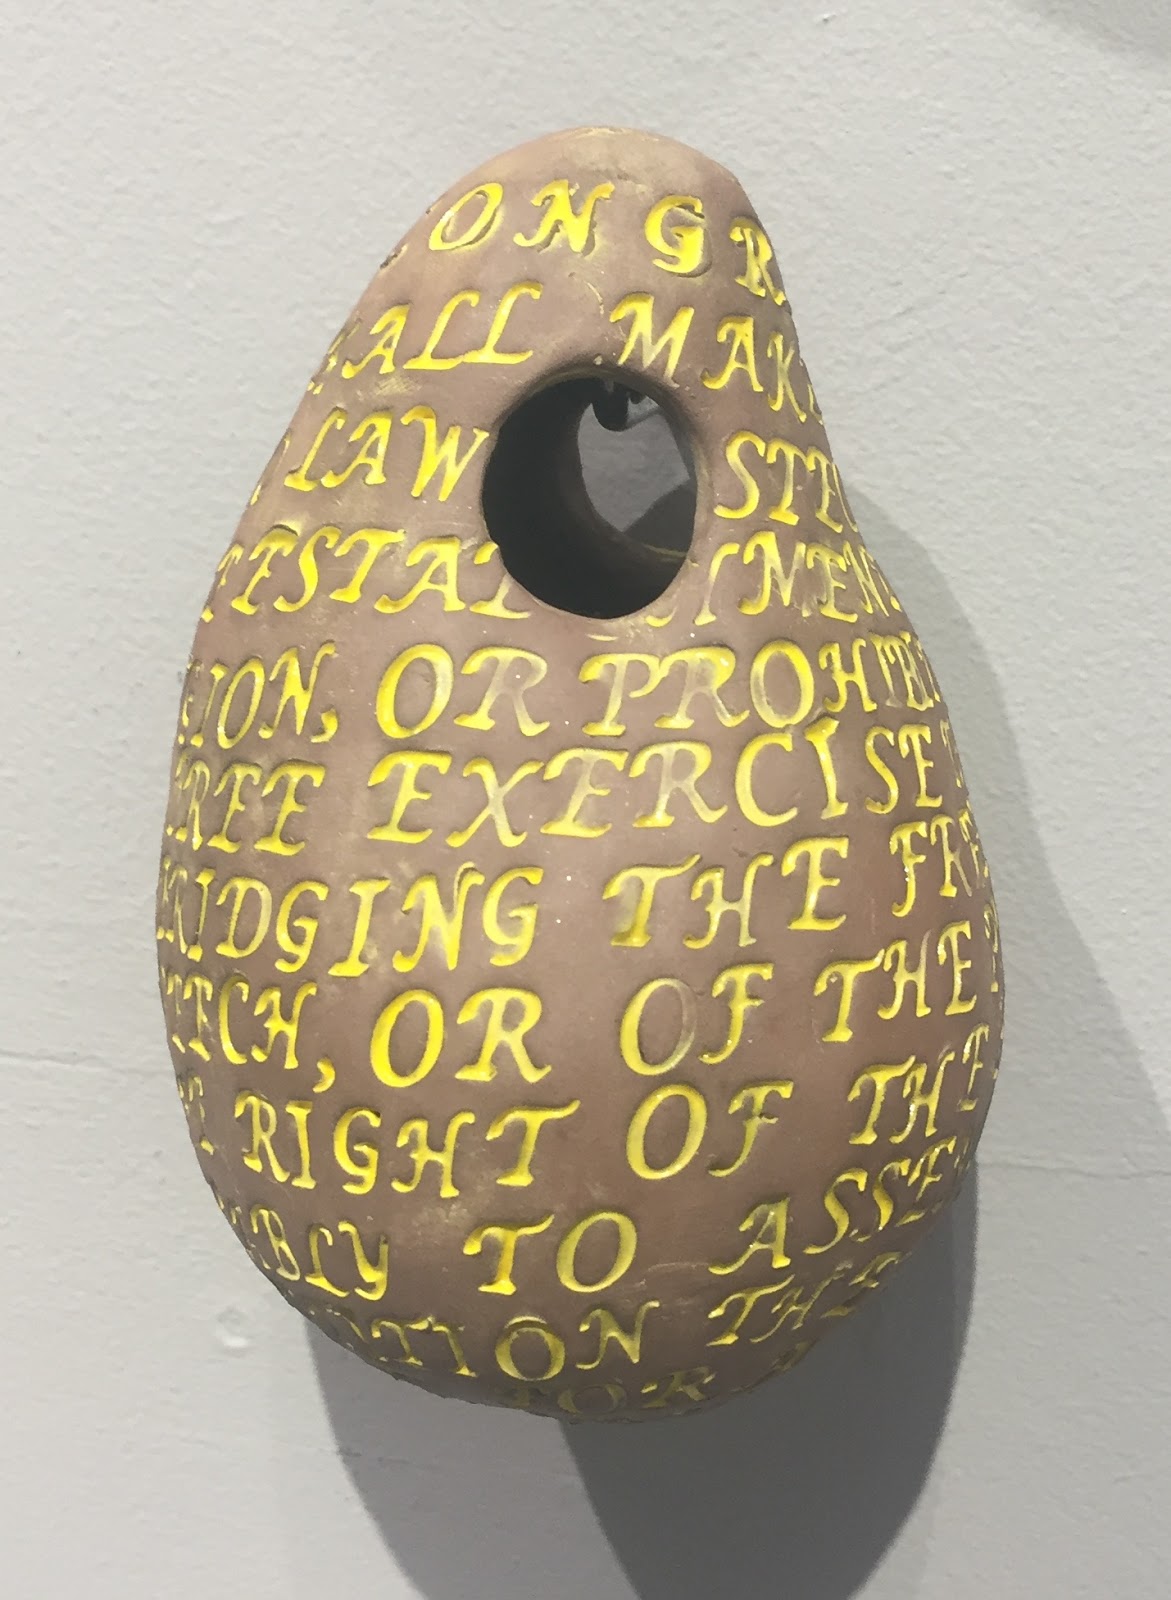
I had pressed the text of the first amendment onto the surface of some bulbs for the earlier iteration of protest bulbs and I like the visual. I've long been interested in the use of text as pattern and decoration, but haven't always had something to say. I decided to press the text of the Declaration of Independence onto some bulbs, both as a reference to the NPR Twitter strangeness, and as a simple reference to the founding of our country. #civics! With this dual reading, I also want to consider calling the pieces and the eventual installation "Patriot Bulbs" rather than the more prescriptive "Protest Bulbs." We bring different assumptions about content based on one or the other title.
Declaration of Independence bulbs
To get started on the text project, I printed out a copy of the text and sat down for the tedious process of pressing the text into bulbs. I figured it would take about 30 bulbs to contain the whole thing. It took 21, but was significantly more tedious than I expected. I almost dreaded sitting down to press the text. I sat on the floor so I could leave the letter stamps out and organized. After I finished and cleaned up, the rug still had traces of the red clay in the spots where the frequently used letters were kept.
The red clay from my fingertips left traces on the carpet where I picked up each letter.
Would you recognize short fragments of the Declaration of Independence, isolated from the whole and out of context? How many of us have read the whole Declaration of Independence? Recently? I read each section as I pressed the text into the bulb, looking for those sections that led to negative reactions on Twitter. I don't know that I'd ever read the Declaration in its entirety before. I could see how some references to King George could seem to relate to the current president, but what I was most surprised by was the section relating to Native American people: "...the merciless Indian Savages whose known rule of warfare, is an undistinguished destruction of all ages, sexes and condition." Perhaps I am just revealing my limited memory of basic social studies, but I'm also fairly certain this language wasn't discussed in high school.
cutting the hole in a new bulb
While I pressed text into theses bulbs (over and over and over for days), I was listening to A History of the Supreme Court by The Great Courses. We take some things for granted, in our country today; one of those things is that the First Amendment applies to state laws, which is not specifically stated in the Bill of Rights, and another is that the famous phrase from the Declaration of Independence: "We hold these truths to be self-evident, that all men are created equal..." is true and it was only warped interpretation that led to it not applying to men with dark skin and maybe even women. Our society suggests that the founding documents are perfectly just and flexible enough to be applied to contemporary society despite the fact that our founding fathers had some warped ideas about freedom, equality, and democracy. It was jarring, to me, to examine the document more closely and find this offensive and hateful prejudice written right in to our initial bid for freedom.
homelessness
It is also surprising, for someone who hasn't read it all before (that I recall), to realize how crabby the Declaration is. Most of us only read or hear the first two paragraphs, which are fairly inspiring. But the rest is a list of grievances. It was interesting to think, then, in this project, of how these distinct sections read as individual chunks, removed from their textual context.
homeless man in progress
It also raises the question for me, as an artist, of whether the 21 text bulbs work together or separately, as part of this project. The bulbs, by nature of their shape, are not particularly easy to read, and there are now so many of them with text. The installation of abstract textured bulbs is meant to be read as a whole, where some viewers focus on one bulb or another, but no one is able to focus carefully on all 60 or 100, because there are just too many. Like faces in a crowd, they are meant to blend together.
abstract bulbs at Yakima Maker Space in April 2017
I embrace the idea of the bulbs alluding to individualism, diversity, and difference and the collective democracy or "melting pot" of the (ideal) USA. The imagery I have been working on this spring and summer works well, to my mind, with this overarching idea of the individual in the group. With so many text bulbs, it is not feasibly for a viewer to read and understood all of them or all of the text together, but I think it might still be feasible for them to work together with the entire work and support or contrast against the imagery. Individuals may stop to read some text on some bulbs. What they notice in the text might be the familiar or the less familiar text.
First Amendment bulb at Larson Gallery
I didn't carefully control the spacing and legibility of the text or individual phrases or sentences. By cramming the whole document onto 21 bulbs, I didn't force jarring phrases, such as ones that seem to apply to the current president, to be isolated on their own bulbs. Perhaps I should have. I also didn't avoid juxtapositions that may show up in display. I made some discoveries in the development of this work. I suspect the work installed will tell me more about what it is, but I also look forward to talking with people who see the work without knowing what to expect or what I was aiming at.
bulbs, including two text bulbs at Larson Gallery
Since I finished the text bulbs, I am back to working on the imagery heavy bulbs. Among these bulbs are more clear and more ambiguous bulbs. Hopefully they each represent something about our culture. Though my slant is more critical than not, I've changed the working name of the pieces and the group to "Patriot Bulbs" and I want to critically consider how the imagery represents the country as a whole.
wet decal, wrinkled, just after I slid the paper out
At NCECA in March, I bought some glaze decals with which to experiment. I haven't used them before, but I kept seeing them everywhere and was curious. I bought a sheet of cats and some Ernst Haeckel-esque images.
cat decal sheet minus the two I used
I didn't have much of a plan for where I was going to use them, but I figured you can put a golden cat on any old mug and the biomorphic designs would fit in with my work generally.
one of two Haeckel decal sheets
The decals are pretty easy to use. You soak them in warm water, then place them on the glaze fired pottery. Then you slide the paper out from under the image. You're supposed to use a tool to press the bubbles out from under the decal. I used a rubber rib and, as long as it was wet, it worked well.
pressing out the wrinkles/ air bubbles in the decal
After firing, the cats seemed to lose their faces and their feet. I don't know if the fading has to do with how they were applied or how they were fired. I don't actually have the instructions for the decals, but I put these in a cone 06 firing with some other stuff. Perhaps these shouldn't be so hot.
faceless kitties
I applied the cats on a flawed jar left over from my Yakima Rotary commission. I like the cats looking up at or through the blue slashes. Next time I'll fire the cats to cone 08 and see how their faces fare.
Haeckel decal after firing
The other decals worked just fine. I applied them onto an already fired jar. I had fired this jar last summer with some cone 6 celadons. The decals don't exactly go with the jar, but they're more interesting than the jar was on it's own.
cookies!
The jar, as it turns out, is an excellent size for cookies, though once I realized it was a cookie jar, I needed to make some lids. I've since thrown a few lid options, but they haven't gotten into a glaze firing yet. The cookie making schedule and the flies combined to require the lid be used before firing.


