Saturday, July 30, 2016

Glazed Mugs for Storytelling Show

I used pencil to plan the mug decoration

Thursday I glazed. All day. I had to work hard to keep myself focused. I had 13 bisque fired mugs and I got them all decorated and glazed in one day. That doesn't sound as impressive as it feels.

Then I drew in the outlines with black underglaze in a slip trailer

Glazing took a little longer than usual because I actually needed to plan the decoration. These mugs are for a show at Boxx Gallery in Tieton featuring "storytellers". My idea is to keep the decoration similar to other cone 6 pieces I have done this summer, but make it sequential.

some of the designs use multiple colors for the "story"

I had sketched some ideas earlier this month, while I was waiting in the doctor's office, but was procrastinating getting them on the mugs. The idea for each mug is based on my slip trailed dripping balloons that I've been playing with this summer and last. In these new storytelling designs, the balloons move and change or other simple drawings interact with the balloons.

here you can see my slip trailer bottle and a design with a bug

Each mug has a different "story" told around the mug. In some, the colored balls fall from the strings down onto leafy stems. Others have the balls move around the cup or up and down in boxes and on strings. I have a bug that eats a balloon and another bug that was the balloon. I also have some plants that shoot stuff at the balloons.

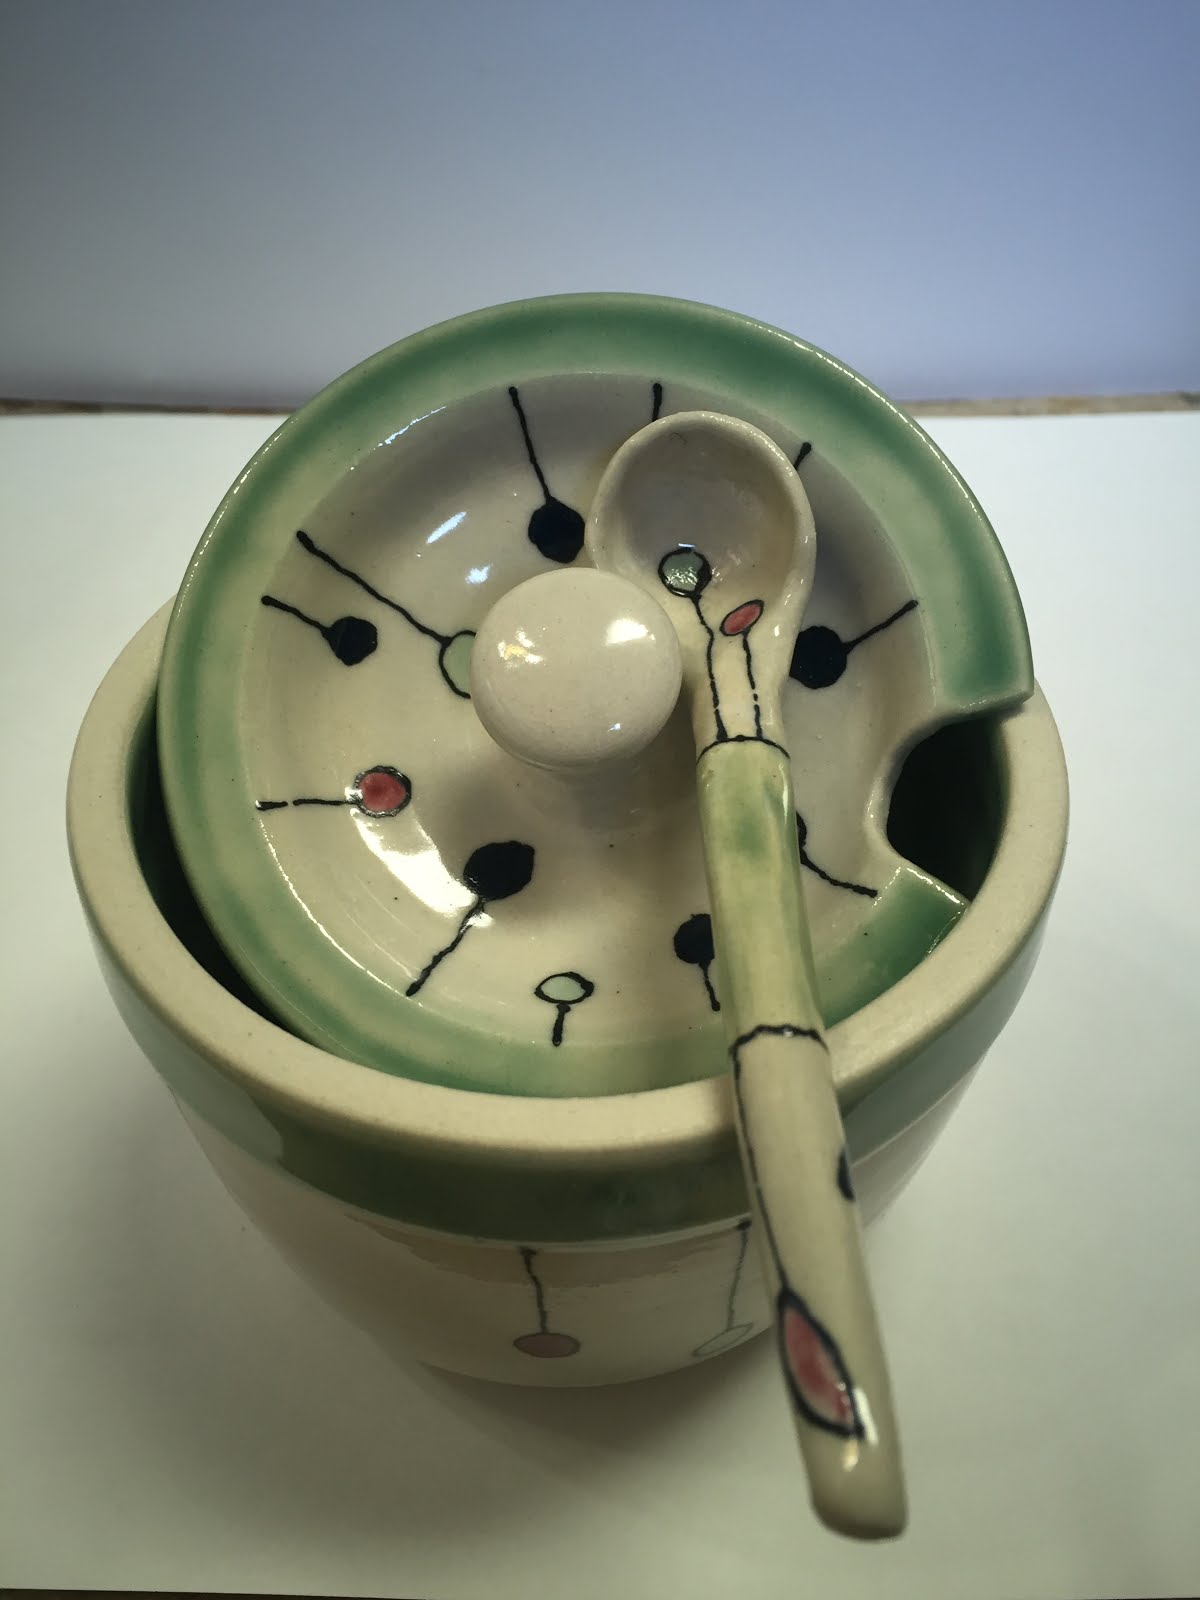
these mugs have the decoration, interior and rim glazed

Each mug has a black slip trailed outline and uses green, blue, and/or pink celadon glaze for the action and the interior and rim. A few have decorations that interact with the handle.

here you can see the finished glaze colors (foreground, right)
I know what to expect from my glazes, but some of these decorations are more complex than I've done before, so I'm hoping everything looks okay once it is fired. I sometimes fire the slip in place before glazing over the top to prevent smearing, but I think I avoided trouble this time. However, I may have misjudged the thickness of the glaze on some of the early mugs before I switched brushes.

these mugs have clear glaze over the decoration

I hope to have these guys out of the kiln next week or the week after. The best looking selection should be going to Tieton to Boxx Gallery for an opening August 27.

Wednesday, July 27, 2016

Sitting is Difficult

Apparently I've been having trouble sitting in my studio this month. Earlier this month my throwing stool suddenly, and for no apparent reason, broke while I was sitting on it.

broken stool
Then this weekend my tall chair seat ripped when I stood up. Hmm...I did have a lot of cookies this weekend...

ripped canvas seat
Luckily, I have two of these tall director's chairs and the other one had its canvas seat replaced a few years ago, so I was able to resume sitting in the studio almost immediately.

did someone ship me a star? just what I've always wanted!

After a few e-mails, a week of waiting, and one follow up call, the stool company finally decided to send the replacement chair base. I was inordinately pleased by the way they chose to package the stool base for shipping. I'm guessing the packing people enjoyed this, too.

friendly wall pieces waiting for their firing

Despite the trouble I've had maintaining a fully functioning seat, I did manage to finish some work in the studio. I finished a few small wall sculptures last week and this weekend. 

lidded forms, ready to dry

This week I threw with the repaired stool and was happy to discover that my previous inability to throw was temporary. Either the new stool or a change in a variety of other factors (clay, mood, wedging, weather...) got me back to normal.

handles that don't annoy me.

I'm not sure the stool can account for my handles going better than last time, but pulling handles was noticeably more effective this week than last time. I was a little more careful in preparing my clay for throwing, but even that shouldn't have had any impact on handles, since I prepare them the exact same way and used the same type of clay.

pitcher/creamer form, pre-handle

One of the reasons I chose to throw again this week was to make a new creamer to replace one in a set that was ordered earlier this year. I am also considering using some of this weeks mugs in place of the ones I threw two weeks ago. 

you can see how lazy I was, I didn't switch out my throwing water when I switched from red to white clay

I usually trim pitchers or creamers on a chuck, but I hadn't prepared one and didn't want to. I was using my Giffin Grip in combination with a sponge to trim my lids and I thought I'd try a similar trick to trim my spouted forms. I was mostly being lazy, but I found that using a folded washcloth, in combination with the Giffin Grip worked pretty well.

Saturday, July 23, 2016

Small Sculptures This Week

small wall sculpture with gears
This week I worked mostly on some small sculptures and some important but boring steps for my Art on the Wall piece.

end of same wall sculpture
I threw some pieces at the start of the week and the throwing went ok, though I was using recycled clay and my broken stool. I've ordered a new base for my stool and I was hoping to get it before I was ready to throw, but they didn't actually ship it until I called Thursday to ask about it.

wiggly rim form for Art on the Wall (with stamen-like addition)

I have been thinking about using concave (bowl) shapes with wiggly rims in several ways on my sculptures this summer. I have some in the works for Art on the Wall. This week I decided to try some as surface decorations of another form.


adding half-bowl forms to surface


I cut the wiggly rimmed shapes in half and attached them to the side of a form. The piece isn't quite finished and will have some non-ceramic stamen-like pieces coming out from the wiggly rim pieces, but I'm not as excited about this particular piece as I might have been.

half-bowl decorated form (maybe I needed more half-bowls)

Part of the reason I started small pieces this week was to take care of some partial pieces that have been sitting in the studio for a long time. My husband built a metal piece for me to use quite a while ago and this week I started building a form for this piece. 

 
top form and base for my husband's metal assemblage

The nice thing about working at a small scale is that it gives me an opportunity to work quickly through a few ideas. Some of the pieces I made this week will also serve as replacements for my wall installation which has had some turnover since it was on display in Seattle last year.

a third, incomplete wall sculpture

Tuesday, July 19, 2016

Lidded Jars with Spoons

lidded jar with decorated ceramic spoon

This week I glaze-fired some functional pieces, including some lidded sugar bowls with spoons.

glazed spoons before firing

I've seen a lot of clay spoons this year online and even in my classroom. I'd never made a clay spoon, so I thought I'd try it. They're pretty simple to make, though I haven't really tried picking up sugar with them yet.

ladle style spoon and sugar jar

I made a few different styles of spoons, including one that is shaped more like a miniature ladle so that it can be pulled straight up out of the sugar.

two lidded jars with different shaped spoons

I made several different jars with more or less similar lids. I'm fairly happy with the lids and jars as I threw them and the slip trailed and celadon glazed surfaces. 


knob'n'all style jars

I made one real mistake, and that was not firing the lids on their bases. I usually do, but the knob'n'all pieces were going to be a little fussy to fire together because of the lid flange which would have touched the glazed interior wall. A sophisticated solution would have been to wad the lid up off the base and fired them together. I took the lazy route, fired them separately, and now the slip trailed decoration on my blue lid don't line up correctly. 


book decorated vase/cup/jar

I also tried out a new slip/glaze decoration on the bottom of one piece. The colorful rectangles on the bottom are meant to represent books. I haven't decided if I like the books yet. 

I'm happiest with the lid fit and spoon fit on this sugar dish

I may make some more similar jars next time I throw. I tentatively agreed to make a matched set for someone who requested one, but I also have a couple other things to finish up in the near future. 

Thursday, July 14, 2016

Bad Throwing Day!

last week, everything's going great

Last week things were going great. I was very happy with two of my sculptures and I finished building on three pieces. I was feeling good about my work. And then I remembered another commitment I had made for the summer. And then another. See, working in my studio at home can mean a few things and I approach them differently. My favorite thing to do is to come up with a new idea for a sculpture, build it from scratch and, eventually, finish it. I also feel pretty good about finishing work that is in pieces in my studio from last summer.

blah cups

For some reason, when I am not in my studio, or when I just get back into it, other projects seem reasonable as well. At the start of this summer, I made a bunch of thrown pieces for Yakima Rotary. It was a nice way to get back into the studio for the summer, it went fairly quickly, and the stuff is done and delivered. But two weeks is about all the functional throwing I can tolerate happily before I want to build up and out and non-functionally.

the look I was going for

So these other commitments: both are more restrictive than building sculpture. One I agreed to in the middle of the academic year; I will be making something to do with metal for the Art on the Wall exhibition at the Fourth Street Theatre. The other is a set of thrown mugs. 

argh!


I thought, for some reason, that I could just quickly throw the mugs in a few days and have them done in a week and a half or so. I threw most of the commission pieces in a few days. But, apparently, after doing the commission and the sculptures, I forgot how to throw. I had a terrible throwing day on Friday. I had trouble centering. I had trouble with air bubbles, I had trouble with just about every step of the process. It was incredibly frustrating.

grr!

I tell my students that some days you just have a bad throwing day. It's true, some days are just like that. But it is a whole lot easier to tell someone else that bad days happen than it is to accept that I am having a bad day.

harumph.

It is possible that a couple of things impacted my throwing. My throwing stool randomly broke last week while I was sitting on it. On Friday I used the stool for throwing, but with the casters taken off and that meant I was seated lower than usual. Sometimes sitting at a different height, or in a different position can contribute to a bad throwing day.

handles I tried to pull, that wiggled and cracked and bent and annoyed me

I also made some adjustments to my clay while I was preparing the clay. Because I cut apart the clay and put it back together, I may have introduced air pockets in the clay that turned into annoying air bubbles in the walls of my pieces.

too-dry handle and sloppy attachment

There are any number of things that might have contributed to me being stressed, tense, distracted or otherwise "off."  Sometimes the best response is to take a break. I scrapped several pieces from this project, but I did manage to throw about twelve cylinders. 

the sound of this handle is "thunk" (as it hits the bat)

Much later that day I pulled handles, badly. I took a break for a couple hours and came back to clean off my wheel and get the handles ready. I had left throwing water in the splash pan and the clay had settled at the edges, forming a strangely stiff, crumbly silt ring around the splash pan. It got me wondering if the clay was a little weird, too. But, I don't usually throw with porcelain and I don't usually leave a dirty wheel for a couple hours.

the little handle is ok

I managed to pull more handles than I needed and not all of them were awful. I left them covered until Saturday afternoon when I attached them. Of course they were drier than I intended. I had originally planned to throw in the morning, pull handles and trim after lunch, then attach the handles in the afternoon. Waiting a day stiffened up the handles more than the mugs. I was able to attach them all, but I'm not excited about any of the handles I made. 

meh

And, sadly, some days are like that (even in Australia).

Tuesday, July 12, 2016

First Summer 2016 Sculpture(s) in Progress (3 of 3)


top of this third sculpture (a similar form to those on the most recent large piece)

I was working on three sculptures for the last week and a half. I wrote about the others last week. The third "first" piece is smaller and simpler in form now, though I plan to attach some more non-ceramic elements once it is colored, glazed, and fired.

working on texture and sprigs


I didn't alter the form much from how it was thrown, though I added sprigs and texture. The piece consists of two ceramic forms now, though there will be some ceramic pieces added later that haven't been built yet.

bike part additions temporarily in place (and lighting fail)

To be honest, this piece got less of my attention last week. I got a little distracted when I was reminded that I agreed to make a piece for a show at the Fourth Street Theatre at the Capitol Theatre. I have spent this week under-glazing for the metal themed piece that I plan to make for the Art on the Wall exhibition.

my barely-started "metal" piece for Art on the Wall

I will get back to the small sculpture after this other piece is farther along or while parts are in the kiln this week. 
first small sculpture of the summer--incomplete


Thursday, July 7, 2016

First Summer 2016 Sculpture(s) in Progress (2 of 3)

the top of this sculpture, in progress
Earlier this week, I posted images of my first sculpture of the the summer, but this week and last, I worked on three sculptures concurrently. This post shows my progress on another first sculpture of the summer.

thrown forms for this sculpture

I work on several pieces at the same time because it is more efficient. I like to throw pieces in one day and then clean up my wheel, so I throw about 25 lbs of parts, and then build with those parts for the next week or two. After I build on it for a while, a piece usually needs to stiffen up a little before I can continue building on it. Having a second or third form to work on allows the first piece to set up while I work on the next.

the simple base of this sculpture with bike parts
I've had an idea for the top of this piece since May. On a walk to school, I saw a plant that had closed buds on one side and open flowers on the other;  it got me thinking about a similar contrast of forms on a ceramic sculpture.

inspiration flowers

I made the closed and open forms, first. I didn't take many pictures because I was generally using both hands for these forms. I threw closed bulb shapes for all ten of the forms, then sliced half of them open and incised lines in the other half.

an open bulb in progress

Then I built up the split base using coils added to a simple thrown form, I split the form and coiled the two knobby parts closed at the top. After these knobby parts and the base set up for a few days, I added the closed and open forms on top.

 
the base and top sections with and without bulbous additions

The closed forms were attached on one side first, which made the whole piece a little tippy on the banding wheel. I attached the open forms on the next day and the whole form is most stable, though naturally the sculpture is a little top heavy now.

bulbous additions (open and closed) in progress

Each side of the top has five bulbous forms altered to represent closed and open buds. There is a space in the inside of each set of bulbous forms that is open and was smooth and plain after I added the bulbs. 

closed bulbous forms
Later, I decided to add some texture inside both interior spaces. It was fairly easy to add small sprigs in between the closed forms, but adding them in between the open forms was tricky because my fingers couldn't reach. I ended up dropping the sprigs inside and then attaching them with a rubber tip tool. 

sprigs inside the closed form
The base of the sculpture is fairly simple in form. the focal point is naturally the large top section, but I seem to be incapable of not decorating a surface.  I ended up using three types of decoration: gear sprigs, impressed stamps with a swirl pattern, and round plain sections meant to hold on some bicycle parts.

 
base and base detail

The addition of bicycle parts will naturally complicate the base section. I haven't entirely planned how this will look on the bottom yet.

crack repair and support with fabric

Just as I was finishing the texture inside the bulbs, the sculpture developed a small crack at the split between the two top bulb sections. I should have known this would happen, look at all that weight on either side of the base. I should have made the transition more gradual, reinforced it better, or used some external support armatures. Since I didn't do those things, I decided to tied a strip of cloth around the heavy sections, reinforce the seam from the top, and hope for the best.

sculpture selfie (the lighting is better facing into the studio, but taking pictures that way is tough)

The end result may be that the piece redevelops the crack during drying or firing. I'm keeping in mind the conversation I had with Beth Cavener last summer in Montana. She was working on a sculpture that she had made in pieces because she wanted to attach the front paw after firing so that she could control the position. Previously I have heard her explain that she attaches the fired pieces together, but I challenge anyone to find her seams. I've also used epoxy quite a bit with my bike part pieces. I can use it on a seam too. (In fact, maybe next time I should build these two parts separately and attach them once they are fired. They'd fit in the kiln more easily.)