Wednesday, December 27, 2017

Nesting Cats, Done

cat family

Somewhat to my surprise, I got the stacking cats done before Christmas. And, on the bright side, most of them can stack inside one another, more or less.

bowl of cats (drying after their post-grinding bath)

After the bisque firing I was very disappointed in the cats. I had tested all of them for fit before leaving them to dry, but somehow, most of them warped during drying or firing. While they all can close just fine, most of them didn't fit inside one another as well as they did before firing. 

cats and interiors

I was able to use a Dremel to sand down most of the cats to fit better, but the biggest one is way, way off. I'm confused, because I checked the fit on all of them and I remember the big one fitting really well. I suspect that I was tired and either used wetter clay for the big one (so it shrunk more than it's fellows as they all dried) or I simply measured with the wrong interior cat. Darn!

snow cat

After I ground the cats down a bit, they fit okay, but need some careful handling to go together. The ears are probably the biggest problem with fit, but the cats are snug on their bellies, too. Though I made these for a 4 year old, they aren't really the best design for a 4 year old, since they are hard to put together. Hopefully the 4 year old will be patient with his aunt's attempt.

moon cat

I applied underglaze colors for the cats. The color of the outside of the cats matches, more or less, the color of the cats in the Kevin Henkes book. I had intended to highlight the whiskers, eyes and mouths, but simply ran out of time and energy.

rain cat

I also used his book illustrations for inspiration for the interiors of the cats. The smallest cat that opens has a dark interior with a white circle for the moon. The next smallest cat has rain inside, though the colors don't quite match the book. The next largest cat has snow, more or less, and the largest cat, the one that is too small, has butterflies inside. I recommend reading the book, if you'd like to know why I chose these interiors. 

butterfly cat with whiskers and eyes done by my daughter

If you'd like your own set of stacking cats, you'll have to look elsewhere because I won't be doing this again (unless my nephew asks me to).

Monday, December 25, 2017

Making Gifts

odd ball dishes that I threw before coming up with the plan to include textures for underglaze inlay

Once the quarter ends, I always think I will have time to spend reading and chilling. Instead, I usually fill up all the available time with new projects, like recording 50 videos and making sculpture examples for class, or like building a set of stacking cats and throwing dishes for gifts.

plates in progress


This December my over-ambitious time suck was making plates and bowls for my brother. Possibly this idea started out as a birthday gift but I quickly passed the time that would be appropriate for birthday. I have now passed the time that will actually get these to him by Christmas.

re-enactment of what my brother does with the dishes I made for him

My brother informs me that, like our family, they have been breaking the dishes I made them years ago. Apparently there's some sort of family competition for breaking pottery. My daughter is all-in on the competition, but she keeps breaking the pyrex bowls instead of the ceramic dishes. I'm ok with her approach, as more of our dishes are made by people besides myself and therefore harder to replace.

big plates with blue, purple and blue underglaze decoration

Anyway, I decided to replace some of my brother's dishes for Christmas. I took a day to throw, half a day to trim and then I figured the glazing would be pretty fast. I'm not sure why I thought this. Apparently because my time estimates are just way off when it comes to what I can make and how fast. This is a chronic problem that is most noticeable in December.

trimming plates = more fun than glazing plates

On Monday, a week before Christmas (because that's how I roll) I spent over 6 hours under-glazing the dishes. I know how long it took because I listened to almost an entire audiobook start to finish while glazing today and the Audible app tracked my work time. 

three different size/shape of plates, notice that the set has only 3 of the smaller sizes because I already broke the others

I was trying to get the dishes glazed in order to fire them before traveling for the holidays. This is a bit silly, as I am unlikely to want to carry a bunch of dishes on the plane, and neither is my brother, but I did want to get the cats done in time for the trip and the plates and cats were going in the same kiln.

the bottoms don't match = fun!

I painted underglaze on the tops and bottoms of all the plates and the interiors and exteriors of all the bowls before bisque firing (because occasionally I do plan ahead). I then intended to apply a contrasting color to the indents and lower sections of all the plates and bowls followed by a coat of clear glaze.

the smallest plates

While I was throwing this seemed like a good idea. Several hours into underglazing the bisqueware I was convinced this was a terrible, horrible idea and the results would make me want to move to Australia.

the wacky not-matching dishes

When I unloaded the kiln, I was really happy with the results and stayed that way until halfway through taking pictures. I wanted to get pictures taken before leaving to see my brother so I could show him what he'd be getting (he doesn't need it all, so he can choose favorites). 

I enjoy throwing bowls, bowls, bowls

I decided to go to the trouble of getting out my photo backdrop and table and stand and taking semi-careful pictures. I'm glad I did, though I drew the line at getting out my tripod and camera and just took cell phone pictures because I know for a fact that I should not be allowed to try to upload pictures on the same day as I plan to travel. I am already on technology time-out after an incident involving iTunes and a significant amount of foul language yesterday.

these bottoms don't match either

Joking and travel/holiday related anxiety aside, I actually am pretty happy with the results. Ironically, they look very different from what I planned. The colors faded and darkened in ways I didn't anticipate. My fears about how they would look around hour 4 of glazing were proven incorrect--to my relief.

the inside is only one underglaze for these little bowls---and my favorite

I am still not getting them to my brother by Christmas and I may even take some better pictures when I get home (yeah, that's not going to happen--Winter quarter starts January 2, so my brother will be lucky to get the dishes in January). I plan to grind down a few stilt marks, do a quality check, and then send on his favorites via UPS or something. Unlike the stacking cats (see this space later this week for an update on the nesting cats), these dishes I might actually make again.

my favorite to throw and to glaze
And now, with the dishes staying home, and me leaving the state, I should be able to avoid starting any ridiculous projects this week. Merry Christmas, everyone!

Wednesday, December 20, 2017

Building Solid for Video

the ear was moved between the first and the second picture to be placed more accurately

Last week I spend three days on videos for flipping my hand-building class. I demonstrated a whole range of things, from rolling slabs, using the extruder, and using coils to glazing and clean up.

the armature, pulled out the the partially disassembled bust

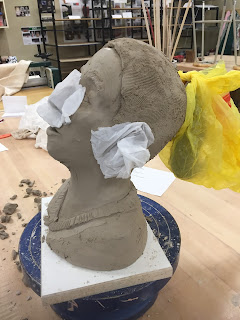
Several of the videos I did for my flipped class video project showed the process of building a human bust on an armature. For the videos, I demonstrated all the steps starting with showing some armatures and explaining how to set them up. 

the head after eyes and lips were partially shaped

In separate videos, I demonstrated how to build up the thickness of clay on the armature; how to shape the head, neck, and chin; how to plan for the position of the eyes, ears, and mouth; how to make a reasonably convincing eye and add lips and ears; and how easy it is to adjust incorrect positioning and size.

the ponytail, nose, and ears were covered to facilitate slower drying

On the second day, after he bust had dried some, I demonstrated keying and cutting the bust apart; hollowing out and measuring the wall thickness; and on the last day, putting the pieces back together and repairing the seams.

the bust ready to be cut apart

This is always a tricky demonstration to do during class because it requires timing and requires me to work ahead of the students. I need to build wet, but then the piece needs to dry to about leather-hard on the outside before cutting. The interior is still wet, so it can be scooped out. It takes some time to scoop out all the wet insides and then the piece needs to be put back together. 

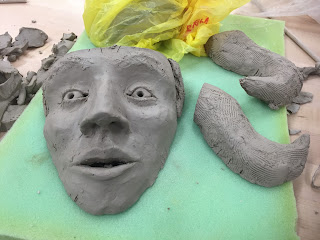
cutting off the face to reveal the armature

For the demonstration piece, I built up the armature the day before the first video, then set up a second armature for the first video and started on that one. But after the first video ended, I switched to my prepared armature to save time. The next video showed shaping the head and face. Then, with the camera off I did some more shaping between videos. I let the bust dry between day one and day two.

cutting out the extra clay of the head

On the second day I cut apart the head and thinned out the top section and ponytail, but carved out the rest of the bust off camera. It took me most of the afternoon to finish carving out the bust and put the bottom sections back together. 

the face and ponytail, cut off

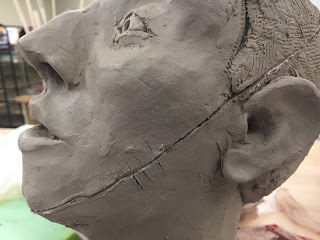
I saved the top section and ponytail to put back together in the last two videos. In the videos I talked about how to clean up the seams and demonstrated on one or two, but I spend another hour on Thursday actually cleaning up all the seams.

the face and ponytail hollowed out and the head waiting to be hollowed

It was important to do my own videos of this whole process because I wasn't able to find what I needed online. The demonstration videos that I've been able to find online don't start simply enough for a beginning class and don't talk enough about drying, measuring thickness, and putting the whole thing back together.

the armature revealed

I haven't viewed my completed video demonstrations yet, but I think each was probably in the 5-10 minute range and there were about 8 videos total for this process.

the bottom of the bust looks a mess before hollowing and clean up

That's a lot to watch in one sitting, but the length of the videos means that students can break those up and watch them one at a time and when they are ready for them. They can also rewatch, slow down, stop, or skip to the sections they need, unlike with a live lecture where the clay might dry too much or not enough to show a particular technique or part of the process again later.

the neck scored with slip in place before putting the ear and chin section back on

I enjoyed building the bust, but I was torn between wanting to get the thing done and wanting it to look good. I compromised a bit, not just because of time, but because I'd like to keep the bust in the studio as an example.

 
the inner seam of the neck, before and after smoothing

I know from experience, if the finished work looks too good, it sometimes wanders away. Luckily this one will be big and awkward to carry.

the keys on the cheek help me get the pieces back together correctly

The last solid built form I made (start to finish, usually my demos are not completed because of time) for the studio was a small Maneki Neko (lucky cat) and it hasn't been seen in several years. I suspect it was too cute and now lives with some previous clay student with sticky fingers.

the piece ready for the last day videos

Saturday, December 16, 2017

Flipped Class Format & Results

This has been an incredible busy week! The quarter ended last week and grades were due Friday, but I decided to take on a fairly massive project over the break. This quarter I "flipped" my Functional Pottery class and next quarter I plan to flip my Clay 1: Hand-building class.


Flipping a class, if you aren't familiar with the term, means that students spend class time doing and homework time watching or preparing. My Functional Pottery students who chose the "flipped class format" for homework this fall watched throwing demos online in lieu of watching me demonstrate the same techniques during class. A few students students chose to watch both my online videos and the live demos.


I'm sure sometimes students skipped the videos, but this was a particularly strong quarter for Functional Pottery and the students produced particularly strong work. One of the ways I knew that students had watched the videos was that I could see them doing the techniques demonstrated in the assigned videos. Because I didn't have to demonstrate everything live during class, I was able, instead, to watch students throw and help them, individually, to improve their techniques at the wheel.


Even if I demonstrated for some students at the beginning of class, immediately after I finished, I could go see the progress of the students who flipped the class and were working during my live demo. I had very little trouble with students coming to class unprepared and I felt that we got more done during class time than in a typical class before flipping.


Before fall, I had been preparing to flip this class for some time. A few years ago I recorded video demonstrations for a whole range of throwing techniques. I spend a couple of days during summer break, all day for two days, recording the demos and then I spent some more time uploading and processing the videos. I labelled this blog post about my videos "tedium" because I was such a fan of the process. The process of getting the videos made was annoying, mostly because I had to clean my hands between every video to operate the camera controls, but also because I spent two solid days alone, talking to the camera, but feeling a bit foolish about it.


The video project from 2016 was also annoying because I had recorded most of the videos before. I was trying to make the videos look better, rather than creating something entirely new. I can easily see the difference between the videos from 2016 and the ones recorded in 2012, but the older videos weren't totally worthless.


I used the videos from 2016 and the ones from 2012 as supplements to my Functional Pottery classes, but this fall was the first time I officially offered students the opportunity to watch me on video and not watch the live classroom demos. Getting the flipped class set up took a bit more work. I had to collect the videos into playlists and make them obvious and accessible each week through Canvas. I also had to be sure that students understood what to watch each week.


One significant advantage of the flipped format is that I was able to supplement my videos with ones done by other potters. Instead of watching my quick demonstration of a variety of surface decorating techniques, for example, students were directed to watch other artists decorate their work using a wide range of techniques and taking more time than I have during class. Students could watch the entire technique or could speed up the video to watch just the parts that pertained to their work. Students could also return to any of the demonstration videos as needed throughout the quarter. Of course students could also watch other related videos that popped up on YouTube after the assigned videos.


After such a successful quarter this fall, I was excited to flip my other classes, but I was apprehensive about the amount of tedium and effort recording all my hand-building demonstrations would take. What I really wanted was some videography help. Sometimes, if you ask for help, you'll find that it is available.


So this past week, I demonstrated while a colleague, Kevin Hager, who works with our online classes, recorded the demonstrations for me. I had a list of about 50-70 things I wanted to record and I figured, based on how long it took last year, that we would need two solid days to record everything I wanted to do. To my surprise and delight, the process took much much less time than I anticipated. We were able to consolidate the videos down to about 50 by combining some things, but we also cranked through them in about half the time I anticipated it might take, in part because he could set up the camera while I set up the clay and tools.


We spent just the morning doing videos the first two days and had to return for about an hour on the third day because one piece needed to dry and be worked on before the final video could be recorded. In all, though, the process was significantly more pleasant than in 2016. It was still exhausting, but there wasn't the associated tedium and frustration with technology (specifically, with having to clean my hands before handling technology). I was also able to rely on a second opinion for how to compose the shots. My face probably shows up more frequently in the videos Kevin recorded, but I didn't have to make the decisions about where to focus.


The videos I did this week should be processed and online in a couple of weeks (folks are off for the holidays and I am getting some help getting the videos ready). I will need to spend some time before January 2 collecting the videos into playlists for class, but the goal is to allow me to have the students spend all their classroom hours working and some of their homework hours watching the demos they would otherwise watch during class time. I'm fairly excited about the possibilities for winter quarter, which is exactly where one wants to be, mentally, in December.


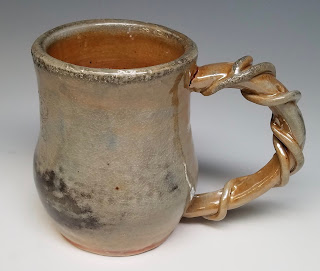
The student artwork featured in this blog post was all made in my Fall 2017 Functional Pottery class. In addition to the flipped class format, this quarter I also implemented a requirement for students to take pictures of their work after each project. They took these pictures using our new studio photo setup.