Sunday, September 30, 2012

A Beautiful Pairing: Ag Meets Art

I am making an artwork from a piece of old apple bin for a fundraiser for Larson Gallery. A group of artist from the area have taken pieces of apple bins, mostly 12" x 12" boards to make a piece that will be auctioned for "A Beautiful Pairing: Ag Meets Art."


I think the fundraiser promises to be fun, but I am most interested in seeing what other artists have done with the apple crate pieces they are using. A few artists had their boards done and on display at Larson Gallery's Membership Open House last week. To see an example of the board before and after an artist's alteration, click here.

I took a board and let it sit for most of a week before I decided what to do with it. I am probably going to use some of my leftover SRAM project pieces in the piece. (I can't imagine working 2-dimensionally.) I haven't decided how much I want the board to show. This project should be about the board to some extent but, on the other hand, it is really just a weathered board. I do have a number on my board, perhaps I should plan to incorporate the number into the design to connect my piece to the project inspiration rather than just using what's on my mind for inspiration.

the leftover SRAM pieces, before firing, resting on the board
the corresponding SRAM pieces as used in the bike part project
The leftover SRAM pieces I have in my mind or, literally, just sitting around the studio were extras I made to be used in my third, large SRAM piece. I threw red flower-like shapes and I threw some clay replicas of threaded metal bike parts.

clay pieces are meant to look like the metal bike part in front
fired SRAM pieces
Earlier in the week my daughter helped me cover the board with a semi-transparent layer of mulberry paper. This obscures the board but doesn't entirely cover the wood grain. It also makes the board less likely to cause slivers. The board I took has a partial crack in one corner which I didn't want to have become a problem for the structure of the piece. The back side has a couple other elements, like the heads of bolts or nails, that could be integrated as part of the visual elements of design I create.

the mulberry paper color is similar to the original board color, some text and grain is visible through the paper

crack on one corner
bolt end and bolt hole visible on the back side
The event is a couple weeks off on October 19. I suppose I will decide how to proceed before then. I will post pictures when I have decided.

Thursday, September 27, 2012

First Week of Classes

The good news is that this week I added about 25% to the large sculptures I finished this summer. The bad news is I finished one. I fired it this weekend and had to take slides in the middle of the week after class. I usually take slides early in the morning when the sun is rising, but the sun is rising after I go to school now, so I had to wait until sunset.


I guess I'm pleased with the piece, though I wish I had done something surprising in the interior. You can't see from this angle, but it is just the interior of the sculpture, visible until the sculpture bends and you can't see down anymore. I may still consider some alterations.


I have a few more pieces around the studio that are at some level of finished. I hope to get them fired during the school year but I'll need to sneak in time to do so. So far meetings and class preparation has essentially exhausted all my work time and my daughter's activities, cooking dinner and cleaning enough to keep the house habitable have managed to fill almost all my excess time this week.

sculpture still needs another layer of underglaze and over glaze before firing

whistle from...maybe January

I finished up some of my mini-sculpture or one piece a day project from the past spring. I have decided not to continue this project during the fall. Instead I have a rather extensive list of things I need to get done in the studio, like glazing most of the mini-sculptures, that I will break up into smaller bites. I will still try to set aside studio time every day or most days. So far this week I spent time in the studio on the weekend and Wednesday evening.

mini-sculpture project

I've also got a few odds and ends around the studio, parts of projects that I planned to or still plan to finish. I have a show next January (2014) for which I want to make 100 small forms. I could do them during the summer but I am hoping to make some progress during the year. I started them this past summer. 

leftover SRAM project clay pieces

 
I plan to make 100 of these guys

Saturday, September 22, 2012

SRAM the Third

Though I finished the SRAM pART Project early in the week and shipped out the piece for that project, I didn't finish the supports for the third piece until later in the week. This piece was the last I made and the largest and most awkward to fire (since my kiln isn't quite large enough for it to lay or stand unsupported).

Third SRAM sculpture finished with supports attached

This piece requires the SRAM supports to stand up. It was designed with this support in mind. I was thinking of the logical function for the bike parts and wanted them to be more functional than decorative in this piece. I made four clay bases for the support and had to alter the bike parts to fit in two of them at the right length and the correct angle.

"back" view of third SRAM sculpture

I had originally planned to make the supports removable for easier shipping, but I would have had trouble getting the red support to stay in the slot at the top if it were only epoxied to the base. I was also concerned that if I shipped the work in pieces, it would be difficult for someone to set it up correctly. I ended up epoxying all three supports to the main form and to their ceramic bases.

Third SRAM sculpture with four green pieces inside red thrown forms

Four bases that touch the ground or table makes this an unwieldy piece to transport. As I worked on the piece, more and more it seemed to grow and become more fragile with pieces sticking out at strange angles. I plan to enter it into juried show, but perhaps only ones where I can deliver the piece myself.

unfinished alternative without green parts inside red thrown forms

At the last minute of making the piece I was debating between leaving the four red circle parts open to show the orange base form and the bike parts or covering the openings with ceramic covers. I had made  several versions of the covers for this form and for the base of the gear sculpture (below). After I added the tall black bike parts, the red thrown forms no longer fit snugly on the bike parts. I considered using the extra red thrown forms to aid in attachment.

Gear SRAM base with different green "caps" on three protruding SRAM parts

I ended up asking my family for their advice and after answers from my parents and my daughter and some family friends, I added the green shapes permanently to all four thrown forms. Later my brother and sister-in-law and their friend recommended I leave the green parts off.

Gear SRAM Sculpture stacked on base

Though earlier in the week I photographed the gear SRAM sculpture, I didn't hadn't finished epoxying all the parts in correctly. I finished it later in the week and am still considering showing the base and the top section separately. Right now they simply stack and I do not plan to make their union epoxy-permanent.


Monday, September 17, 2012

Finished (sort of) with bike part project


I am officially "finished" with my SRAM bike pART project. I took slides digital-images-for professional-use this morning and I think I can start packing one piece today and ship it off tomorrow. However, only the one piece was actually done this morning when I took slides, I epoxied supports for the other two (back up pieces) today. 


First SRAM Sculpture
The first SRAM pART project piece will probably be the one I send (I haven't quite decided, actually). This one was done this morning. I took some images without the base, but the red piece ends up touching the table or ground and I this isn't what I imagined.


I will show it with the base because the piece is more sturdy on the base. I am mostly happy with the piece. Now that it is attached, the highest part reminds me of a beanie cap with a propellor. The pieces sticking out were meant to resemble stamen on a flower petal, though the scale is unusual. 


The piece has 4 black bike parts on the base, 8 red, yellow and black pieces decorating the lowest part of the form, 1 metal bike part as support for the red sprigged piece in the back and 4 blue and silver gears along the stem of that red sprigged piece. There are 4 round hollow bike parts on the low red attachment and 1 white bike part which is the attachment for the red part. Inside the flower petal are 2 bike parts with 1 green one supporting the red and chartreuse piece that comes out of the flower and 3 bike part "stamen" at the top for a grand total of 28 bike parts and 4 separate ceramic parts.


Second (Gear) SRAM Sculpture
I photographed this piece without a base at first. I might consider showing the piece like this if I don't send it in to the SRAM pART Project. It only has 8 bike parts incorporated (four at the top, three gears and a "support" for the pod at the bottom.  The surface is also decorated with sprigs made from small SRAM gears.


If I send the piece to the SRAM pART Project, I will add the base to increase the quantity of bike parts. The base as pictured below has 11 bike parts, though I have since added 2 more and will add another 1 after my epoxy has set. There are 2 cranks on either side of the base, and 6 bike parts make up sets with two bike parts and one green clay cap each around the base. The center includes a green bike part and five metal supports, four of which are cut from 2 SRAM bike parts. The other came from my husband's parts stash and is, I believe, a fuel line.


I took this picture this morning before the whole thing was epoxied. I was a little scared stacking it together before it was all attached and stable. It feels very tall when I stack the pieces together, though it is only about 20" total. I am considering shipping this piece to the SRAM pART Project.


Last, Largest SRAM Sculpture
As of this morning, I hadn't quite decided what to do with the supports. I took a couple images with the pieces merely balanced. I did worry that I would bump my table and send the whole piece to the ground. As it was, I did knock into one of the recently epoxied pieces and snapped it, but I have since re-epoxied and replaced the piece. My biggest project today was cutting down the black support on the right and angling the base of the red support in back. Assuming my epoxy dries well, I will take "real" images of this piece tomorrow.


Saturday, September 15, 2012

SRAM penultimate post?

All I do now is epoxy. Somehow attaching 25 bike parts for each sculpture doesn't seem like that much. Attaching 75 parts starts to sound like a lot, but many of these pieces have to be attached to two or more ceramic parts. The epoxy takes ~24 hours to fully cure, so I've also spent a lot of time waiting for it to dry and taking pictures. The epoxy is actually pretty stiff after only a few hours, but I don't really want to test the limits and risk disaster.


The gear part sculpture is pretty far along, but I am waffling as to attaching the base to the top section. I added the base to up the quantity of bike parts, but I am thinking of keeping the two parts separate. I had originally intended to add more bike parts to the very top section of the gear sculpture, but if I don't use it for the SRAM pART project, I don't need to have as many pieces and I might skip these attachments.
gear SRAM sculpture without the top part
mostly complete top of gear sculpture
upside down base of gear sculpture
right side up base of gear sculpture. wooden sticks and baby food jar lid are temporary spacers.
clay ends being epoxied to bike parts
testing attachments for gear sculpture base


The third bike part sculpture is posing more problems, one of which is that I seem to have counted wrong. The current set-up only seems to have 24 bike parts included. I'm not sure what I missed or how I counted incorrectly. This piece would have been unwieldy to ship and was unlikely to go to New York anyway.

first bike parts attached to top of sculpture

bike parts attached near sprigs made from said bike parts
first thrown form decoration attached to bike part attached to base
painters tape to hold bike parts in place as epoxy dries
base of sculpture after tape removed. More bike parts will be attached and more thrown forms

First SRAM Sculpture
The first sculpture is, ironically, the one I will probably ship to the show in New York. It is small, compact and It appears that I will easily reach 25 parts. Currently 15 bike parts are attached to the main form, five more are attached to another part that will be attached soon. Five more will be attached soon and I have five more optional pieces I might attach. I also created a base to help keep the form stable. The base has four more bike parts attached to it.

form with drying epoxy
some epoxy has dried and tape has been removed. Red form will be attached but it currently balanced in place with at tape roll and towel

two of three wings or stamens attached to clay form which will attach to another bike part on the form

base with bike parts taped in place

I hope (and plan) to have the pieces finished by Monday and final pictures up after that.

Wednesday, September 12, 2012

Beginning to Epoxy (like glue)

Finally, I have some glazed work out of the kiln and I have begun to attach bike parts. I was beginning to worry about my impending deadline (things are supposed to be shipped next week) and was starting to have trouble sleeping. (Usually at this time of year I have bad dreams about forgetting to write my syllabi for the first day of class. I haven't even started thinking about syllabi yet because of the incomplete bike parts project.)

Today I loaded what I hope to be the penultimate glaze firing for the bike parts project. Immediately after I unload tomorrow morning, I should be able to load and fire the last batch, most of which are already glazed. The only sticky point is that I have one piece in the kiln today which needs to be glazed and reloaded for this project. I hope to finish it early tomorrow morning so I can load it tomorrow and have that be the last firing for this batch of work.

wiping off a layer of underglaze on my largest bike part sculpture
This morning after my daughter helped me unload the kiln (She likes to take out the small pieces. I can tell which pieces she likes best because she picks them up first; she usually grabs the shiny glazed pieces first), I finished glazing my largest SRAM bike part piece and loaded the kiln again.

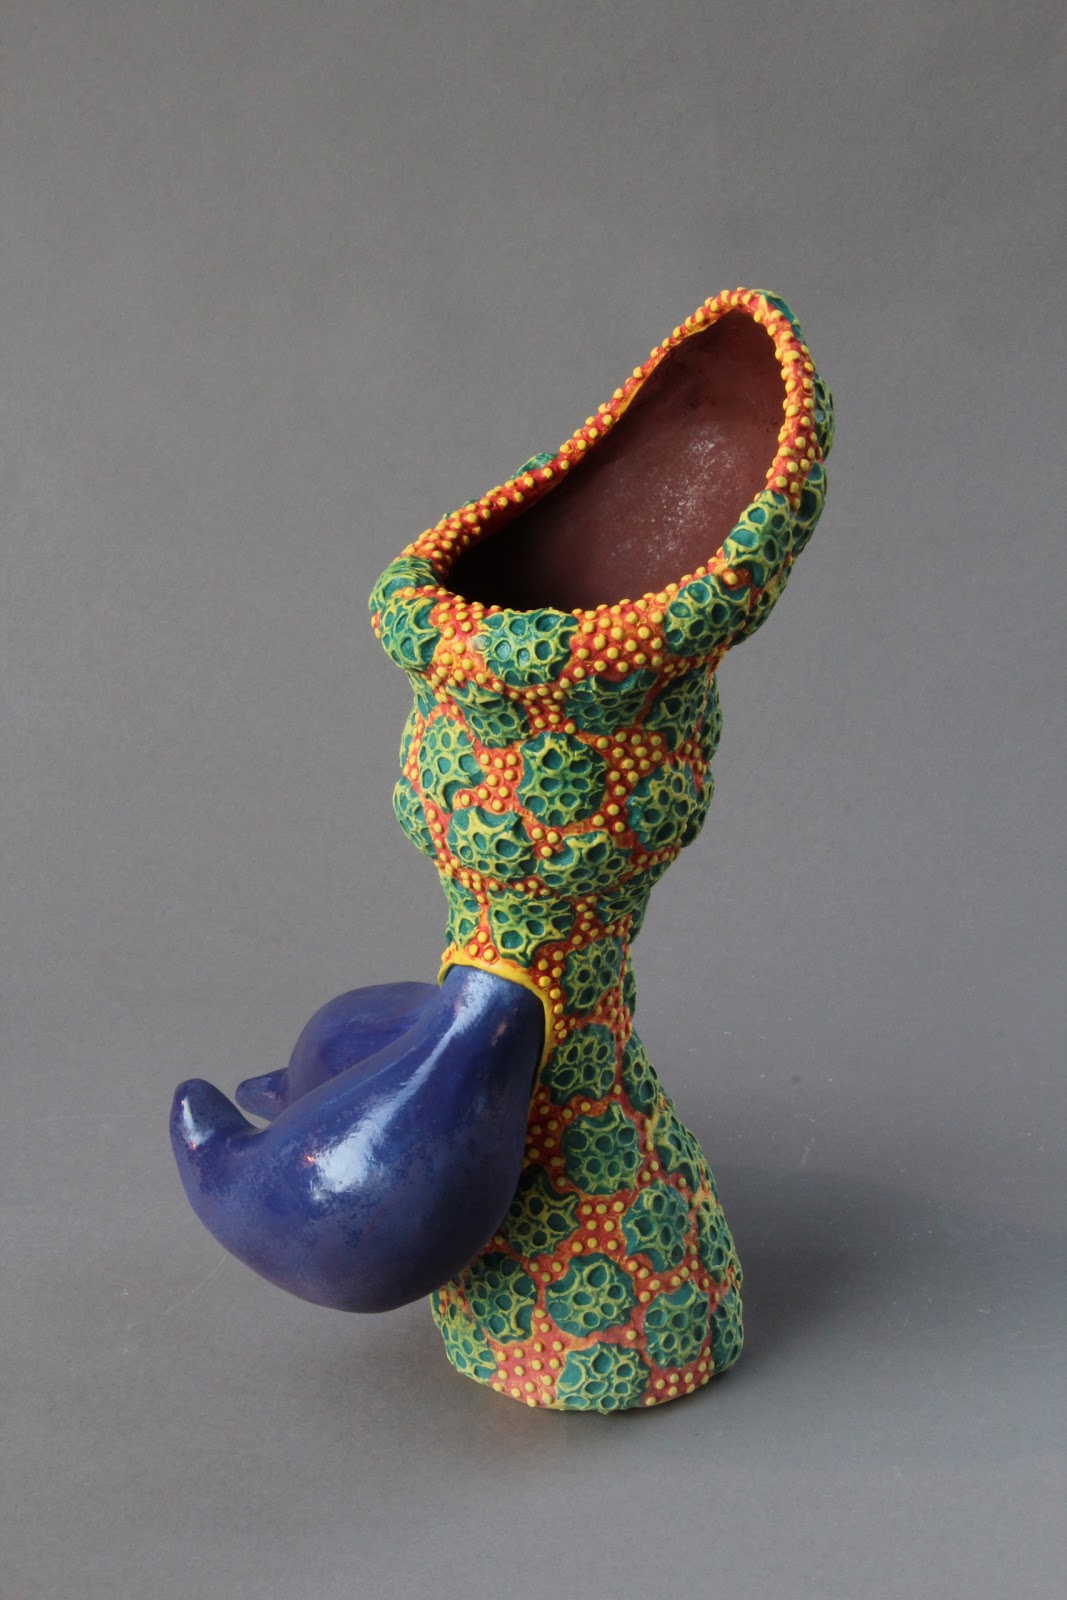
this is what happens when you give the kid the iPhone to take a picture
This biggest piece takes up most of the kiln, so I didn't have much room for the rest of the pieces which were ready, though I had to fit in a piece that was just bisque fired yesterday. This piece requires two firings and some epoxy, so there is no time to lose. The piece is a support that I created late in the summer for the original bike part piece.

chartreuse underglaze layered over red shell sprigs. the chartreuse was wiped away after this photo
After I loaded the kiln, I finished underglaze layers and glaze overspray for the first bike part piece and sprayed glaze on some other small parts and mini-sculptures that have been waiting for glaze since early in the summer. Currently all the bike part pieces save the aforementioned support have been glazed and are either in the kiln or waiting to get into the kiln tomorrow. I have a significant amount of unfinished work in the studio but at less than a week before the work needs to be shipped and just over a week until fall quarter classes begin, I can't spend time on these pieces yet.

silver SRAM bike part epoxied to ceramic form
After a run to school to pick up my long neglected Dremel tool (I rarely use it during the year and students always ask to borrow it), I was able to start epoxying my gear bike part sculpture together. The silver "support" was the first one I attached to the base of the sculpture. I needed the Dremel to mitigate my measuring and shrinkage errors. Hopefully there won't be too many of these errors to contend with. 

epoxy on second layer of gear sculpture

This gear sculpture was designed in sections that are interspersed with bike gears. I used a large batch of PC-7 epoxy to fill in the interior space of the first gear. (PC-7 was hard to find this week. I had some at home already, but went to Home Depot and Lowe's to supplement my supply. I've purchased PC-7 there in the past, but apparently Yakima/Union Gap is too small an epoxy market for this stuff. When I asked a Home Depot employee for epoxy, she asked if I meant glue. She'd never heard of PC-7 nor had anyone else at the store. The Lowe's guy seemed confused by the idea that epoxy might come in a form other than liquid or putty. Ace, however, is the place.)

thick layer of epoxy paste on second layer, gear on third layer ready to attach

PC-7 is a black epoxy paste. I believe it is recommended for car engine repair. It goes on thick and doesn't really move while it dries, though it takes about 24 hours to set firm. I put a layer around the interior seam of the sculpture form and then put the two pieces together with the gear in between. The gear squished into place on the epoxy. Then I removed the top part of the ceramic piece and filled in more epoxy paste before reattaching the ceramic top with more epoxy. One of the ceramic forms has a hole, the other has a tube that fits in the hole to help keep the two parts together and keep the gear in place. This may have been unnecessary engineering on my part but it adds some stability during this stage of the process.

two gears and two ceramic forms
Though I have the first three sections of this form out of the kiln, I decided to let the first and second sections set together while the third has only the gear on top. I was concerned the weight of the third section might shift the alignment of the seam below. It probably wouldn't but if it does, I'm stuck (epoxy humor).

metal bike part with red thrown ceramic form (behind are others waiting to compete with similar parts in the kiln for the best fit)

I had a few other small parts to epoxy together but I tried Goop glue. I usually use two-part 5-minute epoxy for small attachments with more visible seams, but I was curious whether the Goop glue was better. I tried it on one SRAM part that attaches to a round red clay part and will also attach to the largest bike part sculpture. I only tried one of these with Goop but I think I don't like it. I will wait to mix up the 5 minute epoxy until I have more parts out of the kiln tomorrow.

At this point I think I should be able to get most of the work done this week. Next week I can take "slides" and have the work shipped by the middle of the week. I am making three bike-part pieces, even though only one is required by the project. All along I have been expecting (or maybe just worried about) trouble. I have been working on three pieces so that one will be left if there is a catastrophe (or two). Now I am starting to think about ease of shipping instead. 

It will also be strange, after spending so much time with these pieces this summer, so send one away so quickly after it is completed. We will barely have any quality time to enjoy each other's company as fully realized objects.

If you are interested in seeing previous SRAM bike projects by other artists, click this link.


Did you know you can now comment on my blog without signing-in? Tell me what you think. (Do you also anticipate impending catastrophe?)