Monday, August 25, 2025

100 Spring and Summer bulbs ready for Labor Day open house

bulbs in progress (before glazing)

Join me at my home studio this coming Labor Day weekend for a free open house featuring my work and that of my friends and art colleagues at Yakima Valley College, Kayo Nakamura (drawing, prints, mixed media), Monika Lemmon (drawing) and Chris Otten (photography). Oops! in my last post, I forgot to mention that my daughter will also be there with her handmade jewelry.

Now that she's nearly and adult and working independently, she decided to rebrand her jewelry with her name (before she and her friends were "Dezignosaur")

Stop by my studio, 203 S. 8th Ave, just south of Walnut Saturday and Sunday, August 30 and 31 from 10-4 and/or Monday, September 1 from 10-12. Admission is free. Kids welcome, as long as they can be gentle around art. (Adults welcome under the same expectations ;-)

bulb in progress, partway through its first coat of underglaze

In the Spring and early summer, I made a bunch of bulbs, to replace the 100 bulbs that I installed at YVC. I had a blast making the bulbs, but now I've spent what feels like the whole summer glazing them. 

finished bulb, this one was fun to underglaze

Last week, I unloaded maybe the third load of glazed bulbs (and a few other odds and ends). 

bulb from my sketches, made to look drippy

Somehow I still keep making them, so I'm not exactly caught up, but I did get all the ones made in spring done. It's funny how small pieces like this can feel both like nothing (I didn't make any new large or even medium sized sculpture this year), but also like a lot (I made and finished 100 pieces in about half a year).

some of the 100 bulbs made earlier this year

The irony, of course, is that I don't have space to show 100 bulbs during the Labor Day open house. Maybe I'll just put out a bunch in some bowls for folks to play with. 

the original idea for the bulbs installation was that the audience could rearrange their order and orientation

For the show, I bring in a partial wall with hooks. While I'm using the studio for making, this wall is in storage, but during the show, it gives me space to install 27 bulbs while hiding the clay storage area under my worktable.

the partial wall during a previous year's studio tour


The other thing I'm not sure how to think about is all the bulbs that require more work because the plan is to include mixed media. I've got maybe half a dozen bulbs that I planned to add stuff too, and adding that stuff takes extra time. 

These perforated pieces are a bulb I intend to sew together. So far I'm on attempt 3 to get the sewing to look right

I'm not exactly behind my timing plan, so they might still get finished, though I have a lot of things I plan to do if I have time. I already started cleaning my studio, and I've fired what I hope is the last firing (I got an error code, but the top layer looks ok, so far). 

a new bulb with glaze on only the sprigs

Most of the mixed media stuff can be done in the house which may work out well, since this week is supposed to be very hot and my clay studio does not have air conditioning. The weekend of the open house is supposed to be cooler, and my studio feels great when the fan is on and the windows are open, as along as it isn't 101 degrees outside.

a bulb after underglaze, but before glaze

The bulbs that I've been working on have been a blast. I got really excited about making them earlier this year and still have lots more I want to make (and finish). I've been trying to balance my glazing (and painting) time with my making time, because, apparently I could just make bulbs basically forever and not do anything else.

a chain bulb--the chain moves

Earlier in the year, I thought I'd spend this summer focused on more political pieces and/or screaming faces, but I just didn't find the energy. The politics pieces and the faces tend to take more of my mental and emotional labor, while the abstract pieces are fairly relaxing and calming to create.

the only screaming bulb from this batch

Even applying the underglaze layers to these pieces can be fairly relaxing, at least when compared to painting and using glazes themselves. For those of you not familiar with my process, underglazes are the colors I use for the bulbs and most sculpture. These colors look similar before and after firing, while glazes are the ones that can melt and get shiny. They usually look very different before and after firing.

bulbs with the second coat of underglaze applied, ready to be wiped

For most of my bulbs and sculpture, I bisque fire the dry work, then I apply the first layer or layers of underglaze and fire again. After that I add a second layer of underglazes, wipe that away with a wet sponge, so that it highlights the textures of my forms. Then I add a layer of clear glaze to some or all of the sculpture. That clear glaze will be glossy, and may also darken or deepen the appearance of the underglaze.

bulb before the third firing, with pink underglaze

The glaze I usually use over the underglazes appears pink before firing and clear after firing. I use different glazes, which fire to a hotter temperature, for my functional work. Most of the glazes we use at YVC are still different glazes that fire to a yet hotter temperature.

the same bulb after firing, the pink turned clear (over green)


Thursday, August 21, 2025

Labor Day Weekend Open House & Tall Work in Progress

Coming up this Labor Day weekend, I will be hosting an open house at my home studio. My art colleagues at Yakima Valley College, Kayo Nakamura, Monika Lemmon, and Chris Otten will also have their work on display at my studio. 

This year's postcard, featuring work by me, Monika, Kayo, and Chris

Like last year, the show will run Saturday and Sunday 10-4 and Monday 10-12 at my house, 203 S. 8th Ave in Yakima, near Davis High School. Unlike last year, admission is free! The studio is on the ground level, but in back of the house, and visitors will have to walk across some grass and there is a small step into the studio itself. We'll also have work displayed in the yard.

me, Chris, Monika, and Kayo


My studio has been a part of the Yakima Artists' Studio Tour for the past 4 years, but this year we decided to separate ourselves from the tour for several reasons, including that we don't really want to charge folks to visit the studio. We are holding the open house on the same weekend and have offered to tell our visitors about the Tour, though we are taking care of our own advertising, such as it is, for this event.

finishing three parts of this large sculpture from last year (the cat thinks the paint water is her dish)


My goal with this event is to show off my studio and my work, as well as the work of my colleauges, and to chat with folks, socialize, and hang out with friends. I signed on to the tour back in 2021 for the same reasons, and because I like the idea of a weekend set aside for folks to visit different art studios in the area. I would like the tour to be free for visitors.

Dates and times are the same as last year, but we're no longer an official part of the tour 

Months or a year ahead of time, I always think that inviting people to come to my studio sounds easier than taking my work someplace else, but when it comes down to it, I'm not sure that's actually true. There's a lot of cleaning involved in opening my home studio to the public, and I need to stop making new work (or finishing old work) at least several days or a week ahead of time in order to clean and arrange the space to show work rather than make it.

clean windows, floor, and wheel, this only happens once a year!

On the other hand, it's not a bad idea to sometimes clean my studio. This is the only way the windows are going to get washed.

my large (complicated) sculpture started last year

I've spent most of my studio time this summer trying to finish work I made last year or in the spring. Honestly, I kind of hate finishing work. I like making things out of clay, but I don't like glazing nearly so much and this summer I learned that I pretty much hate painting--at least the way I was doing it.

ooh, that crack!

Last year I completed several tall multi-part sculptures, but the bottom parts cracked in the kiln. I suspect that they cracked because the clay body couldn't handle the size and weight of the clay. In May, I bought several different sculpture clay bodies to test my theory that the clay is at fault, but I haven't found the time to do make anything out of those clays (because I've been glazing and painting instead).

I usually fire the first layers of underglaze, then add a second layer and wipe it away from the raised textures

Because the bottoms cracked in the bisque or first underglazing firing, I didn't want to fire them again. My usual approach to sculptural surfaces is to layer underglazes, which, for me, means 3 firings. The cracks  were likely to get worse in subsequent firings, so I had determined to patch the cracks and use a cold finish (meaning an unfired finish, in this case paint and paper).

the repaired base with acrylic paint


Last summer I asked my painting colleagues for recommendations and during the year I purchased some acrylic and gouache paints and practiced using layering gouache over acrylic paint. This summer I finally got around to using the gouache on the most complicated of the large sculptures. It worked great for what I wanted, but it took forever and was somehow more tedious than my already far too tedious underglazing layering techniques.

the first layers of gouache on the sprigged surface

The tedium had a lot to do with my approach. Instead of using one or two colors of gouache over the blue acrylic, I decided to use eleventy-seven colors, which took eleventy-seven hours to apply, and then an additional infinity to wipe away.

the gouache partially wiped away from the sprigs

I finally finished the paint layers on all 3 of the parts of this textured stacking form, but I still haven't finished the piece, because the plan is to add paper layers over the blue sections. Honestly, by the time I finally finished the paint, I didn't want to look at this sculpture anymore.

the gouache nearly completed

Also, before the Labor Day open house, I really wanted to finish glazing the 100 bulbs I had made in the Spring. I've got the last batch in the kiln today, so my plan is to clear some space and get the paper done on this sculpture before the show. Which is why I've decided to take time out of my day to write a blog post...and mop the floor...and clean my email...and maybe I'll paint the kitchen today, too.

painting all done, pieces stacked (somehow it feels like it should be taller than this)

If you'd like to see this piece finished, stop by my studio on Labor Day weekend, there's, like, a really good chance it will be done by then.

Monday, June 23, 2025

Yakima Art Festival this weekend, and what I've been working on


This weekend I am participating in the Larson Gallery's Yakima Art Festival downtown at the Farmer Market space (Rotary Marketplace) on Yakima Ave.  The festival runs 11-4 on Saturday, June 28 and there's a long list of artists, including myself, John Barany, Cydney Bacon, Denny Driver, Susan Harris, and more. I count 24 participating artists listed on the Larson Gallery website. 

bowls, like those I'll have at the Art Festival

There will also be art activities for kids and food trucks. I've done this show before, but it's been several years. I am hopeful that the new location will make the event more popular and cooler (it was really hot last time I participated). I am also pleased that Larson Gallery has made an effort this year to increase the quality of the artists exhibiting.

I'll bring some sculpture, too

When I agreed to participate, I told myself I would not overdo it on set up and what I would bring. I also told myself I would not try to make a bunch of new work specifically for this show. I have a tendency to forget or write off all the work I have stored in boxes (out of sight; out of mind) and try to make entirely new work. Earlier this spring, I boxed up a lot of my functional pieces to make space for works in progress, which was helpful, but I can feel myself starting to worry that I don't have enough pieces for this show (even though I have so much stuff stored!).

And a few vases and mugs


Since the quarter ended June 13, I have spent most of that time making new work in my home studio. Since I have a show coming up, I have told myself that I should get at least one kiln load finished before then. Why? I don't need to do this, but it just feels like I should need to. I spend something like 12 hours yesterday applying underglazed to new bulbs I've made in 2025 (before the quarter ended). My husband drove my daughter and some classmates to a band leadership camp in Oregon, so I was home alone for most of that time.

experiemental bulbs and bulb parts from spring

I got really excited about making bulbs this year. In March, I installed a group of 100 bulbs in the faculty office hallway in my building, Palmer Martin, at Yakima Valley College. I had already gotten excited about making new bulbs before then, in large part, I think, because our union contract bargaining was finally over. 

my installation at YVC

The installation required 100 bulbs, which I collected from three different "bodies of work" (abstract bulbs, chemo bulbs, and protest bulbs. I also had one single bulb from way back in college or grad school when I was still raku firing the bulbs. (I wanted a raku piece so that I could grab it off the wall and show students, which I already did for the spring class).

my home installation with place-holders non-bulbs and a gap

Collecting 100 bulbs for the Palmer Martin install left me with some gaps in my home installation, so I figured I'd made some more. All spring I felt like I had tons of ideas I wanted to try. I had more ideas than time, which is a nice way to be out of balance. I finished making 100 new bulbs (starting in February, I think) earlier this month


the first layer of underglaze and some newly fired bulbs


In May, I attended an AFT convention in Tacoma. The convention was good, but there were parts of the process that were boring. They weren't pointlessly boring, which was an interesting distinction I hadn't particularly thought of before. Instead, the process requried by Robert's Rules of Order meant that there was repetition that was required. I found that the absolute best way for me to focus was to get out my sketchbook and start sketching bulbs. I was able to pay attention to what was being said, but my mind didn't wander and I wasn't tempted to play on my phone.

my sketch of bulb ideas

The convention was at the Murano Hotel in Tacoma, where glass artists are featured on each floor, meaning that in between convention events, there was lots of art to look at. I came away from the convention with just a ton of pieces I wanted to make. 

I started coloring in the bulb ideas I had started making

As I reached the end of the academic year, I was thinking about what I wanted to do over the summer. We've got a few school visits planned for my daughter, so there's some heavy duty traveling scheduled, but I also wanted to spend time in my studio on things I wanted to make.  The irony is that what I thought, in May, that I'd want to make in summer has turned out to not be quite accurate.

underglazed bulbs waiting for their second layer of underglaze (and glaze)

As usual, my plans for what I want to make in summer include about 3x as much stuff as I can actually find the time to make. Over the summer, before our the open studio at my house on Labor Day weekend, I want/wanted to:
  • finish (glaze and underglaze) the 100 bulbs I made during spring
  • make face mugs
  • make protest and/or face bulbs
  • test 3 new (to me) clay bodies on large sculpture to see if they are less likely to crack
  • create new pieces for a different wall installation at YVC
  • install said wall installation at YVC
  • make some mid-size sculptures from my sketchbook
  • finish painting the large sculptures from last year
this chain was trick to underglaze without it getting on the bulb

This is obviously way too much. The face bulbs take a lot longer than the abstract bulbs, mugs take longer than bulbs, large scupture takes longer than small or medium sculpture, and my approach to glazing is so stupidly time consuming that it took me 12 hours yesterday to finish the first (of 2 + a glaze layer) layers of underglaze on about 25 bulbs. In the past week, I probably spent ~40 hours on just the first layer of underglaze for 100 bulbs.

tiny vases and bowls for necklaces

Then, once I started thinking about the show coming up this weekend, I decided it would be good to make some cute little critters for kids to see at the show. I also decided I had plenty of time to make and glaze a bunch of tiny vases to turn into necklaces for this weekend.

bulbs waiting on their second layer

And while I've been perfectly happy to do the underglazing on these pieces, I've got two face mugs that have been in progress for most of that week (that I can't seem to get myself to finish). I also bought all this new clay at the end of May so I could use it for the face/politics bulbs and the large sculpture tests, but I haven't gotten to those yet either.

Cali after investigating my new clays

I know that part of the problem is that things just take time. There's literally just two weeks between the end of the quarter and the Art Fest this weekend. And its not even reasonable to spend all day every day in the studio. One day I had to go in to YVC to finish ordering for fall classes, another day Alison and I had our motorcycle endorsement test, and we have had other things like laundry and groceries, and all that non-studio stuff.

a new texture I just tried

So, in large part, I'm writing this post, which is ostensibly just a post to invite y'all to come to the Art Fest this weekend, to calm myself down. I get like this and I need to write it out to calm myself down. But the other thing that's been bugging me is that when I listen to my brain or heart or whatever part of me decides, I really just want to make more abstract bulbs right now, forget the faces and the mugs and the things I think I "should" be making or that folks will buy. I just wanna keep experimenting with textures and ideas from my sketches. I don't wanna do the heavy/thoughtful stuff right now.


these bulbs are ready for cone 6 glazing (which I usually don't do for my bulbs)


Thursday, June 19, 2025

Harry Potter Quilt (at the LG Members Show)

After working on it, on and off, since 2019, my daughter, Alison, and I finally finished our Harry Potter quilt this year. To celebrate, we put it on display in the Larson Gallery Guild Members' Exhibiton which opened last weekend.

with our quilt at the opening reception for the members' exhibition

The Members' Exhibition is an annual exhibition of work made by members of the Larson Gallery Guild (or, in other words, people who support the gallery). This means the work tends to run the gamut between professional, amateur, and experimental. I remember one year when a local painter showed a wheelchair entirely covered in googly eyes. I don't know that I'd enter this quilt in a juried show, as it isn't my normal "work" but this is a perfect opportunity to show off this collaborative piece that has been in progress for so long.

postcard for this year's membership exhibition

The Membership show runs June 14 through July 12, at Larson Gallery on the west side campus of Yakima Valley College. The gallery is open Tuesday - Friday 10-5 and Saturdays 12-5. Admission is always free, and this year's show seemed particularly strong to me, with a wide range of media and work that looked much more professional in quality than some years.

Alison explans an idea to me during our first planning/sketching session in March 2019

Alison and I first started sketching our plans for this quilt back in March 2019 (I had to go back and look at the dates of the photos to check). Alison was in elementary school, had been doing 4H sewing for several years, and was finishing up her third quilt (the first one was doll sized), when we started discussing what we wanted to do next.

After the doll quilt, which was made of squares, Alison created two quilts using designs by Elizabeth Hartman. The first one was a small Fancy Forest quilt. For the next one, she used the fox design from the Fancy Forest pattern to make a larger fox quilt (adding glasses onto three of the foxes). Because she was a kid, I also attended the 4H sewing sessions and helped with the quilts, as well as her other projects. We both learned a lot through doing the Fancy Forest and fox quilts. These quilts both used pieceing, where rectangles and squares of fabric are sewn with straight lines or diagonals to create different shapes. Then the fabric is folded overwith the cut edges hidden behind. 

Alison's Fancy Forest quilt in progress

We wanted to make our own design for the next quilt, based on Harry Pottery imagery and using the piecing and folding techniques we learned in the Hartman designs. The first pieces or imagery we made for the Harry Potter quilt were the broomsticks (we made two for the quilt and a third as a gift for a friend). The broomstick bristles were based on the top of the hedgehog or thistle from the Fancy Forest quilt, with some modification for where they attached to the handle.

a Ravenclaw broomstick pillow for a friend

Fluffy, the three headed dog from book one was based on Hartman's fox head, again with a modified bottom. We had just finished making 42 fox heads, so these three heads came together fairly easily. We didn't use any of her designs directly, but modified several into the shapes we wanted.

Fluffy, Hagrid's three-headed dog, in progress

As we started sketching the quilt design, we discussed what imagery would lend itself to techniques we already knew or could borrow from our experience with the Hartman quilts. Hedwig obviously could be done like the owl, the glasses (Harry's and Luna's Specrespecs) could be based on the owl's eyes. The lion's head (from Luna's hat) and the niffler were more distant, but still based on some of what we learned in the Fancy Forest quilt. For others, we just made them up as we went along. Someone recommended that we used paper piecing, but it was the pandmic and we didn't have anyone to teach us, so we just kept doing it our way.

The nitch, niffler, and Hedwig, in progress

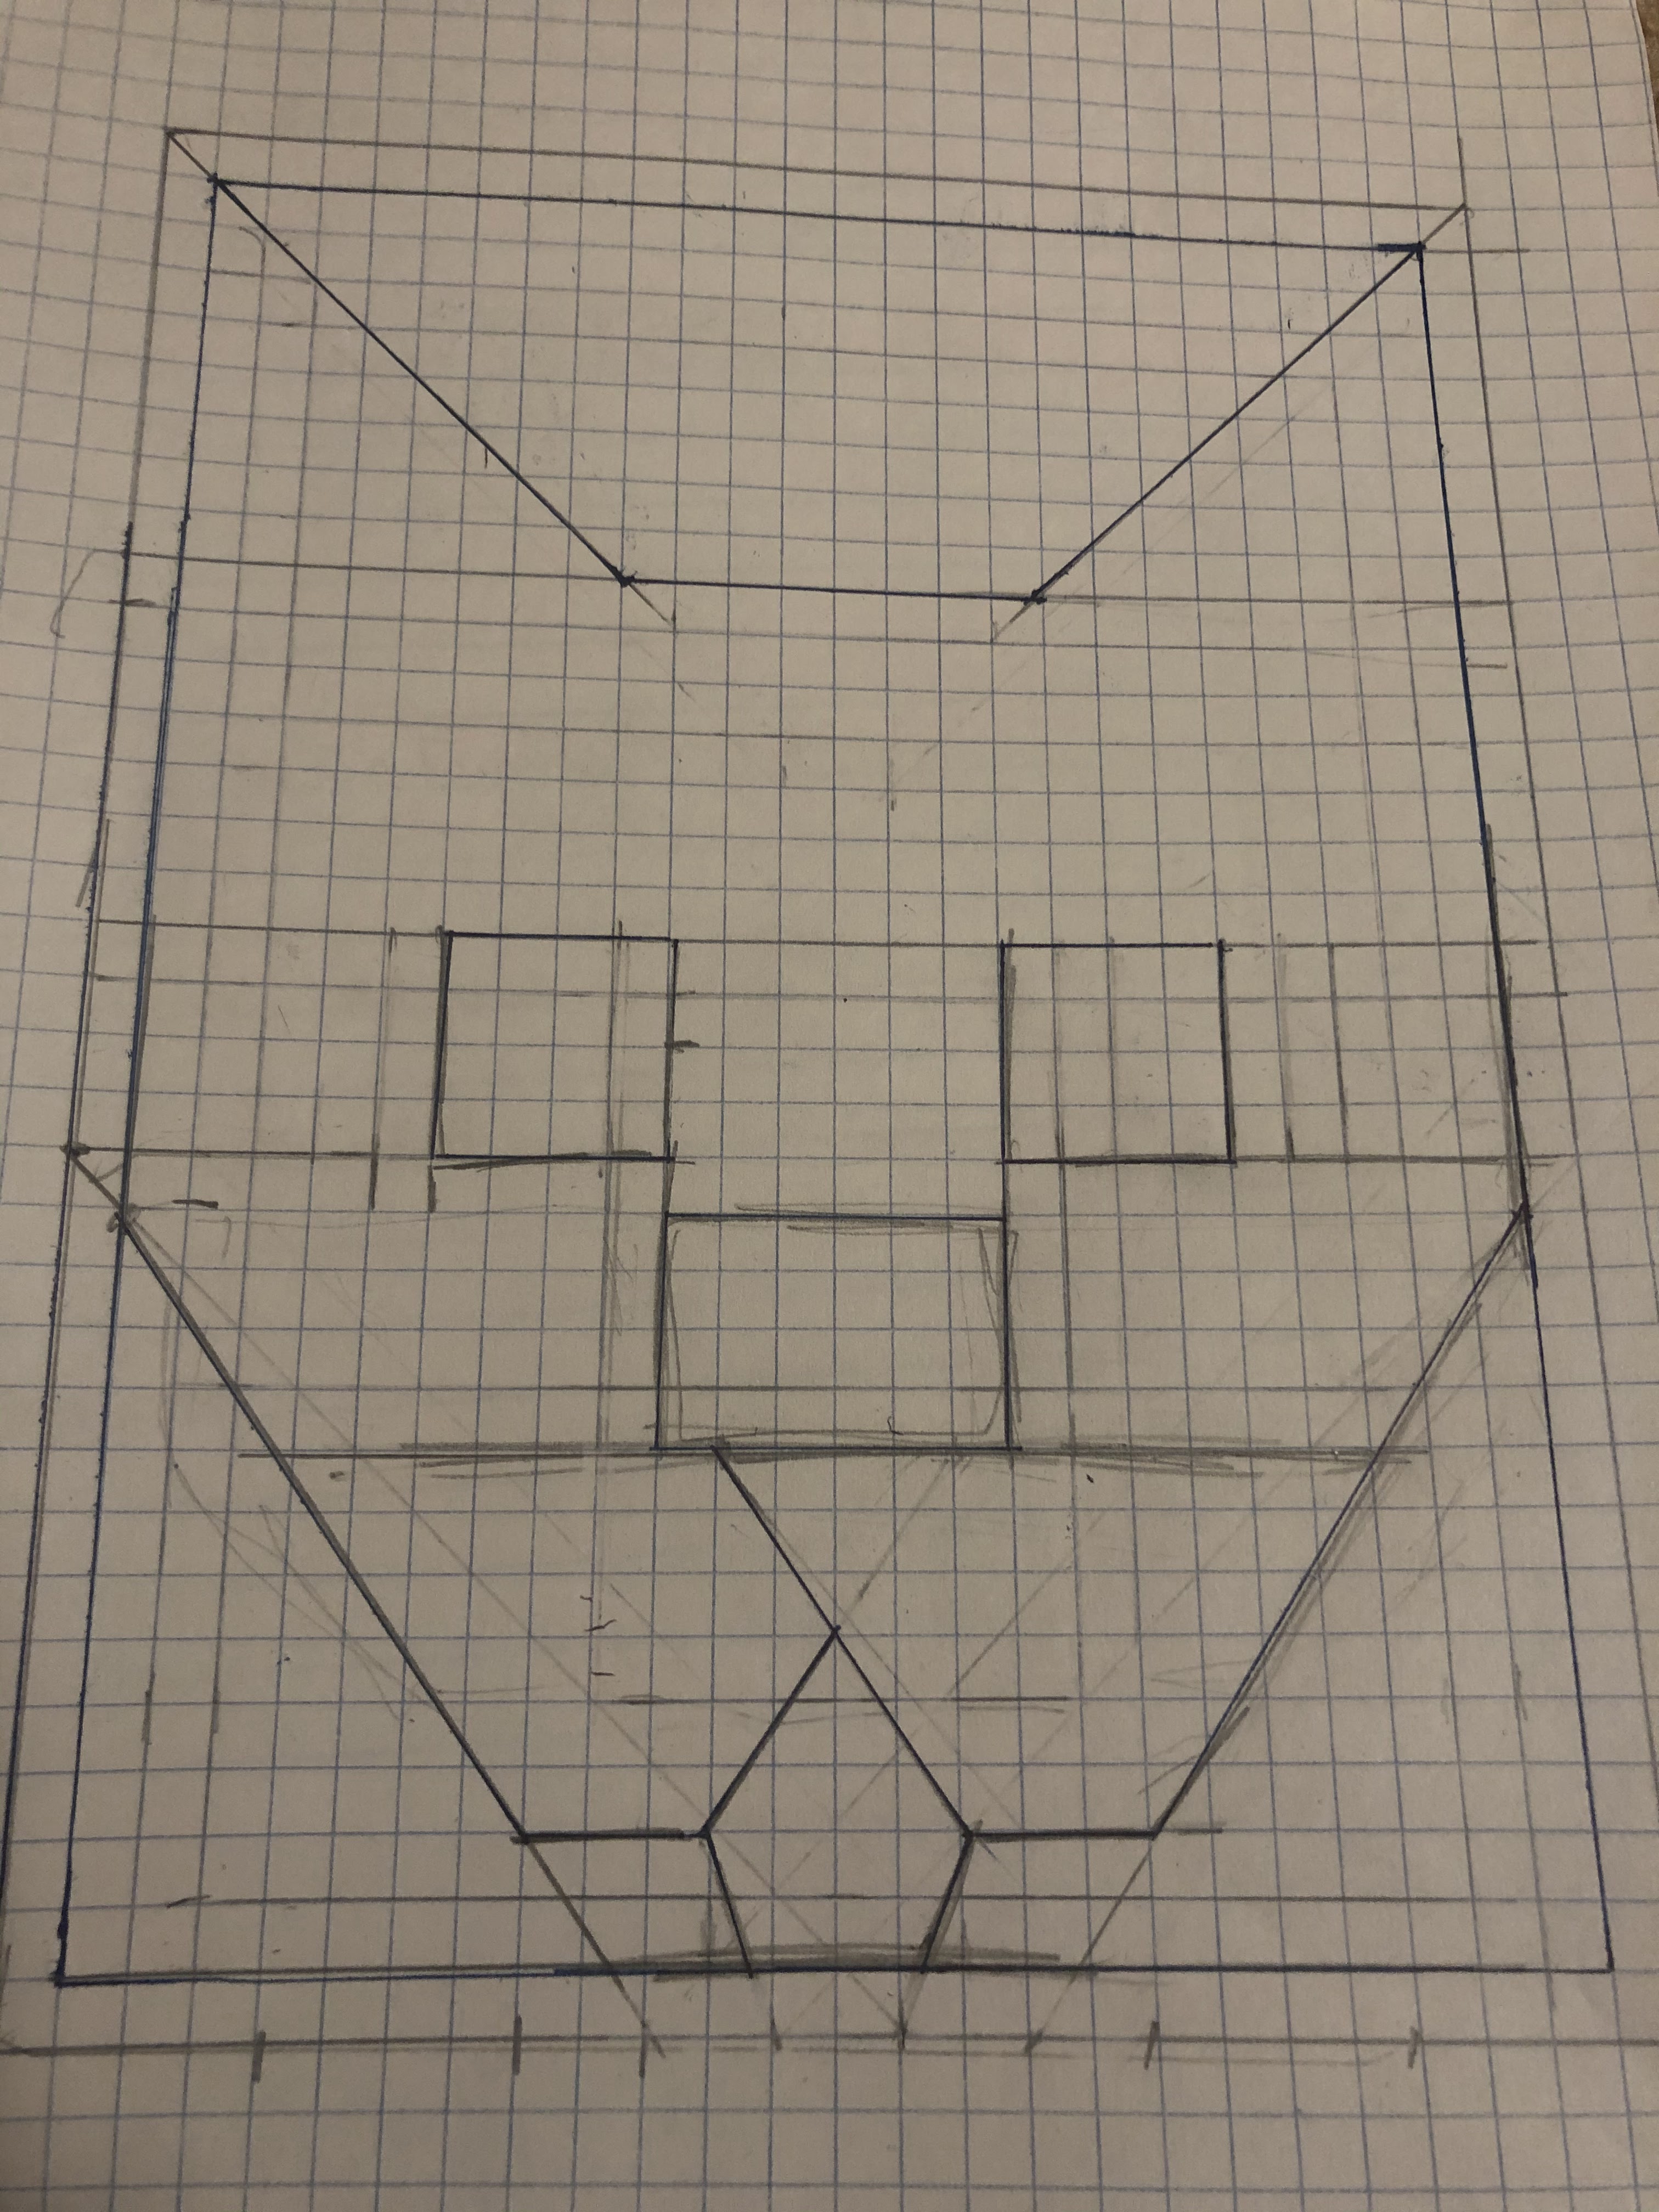
After the original sketch, in which the imagery was decidedly not to scale, we sketched most of our designs to scale on graph paper. This helped us plan for size of elements and seam allowances. I think we skipped this on some of the last pieces we made, like the castle and the snake, but if we did skip it, it was probably because we forgot about the earlier process and because the straight seams and large sizes didn't require it quite so much.

one of the 3 heads of Fluffy, with plans for how to design the tongue

As we started actually making each of the designs, they grew and changed as we stumbled, learned, and adapated to what we were able to do. We also learned what we didn't realized we needed to know when we went to put everything together. The adapatations we made as we went along meant that things changed in size, and sometimes color, in ways that required us to move farther and farther away from the original design. Now looking at the finished quilt, I notice where the spacing between elements varies (unlike in our sketch) or Hartman's quilt designs.

Our original sketch, which we photocopied and colored in during planning

Looking back at the original sketch, I can see that we stuck pretty close to the original plan in a lot of ways. Our original plan had about 41 separate elements (I'm counting three elements in the bookshelf, and all the Skiving Snackboxes as one element) and 41 in the finished quilt. Our original layout had the snake (Nagini) spanning the entire bottom of the quilt, with Trevor the toad underneath the snake's head and the diadem above. In both quilts, the sword is positioned so that it is about to cut the snake's head off.

the bookshelf with books, a penseive, and Crookshanks, the cat

Periodically, after finishing a batch of pieces, we laid out the elements on the floor, both to celebrate our progress and to reconsider orientation, color, and spacing. Color spacing, I think, was what led to the chocolate frog and Trevor the toad switched places in the final design. We also had to start thinking about how to sew different sections together (without trying to sew around corners).

I'm not sure if this was an organizational plan or jsut what we'd made so far

When we started the quilt in 2019, we wanted a challenging quilt that would allow us to come up with our own designs. I loved Harry Potter before Alison was around. I read the first three books while living in Japan. Because we had a limited number of books in English, there was a lot of sharing of books. For the last 2 or 3 books I attended book release parties at bookstores, one I remember reading in the car after midnight as I accompanied my husband as he drove around Wisconsin to deliver lost luggage from the airport.  When Alison was old enough, I read the first ones to her, and we read the later ones to each other. Reading the books together and talking about the stories translated well to designing the quilt together. 


Alison would often sew while I pinned or prepared the next set of pieces

Unfortunately, at some point, I started to feel funny about sharing our progress on the quilt (and my general love of Harry Potter), because at some point after we started working on it, the author decided to reject the themes of her books and start using her platform and fame to say hateful things online.

Scabbers and the grid plan for his creation

For the Members' Exhibition, we've titled the quilt "We started this before she was a TERF." I was actually surprised during the reception that people mostly didn't know what we were talking about. TERF stands for "trans exclusive radical feminist" or, specifically, someone who considers themselves a feminist but doesn't like trans people. (By "doesn't like" I guess I mean that this person doesn't think that trans people should or do exist and thus have rights including access to bathrooms and/or healthcare.)

testing options for thread color around the appliqued puking pastilles

I believe the author started her descent into the anti-trans world by voicing opposition to trans use of womens' bathrooms, but since then she's doubled and tripled down on saying mean things about trans people, extending that to saying mean things about people who support trans people and, more recently, using her buckets of (mostly Harry Potter) money to fund anti-trans legislation in the UK. Also recently she decided to say mean things about asexual people, which seems to simply be an expansion of the unnecssary hate. Why?

documenting the completion of the deathly hallows

So, now we're in a world where I feel compelled to distance myself from the author and her views if I publicly enjoy something she created. I don't want to provide the author with any more money--though we've already spent money and time on this project we love. Our financial investment in HP licenced fabric was all done by the time she outed herself as a TERF, but I still feel funny about how connected this quilt is with an author I no longer respect.

planning sketch for Riddle's diary

It's the first time I've thought very seriously about "death of the author" (by which I mean, both that the author doesn't get to determine what their work means AND that the author is separate from the work).  This is the first author whose work I really loved, who went on to make what I consider a real negative difference in the world. I loved Good Omens; Terry Pratchett has always been one of my favorite authors, while the living author of those books was not. I feel ok about continuing to support Good Omens, since the problematic living author is no longer associated with the TV version. 

tracking which elements we'd created, which ones we had patterns for and...others

I honestly thought, back in 2020, that the Harry Potter author would get some push back to her original comments, hear what people who disagreed with her had to say, then eventually walk back her comments.  I thought at least she would say she respected their perspective, but couldn't fully agree. Instead, she leaned in to saying and supporting things that I disagree with. Thus, my love of the books (and audibooks--Jim Dale is amazing), and this quilt have to occupy an awkward space where I no longer support or respect the author, but still love what we've made and the time we spent making it.

Crookshanks, basically completed, including wonky edges

When we started this quilt, I don't know that we had considered how long the process would take. We obviously didn't anticipate the pandemic, which paused our 4H sewing sessions and initially slowed us down (and limited the assistance we could get in problem solving some of the more difficult designs), but at some point the limitations of COVID gave us more at-home time to work on the quilt.

this one was tough, notice the word "platform" in green

The next big delay was my stupid cancer, which limited my energy. Then Alison started high school, which meant cross country and marching band and TSA--and we just had no idea how all-consuming marching band would be. Speaking of all-consuming, I took on the union presidency in 2019, then dove head-first into bargaining the contract and pandemic changes, then return from COVID, then 3 years of bargaining the second contract and all the drama that came along with that (things are MUCH better now). For most of that time, the union was a second job, and I was also teaching full-time (or slightly more than full-time).

at some point we started highlighting the sections we had finished, so we knew which imagery still neded to be made

Throughout all of this, we never entirely abandoned the quilt, though we'd go months and months without touching it. Some of the hardest times to work on it coincided with some of the hardest decisions to make. At some point we needed to determine how to put it all together. In the original design, we saw the quilt as basically four separate sections that could be put together in pieces, but as the measurements of individual elements changed, that impacted whether the pieces would fit together in a grid, and whether that grid would fit with the other pieces.

the cat on the bottom right wasn't part of the original design

The layout always called for having the snake at the bottom, but we never entirely planned for how the snake would fit across that space with it's head somehow above the edge of the elements next to it. We basically just saved it for last. After ignoring it for months, I believe we got the quilt pieces out in late fall of 2024 (after marching band, cross country, and CBA bargaining had all come to an end). At this point, I think we were just hoping to finish before Alison graduated high school.


Rita Skeeter (as a bug)


Regardless of how you feel about the author, I hope that you enjoy looking at our quilt. If you are a quilter, be gentle with us, as this is the first design we've ever planned an executed and we did it during a fairly tumultous half decade. If you are in Yakima, check it out at Larson Gallery. If you are coming to Alison's graduation next year, maybe you can see it in person then (since we did, in fact, finish it before she finished high school).


we had to spread it out on the floor to see the whole thing

Can you identify all the various elements in the quilt without help? 
Here's my key: right to left, top to bottom:

Rows top to bottom
  • Weasley's Wizarding Wheezes box (all the skiving snackboxes are falling out across the quilt), scroll, cat plate from Umbridge's office, Fluffy the 3-headed dog, broomstick, Rita Skeeter as a bug
  • Sorting hat, puking pastille, dragon egg (tri-wizard tournament), Scabbers, wand with red sparks (hard to see in photo), top of bookshelf, Luna's Spectrespecs, time turner (our design, not based on the movie--because circles are difficult)
  • Lion from Luna's hat, Hedwig, Ravenclaw's diadem, Trevor, penseive on bookshelf, Crookshanks, Slytherin's locket, quill
  • Hogwarts, Skiving Snackbox, snitch, dealthly hallows, platform 9 and 3/4 sign, niffler, Triwizard cup
  • Griffindor's sword, Skiving Snackboxes, moon (Lupin), Riddle's diary with a baselisk fang, Harry Potter's glasses/scar, Marauder's map, broomstick
  • Dobby's sock (falling out of the diary), mandrake (hard to see in photo), howler, Sorcerer's/ Philosopher's Stone, quidditch goals
  • Chocolate frog, Nagini (getting her head chopped off), divination teacup ("one of the blue patterned ones")