Showing posts with label advanced students. Show all posts

Sunday, March 24, 2019

Donuts and Teapots

Donut teapots by Kaylee Bays
One of the neat things about a good clay class is watching how the students influence each other. I've always observed that a few hard working students in the studio tend to encourage other students to also work hard. This quarter was unusual in that I started and ended the quarter with a full class of 16 students. And all students were doing all the work through to the end of the quarter.

Tea set by Kim Hansen

This quarter I had three advanced students meeting at the same time as the beginning level Functional Pottery class. The advanced students were, of course, working on different projects than the beginners. And in at least one case, the forms that were being made by an advanced student influenced what some of the beginners made later in the quarter.

Donut Teapot by Lauren Coffey
Lauren Coffey, in the advanced class, started her quarter by making three donut teapots. A clay donut is a hollow form thrown on the wheel with hole in the middle. It is a more complicated form to make than what we usually do in the beginning class. It also isn't really an essential form, since there aren't a lot of forms that just NEED to be made with a hole in the middle. I usually introduce this form in the second quarter Intermediate Wheel class and even then, just for fun. The donut is thrown on its side and is often set on end to be turned into a teapot or vase.

Donut Teapot by Lauren Coffey
Lauren's first project teapots were made with thrown lids and lid attachments, thrown spouts, and added feet and handles. Seeing these forms at the start of the quarter and hearing Lauren describe the process during critique got some of the beginning students interested in the form. Kaylee Bays ended up making three donut teapots for her first project, one of them decorated in the most delicious manner as a frosted donut with sprinkles. During critique she showed us how she could also drink out of it as a mug. 

Lidded Jar by Taelynn Loyd

Taelynn Loyd, also in the beginner class, took a very different approach to her donut and cut it in half. Her original idea was to make a half donut teapot, which neatly solved one of the major problems with donut teapots: instability. She ended up not attaching a spout and handle, but her lidded container is a sweet little form and not one I remember any other students making in the past. The piece is quite small and her glaze application a little heavy; the picture above was taken before she cleaned up the glaze drips.

First Puzzle Jug by Lauren Coffey
For her last project, Lauren returned to the donut form but used it in a different application.  She created puzzle jugs using skinny, hollow donut forms for the rim and handle. Lauren followed instructions by Michelle Erickson (see the video below) on how to make the puzzle jugs work and she was able to demonstrate them during the final critique.


When Lauren blew into her jug without covering all the holes, we heard nothing. But when she blew into the jug with her finger covering the holes, she created bubbles in the water in the bottom of the jug. It was an entertaining demonstration to watch, even for those of us who could hear but not see the bubbles. Lauren's presentations during critique are usually full of details and entertaining. During this one she made students guess where the hidden hole might be (hint for blog readers: see the video above).

Second Puzzle Jug by Lauren Coffey
Lauren's first puzzle jug was a simpler design with just one hole. She used it to try out the process, which is fairly involved and requires the potter to throw two donuts, a vase or jug form, and at least one nozzle. She then needed to attach all these parts together and line up the hole in the bottom with the handle hole and make sure nothing leaked.  The proportions of the first jug aren't as elegant as the first, but in person the shine from the gold luster makes the piece more engaging generally. Lauren's second design is more complicated, with three spouts in the rim and a hidden hole besides.

Teapots by Amanda White

This was an excellent quarter in the clay studio, but I'm optimistic for next quarter, too. I have four students returning in the intermediate class and we've finally gotten the 3D printer working again (it was in some state of being repaired or waiting for repairs for nearly all of Fall and Winter quarters.


Sunday, June 5, 2016

Leaching Test for New Studio Glazes

This quarter began with a great deal of energy in the studio around testing new glazes. Most quarters I have my intermediate class mix and test glazes to give them some experience reading glaze recipes, handling materials, glazing, firing, and analyzing test results. Occasionally I have organized larger groups of students to find new glazes or glaze replacements, or to perform leaching tests.

our glaze test bowls laid out before the leaching test commenced

In 2013 I had a large group of students involved in a leaching test to make sure that all of our studio glazes are food safe. About a year ago, I had two smaller groups of students test and mix replacements for the clear glaze we had been using in the class (it was coming out opaque) and for another class glaze that wasn't giving us the color we wanted. Both of these glazes are now used in the studio in place of the old blue and old clear glazes. As a result of the leaching tests, we have relabeled all of our class glazes and are in the process of phasing out our last remaining decorative glaze that is not food safe but could mistakenly be used on a functional interior.

our leaching test with lemon, detergent and control (nothing)

In March of this year, there was a lot of energy and excitement about testing glazes and replacing some class glazes, especially from my independent students. Early in the quarter, I met with the students to discuss the scope of the project, divide up the work and plan when various stages of the process needed to be done. Most students who volunteered (or, in the case of my intermediate class, were required) to be involved were able to find recipes and mix small batches by the agreed upon date. Most of these were then fired and we planned to meet to discuss the results.

The fourth line of bowls (at top) is in a different clay. Most test bowls are stoneware with the spare in porcelain. The celadon clay bodies are reversed with an inlaid coil of stoneware for two bowls because uniformity is, apparently, too difficult.

For a variety of reasons, several students didn't attend the second meeting. This quarter's independent student cohort has been uncharacteristically incapable of getting along in the studio and some of the drama escaped its bounds that day. I've had patches of disharmony in the studio before, but this year, and this quarter in particular, the situation reached an almost unbearable level. It has since gotten marginally better and we were able to complete the work of the quarter, but I am discontinuing the independent class for a time. Some of the students need to move on and find a new place for their work to continue to grow. Some students simply took advantage of my patience and the studio setup too many times until I finally reached my own breaking point.

washed bowls after the test, can you spot a difference?

Even with the drama of these students this quarter, we were able to successfully complete the planned testing process for five glazes, more or less. All five of the tested glazes passed the leaching test, though one test was a little odd since we appear to have two different colors of one recipe. Next week we will decide whether to incorporate any of the glazes into our studio as new glazes or replacements for existing class glazes. We tested two black glazes, one matte and one gloss. We also tested a celadon, a satin/matte orange glaze and a purple/blue glaze that has been hanging around the studio for some time. We (sort of) performed leaching tests on our new-this-year blue and a Shino that gets used sparingly in the studio.

The two bowls on the end only had one bowl dipped in each glaze so the leaching tests had to be done in stages. The cracked bowl is in celadon as are the others in its line. For some reason one of the bowls is blue, the other is taupe; they are supposed to be the same glaze.

If you like the bowls in this test, some of them will be available for purchase in the clay sale this coming November 2016.

Wednesday, March 23, 2016

Windows Alive Opening Reception March 25


Join me this Friday from 5-7pm at Hotel Maison in downtown Yakima for the opening reception for this iteration of Yakima's Windows Alive Project. I've been told there will be snacks.


I have work on display in the window of what used to be Eddie Bauer in the old mall on Yakima Avenue (between 3rd and 4th street for those of you who haven't lived in Yakima for multiple decades). 


I installed the work a few weeks ago, but it has taken a little while to get everything ready. 


Down the street a few windows some of my clay students also have work on display in what used to be Gap (when Yakima had businesses in the old mall building). The last time I checked, five of my students have work on display, though one was planning to bring work down. 


I didn't manage to get good pictures of the student work, so you'll have to come see it yourself.

Monday, December 22, 2014

Lidded Jars, Thrown With The Lid Attached

A few months ago, a student of mine was telling me about a video she had watched in which the potter threw a lidded piece with the lid attached. In class I have often shown students how to throw "knob'n alls" that are thrown in one piece and later the lid is cut off. I first heard of these pieces on a Robin Hopper video "Form and Function."

closed top cylinders (for sculpture, not lidded containers)

I find 'knob'n alls" easy to throw, if not exactly easy to spell.  They are simply cylinders that close at the top. Later the top half of the piece is cut off, usually at an angle. The lid fits tightly because it was originally part of the piece itself. 

a knob'n all

The lid can be made to fit very tightly by keying the cut. Instead of cutting off the lid evenly all the way around, I cut a notch or notches which then help keep the lid in place and assure that the lid is always put on in the correct orientation.

new knob'n alls drying (before cutting)
When my student told me about her new method for throwing a knob'n all, I didn't really understand her. It wasn't until the quarter was almost over, and I was laying in bed thinking about throwing projects, that I really thought about what she had said. I realized what she meant and what she'd done and I determined to try it.

lid after trimming (I didn't have a chuck, so I used a glass jar)

Last week I threw some of the new knob'n alls. The piece is thrown basically the same as normal, a cylinder with a closed top, but before finishing, I pushed the wall in, just under where I wanted the lid, to create an indent. It took me a few tries to find the right shape of tool to create the indent. The indent will eventually become the lip that comes down from the lid and inserts into the base of the container, keeping the lid securely in place.

lidded container after trimming

Later, once the piece has dried a bit, the bottom edge of the indent is cut and the excess trimmed away. The lid now slides easily down into the base, creating a secure lid. I tried this method a few times and all of them worked to different extents. I learned a bit more about how thick the wall needs to be where the indent is and how deep the indent itself needs to be. I'm looking forward to sharing this with my students next quarter.

trimming base on the lidded container

Thursday, June 12, 2014

Raku Firing Spring 2014

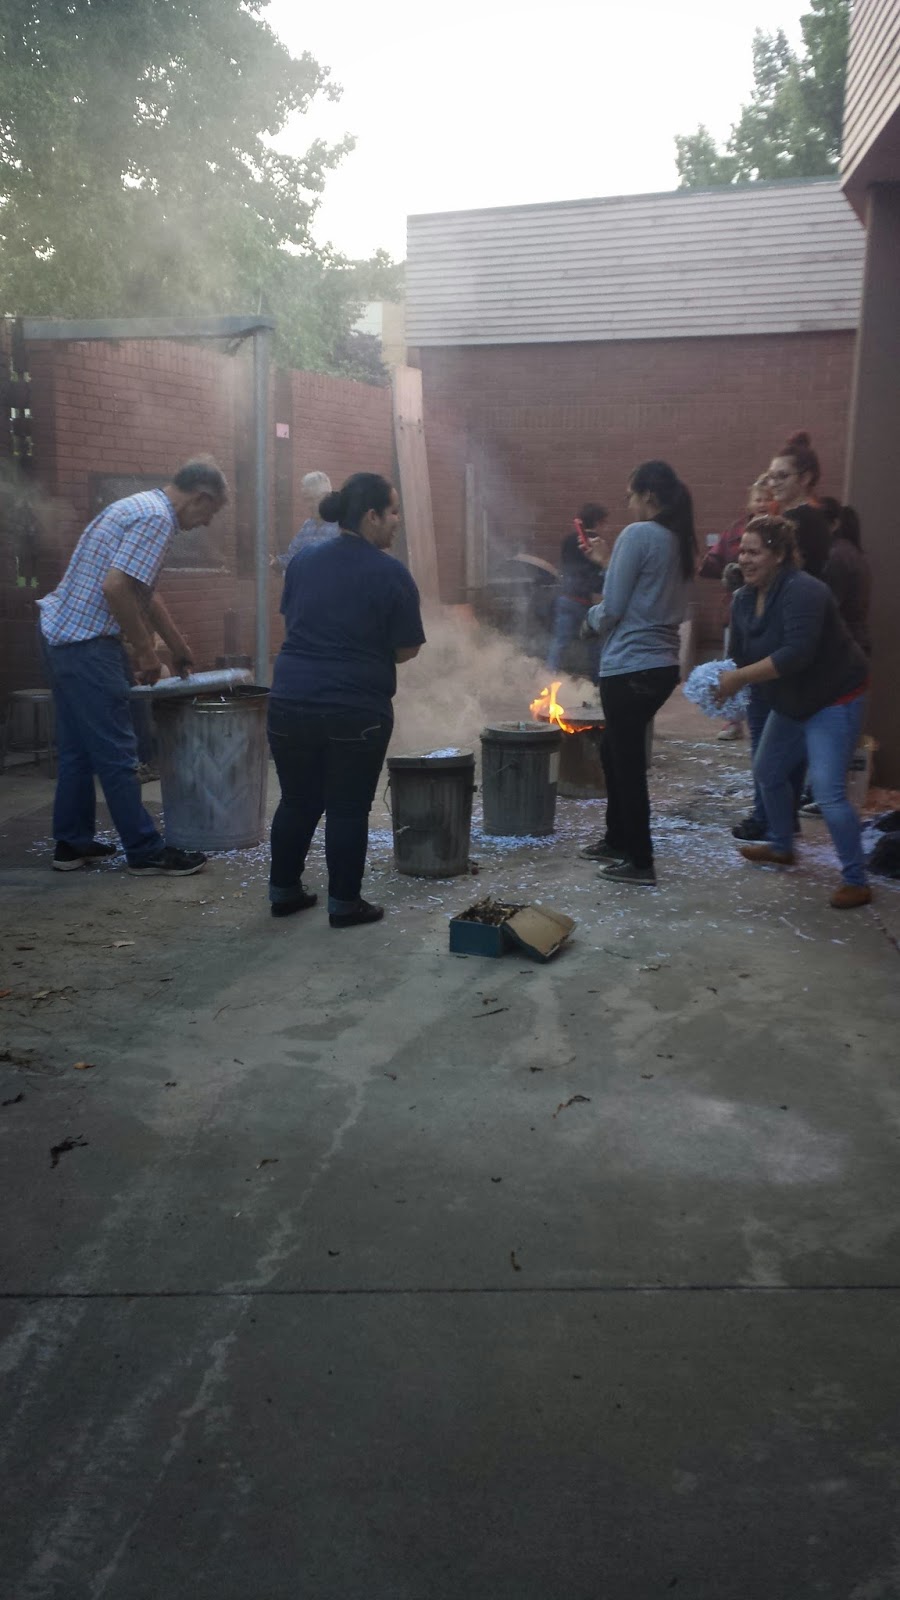
YVCC clay held a raku firing at the end of May. I didn't bring a camera, but luckily some students did. I just got these pictures the other day from a student who was helping out that day (thanks Zori). 


We fired during an evening class. I don't usually teach in the evening, but it was nice to fire during class time instead of on the weekend. All of my students were invited to participate. Several advanced students were in charge of loading and unloading the kiln. Beginners got involved too, throwing paper into


The firing was pretty efficient so we were able to get everything or almost everything fired during the class. While some students were taking hot work out of the kiln, others were in charge of covering the work with shredded paper and a few people were bringing work over to load the kiln so we could start it up again before it lost heat. 

We were also firing a smoke firing in a barrel which, unfortunately, was loaded with pine needles. The needles smoked a lot and the wind was such that the smoke mostly blew directly into my eyes. 


Wednesday, May 14, 2014

This is What a Supportive Studio Looks Like

One of my main duties at Yakima Valley Community College is running the clay studio. In a given quarter I usually have at least two classes, a handful of independent study students and several work study students. Being that the studio space is shared between a number of people, I believe it is very important to foster a pleasant and supportive studio atmosphere so that people feel comfortable working together.

Today I experienced a really wonderful side effect of this positive studio atmosphere. A sick kid at home and arrangements for her care left me with less than 15 minutes to set up my late morning class. I ran through the studio on my way to my office and noticed students working and someone's lunch on the main table. As I ran through, I shouted "Running late, sick kid, I'm gonna need the table cleared off, class is coming in for a demo in 15 minutes!"

raku firing (the clay students at their most cooperative--just add fire)

I suppose this method of expressing myself isn't flattering or considerate, but I was in a rush and stuff needed to get done. I grabbed some papers from my office and ran back in. Though the students were rather stunned, the lunch had been moved and a student was cleaning the main table. I proceeded to hurry through getting out the materials I needed for my demonstration. Luckily I've done this demo many times before, so I knew most of what I needed. However, I had some papers for the students and I had hoped to have more time at school to get them ready.

As I started looking for a wheel where the students could see my demonstration without being in the way of the half-dozen students working, one student, Grace, offered to give up her wheel and move to a new location. Another student, Janice, asked what she could do to help me get ready. Both helped me set up my demonstration without batting an eye at my abrupt and bossy entrance and inconvenient timing.

Janice's award winning bowl from DoVA 2014
My class went fairly smoothly, as did the lunch meeting immediately following and the 3-hour class right after that. After finally catching my breath, I thought about the start of my school day and how that kind of assistance is so very valuable and so much appreciated. I don't want to take for granted that I can rush into the room, give out a general call for aid and be immediately supported by whomever happens to be in the studio at the time. This kind of thing regularly makes my life easier.

The main reason for trying to build a positive, supportive studio atmosphere is to make students feel comfortable coming into the studio at any time to throw and build and glaze and spend time on their pottery. Generally I have found that an energetic, lively and cooperative studio atmosphere means that students inspire each other, learn from each other, and push themselves harder to be as good as the next person. When a bunch of hard working students are all sharing the studio space and time, skill improve more quickly and the output of the whole group is better than when people work in isolation.

Grace's pottery from Tour of Artists' Homes 2013
The benefit for the instructor in such a studio is that she has many hands acting as supports when  things need to be done quickly or when she just needs help. Thanks for today, Grace and Janice, and thanks for everyone else who helps like this in the YVCC clay studio everyday--even when the instructor is not in a mad rush. (The kid is feeling better. too.)

Sunday, May 26, 2013

My Clay Students


Can I just say how proud I am of my clay students this year? I have an amazing group of students and this May and June seems to be a culmination of their superior achievements. My clay students are winning nominations and awards for their art and their schoolwork. My clay students are strongly represented in the Student Exhibition (and awards) and I have students showing their work professionally at various locations in Yakima.


Tour of Artist Homes
I recently wrote about my home on the Tour of Artists' Homes and Studios. Several of my intermediate, advanced, and independent students showed their work at my home.

work by Grace Keller and John Peterson (photo credit: Gary E. Miller, Larson Gallery)

work by John and Timer Harrison-O'dell (photo credit: Gary E. Miller, Larson Gallery)

work by Shannon Hoptowit (photo credit: Gary E. Miller, Larson Gallery)
work by Katie Schnieder (photo credit: Gary E. Miller, Larson Gallery)


Student of the Year Nomination
Shannon Hoptowit, one of my independent clay students, my most senior clay work study and an invaluable worker for the last few years, was recently nominated by the students of Yakima Valley Community College for the ASYVCC student of the year award. YVCC students can vote for her for Student of the Year. 


Professional Venues
Besides the Tour of Artist Homes, I know of at least 4 other professional venues where students have or will show their work this year. 

Grace Keller, an advanced clay student, has a tiny studio in Glenwood Square on Tieton Drive and displays some of her work at The Glass Kaleidoscope on the main floor.

Mason Cooper, an intermediate student from 2012, displayed one of his pieces at the Emerging Artist show at Allied Arts earlier this year.

Shannon Hoptowit, Grace Keller, and Katie Schnieder, all students who displayed at the Tour of Artists' Homes this year, will also be featured in the Emerging Artists Exhibition at Oak Hollow Gallery in June. The Exhibition opens June 4 with a reception on June 7 from 4-6pm. Monika Lemmon, the painter who showed at my house for the Tour will also have her work in this exhibition.


Additionally, on June 8 my perpetual clay student, Mike Hiler, will be sharing a booth with me. I believe we will be up near Wray's if you are looking for us. Mike is nearing the limit of what one might call a student, as his work is regularly show at Oak Hollow and Larson Galleries and I saw his work in Yakima Magazine's Art Issue. (Look closely at the third picture in the linked article to see Mike's work.)


There is one more place you might be able to see my students' work in the future. I know at least one student is expecting to have work in Larson Gallery's Membership Exhibition, opening Friday June 7 from 5-7pm.


DoVA Show and Awards
The DoVA Student and Faculty Exhibition has been up for some time, but I haven't gotten a chance to mention the awards or show pictures. Seven of my clay students took home awards, including cash awards, purchase awards and Best of Show.


More than two dozen clay students exhibited work in the Student Show. Several student exhibited more than one work and a few showed three pieces, one for each quarter they took clay classes during the previous year.

clockwise from top: work by Sandra Juarez, Katie Schnieder,  Shannon Hoptowit and Shannon Hoptowit. 
Katie Schnieder, hand-built vases
Honorable Mention: Sandra Juarez's hand-built "Twisted Lady"

I taught beginning throwing and beginning hand-building classes this year. I taught throwing classes every quarter and my higher level throwing students have been experimenting with larger and more complex forms.
center: Shannon Hoptowit's "Giant Cookie Jar" wheel-thrown clay Award of Merit
also pictured, clockwise from top right: work by Janice Buckler, Jamie Davis, Amanda Gutierrez and John Harrison-O'dell 
Honorable Mention: Grace Keller's "Lidded Casserole"

My beginning students are making strong, though usually smaller, work. I believe part of the overall quality of my students' work comes from seeing each other working in the studio. I have a strong group of continuing students who demonstrate a solid work ethic. Students see each other working in the studio, recognize hard work as an expectation and thus work harder themselves. The hard work is practice and practice results in more work and better work. 

Shauna Avery, Functional Pottery (first quarter wheel class)
Amanda Gutierrez, Functional Pottery (first quarter wheel class)

My higher level throwing students combine hand-building and throwing techniques, altering their forms off the potter's wheel.

Doug & Laurie Kanyer Purchase Award: Mariah George's "Owl Lamp"
thrown and altered wheel pottery
Janice Buckler's "Paddled Vase"
Shannon Hoptowit's "Fish Kiss Vase"
Katie Schnieder's thrown and altered vase

This past winter I was blessed with an incredible hand-building class. Somehow I ended up with a whole cohort of hardworking student who challenged themselves and their classmates. Some of the strongest work in the exhibition came from first-quarter hand-building students. The class included a couple of students who had taken throwing classes before. Throwing skills may not directly translate to hand-building skills, but familiarity with clay helps with any technique.
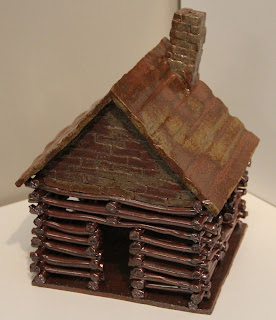
Joshua Baxter's "Log Cabin"
Sarahgenie Bliss' "Centaur"
Makaela Duim's "Waterfall"

In fact, the hand-building energy was so strong this past winter that I wrote a new course to be offered next year which will be a second quarter continuation of hand-building. I have one continuing hand-building student this quarter who is testing out some of the hand-building projects that may be used in the new course next year.

hand-built clay Award of Merit: Lydia Gallegos' "Cebollas"

Jessenia Rodriguez's "Pomegranates"
Students in the Hand-building class made work inspired by Yvonne Pepin-Wakefield's "Abaya and Beyond" show, which was up during the winter. "Pomegranates", "Cebollas" and the Purse bag below were all inspired by this exhibition.

Further evidence that the clay work in the DoVA show is strong is that my clay students took home seven awards including Best of Show, a purchase award, a design award and three honorable mentions, as well as two clay specific awards. I also noticed, when I was last in the gallery, that several clay students had sold their work. 

Dick Lord Memorial for Excellence in Design: Timer Nite Harrison-O'dell's "Abaya and Beyond Purse bag"
Assistant Director Honorable Mention: Katie Schnieder's "Cracked Jars"

If you haven't gotten over to see the show, I highly recommend that you do. The show closes on June 1. Larson Gallery is open 10-5 Tuesday-Friday and 1-5 on Saturday. Students may start picking up work after 3pm on Saturday, so get their early. If you do miss it, never fear, you'll hear from these students again.

For some reason, this year's exhibition had a significant selection of dragons and dinosaurs, including a combination thrown and hand-built piece by Janice Buckler
Dragon Alley also featured this thrown and altered teapot by Timer Nite Harrison-O'dell
John Peterson's "The Year that Was"
Best of Show: Katie Schnieder's "Tyrannosaurus Rex"