Wednesday, June 30, 2021

Online Design Students: Line Projects (week 1)

This post features work from my Design students in Fall 2020, Winter 2021, and Spring 2021. These students all gave me permission to show their work here. These represent some of the best and most interesting submissions from our Line project, the first project in all four sections of this class this past year. There were a few other submissions I would have liked to to share, had I had permission from the students.

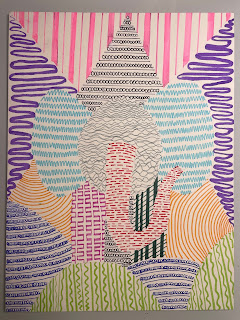
Student Example, Winter 2021. This example has a bit of everything: carefully crafted lines (where the student probably used a ruler to keep them even), big contrasts in thickness, tone and shape of lines, consistency or repetition of line types, and a fairly complicated original to work from.


The line project, as I said, was the first project they did in the Design class. Remember that this Design class was entirely online and was set up as an asynchronous class, meaning we didn't have shared work time or a regular meeting time as a class. Students learned the content (line qualities and line types in week 1) and the techniques from interactive lessons and demonstration videos.

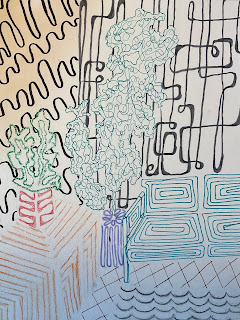
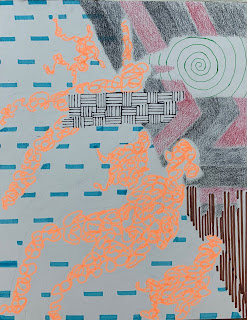
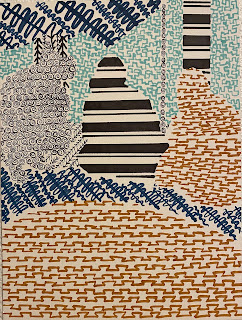
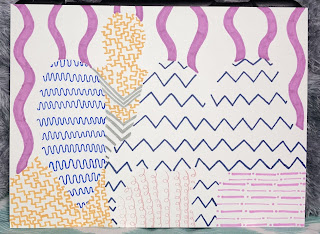
Madeline Crowder, Spring 2021.  The variety in line shapes here is lots of fun, especially as the black lines in the back right seem to come from a particular era. This student has also taken advantage of line qualities that can also act as line types to define space, specifically linear perspective in the couch.


They created sketches, in many cases discucussed their plans with me between the sketch and the project, and then created their projects. Projects were submitted via photos into Canvas. (One added challenge this year was that students had to learn how to set up and take quality photos of their work, adjusting for lighting, location, and angle of both the work and the camera, then they needed to work out some of the challenges that came up with regards to uploads and file types).

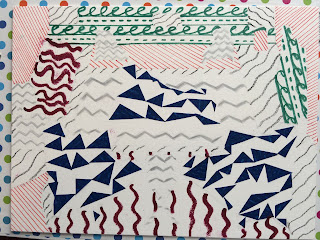
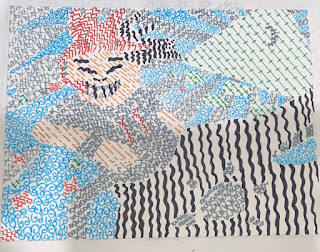
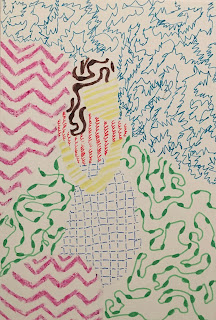
Student Example, Winter 2021. I don't remember all of the original designs, but this one I remember because the student discussed with me how to deal with the quilt on the lap. The two figures could have been treated as one with the quilt. Not only did this student separate the figures from each other and the chair, but the quilt pieces were also separated, making for a lively composition. 


The students eventually had group critiques where they could see and discuss work created by classmates and get feedback on their own designs. All students got feedback from me, of course, on both sketches and projects, but feedback from classmates is sometimes more valuable or more interesting to students. Plus is is great for them to see each other's work.

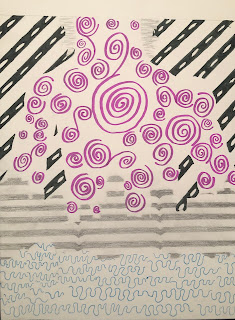
Allison Parke, Fall 2020. Allison was in the Fall class. Fall students' works were used as examples for students in winter and spring classes. Though it may have been frustrating for fall students to do the project without many examples, they were patient with me as it was my first quarter for the online class (and this project).


All year, I've been discovering things that I miss about teaching on campus. It's funny; I thought I knew ahead of time what would be challenging this year with online studio classes, but there's so much more. For example, just this morning I realized how much I miss students' artwork on the gallery walls in the hallway of the art building.

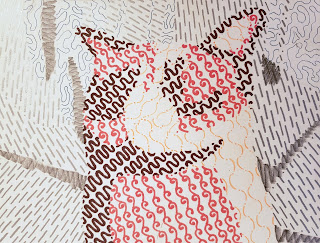
Patrick Byers, Winter 2021. Patrick's subject is easily recognizable, but I particularly like how he has used the tonal and thickness changes in his lines to create a sense of shading in the cat.


I hadn't taught Design on campus for years. The last time I taught Design was in the old Palmer hall, which means that I haven't taught any 2 dimensional classes in Palmer Martin Hall--ever! Palmer Hall was a round building. It was quirky and strange, as an art building should be if it can, but it didn't have hallways. The design studio functioned as the hallway between classrooms and to faculty offices, the clay studio was the hallway to the bathrooms, printshop or mailroom from faculty offices and studio classrooms.

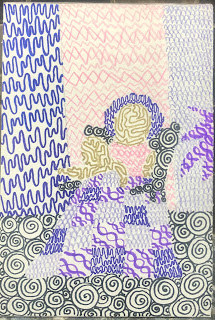
Heaven Calvert, Winter 2021. In winter, I had two sections of the design class, which allowed for many more examples in spring. It also allowed me to see a much wider range of approaches and the ways in which different sections of classes, even asynchronously, can develop a distinct character.


In that odd building, there was never a space for students's work to be on display. In Palmer Martin Hall, right from the start, we requested display space, both temporary and semi-permanent in the halls. What we got is excellent. We have four glass fronted locking display spaces, three for 2D and one with shelves. We also have four sculpture vitrines (pedestals with locking plexiglass boxes on top). We also have 3 walls in the downstairs hallway where student work can be hung up for critique or display. This is where the drawing, painting, design, photography, and printmaking faculty reguarly hang student work during and between classes. Usually work is up for a few week or a month. The current work has been "on display" for 15 months because we haven't been in to take it down.

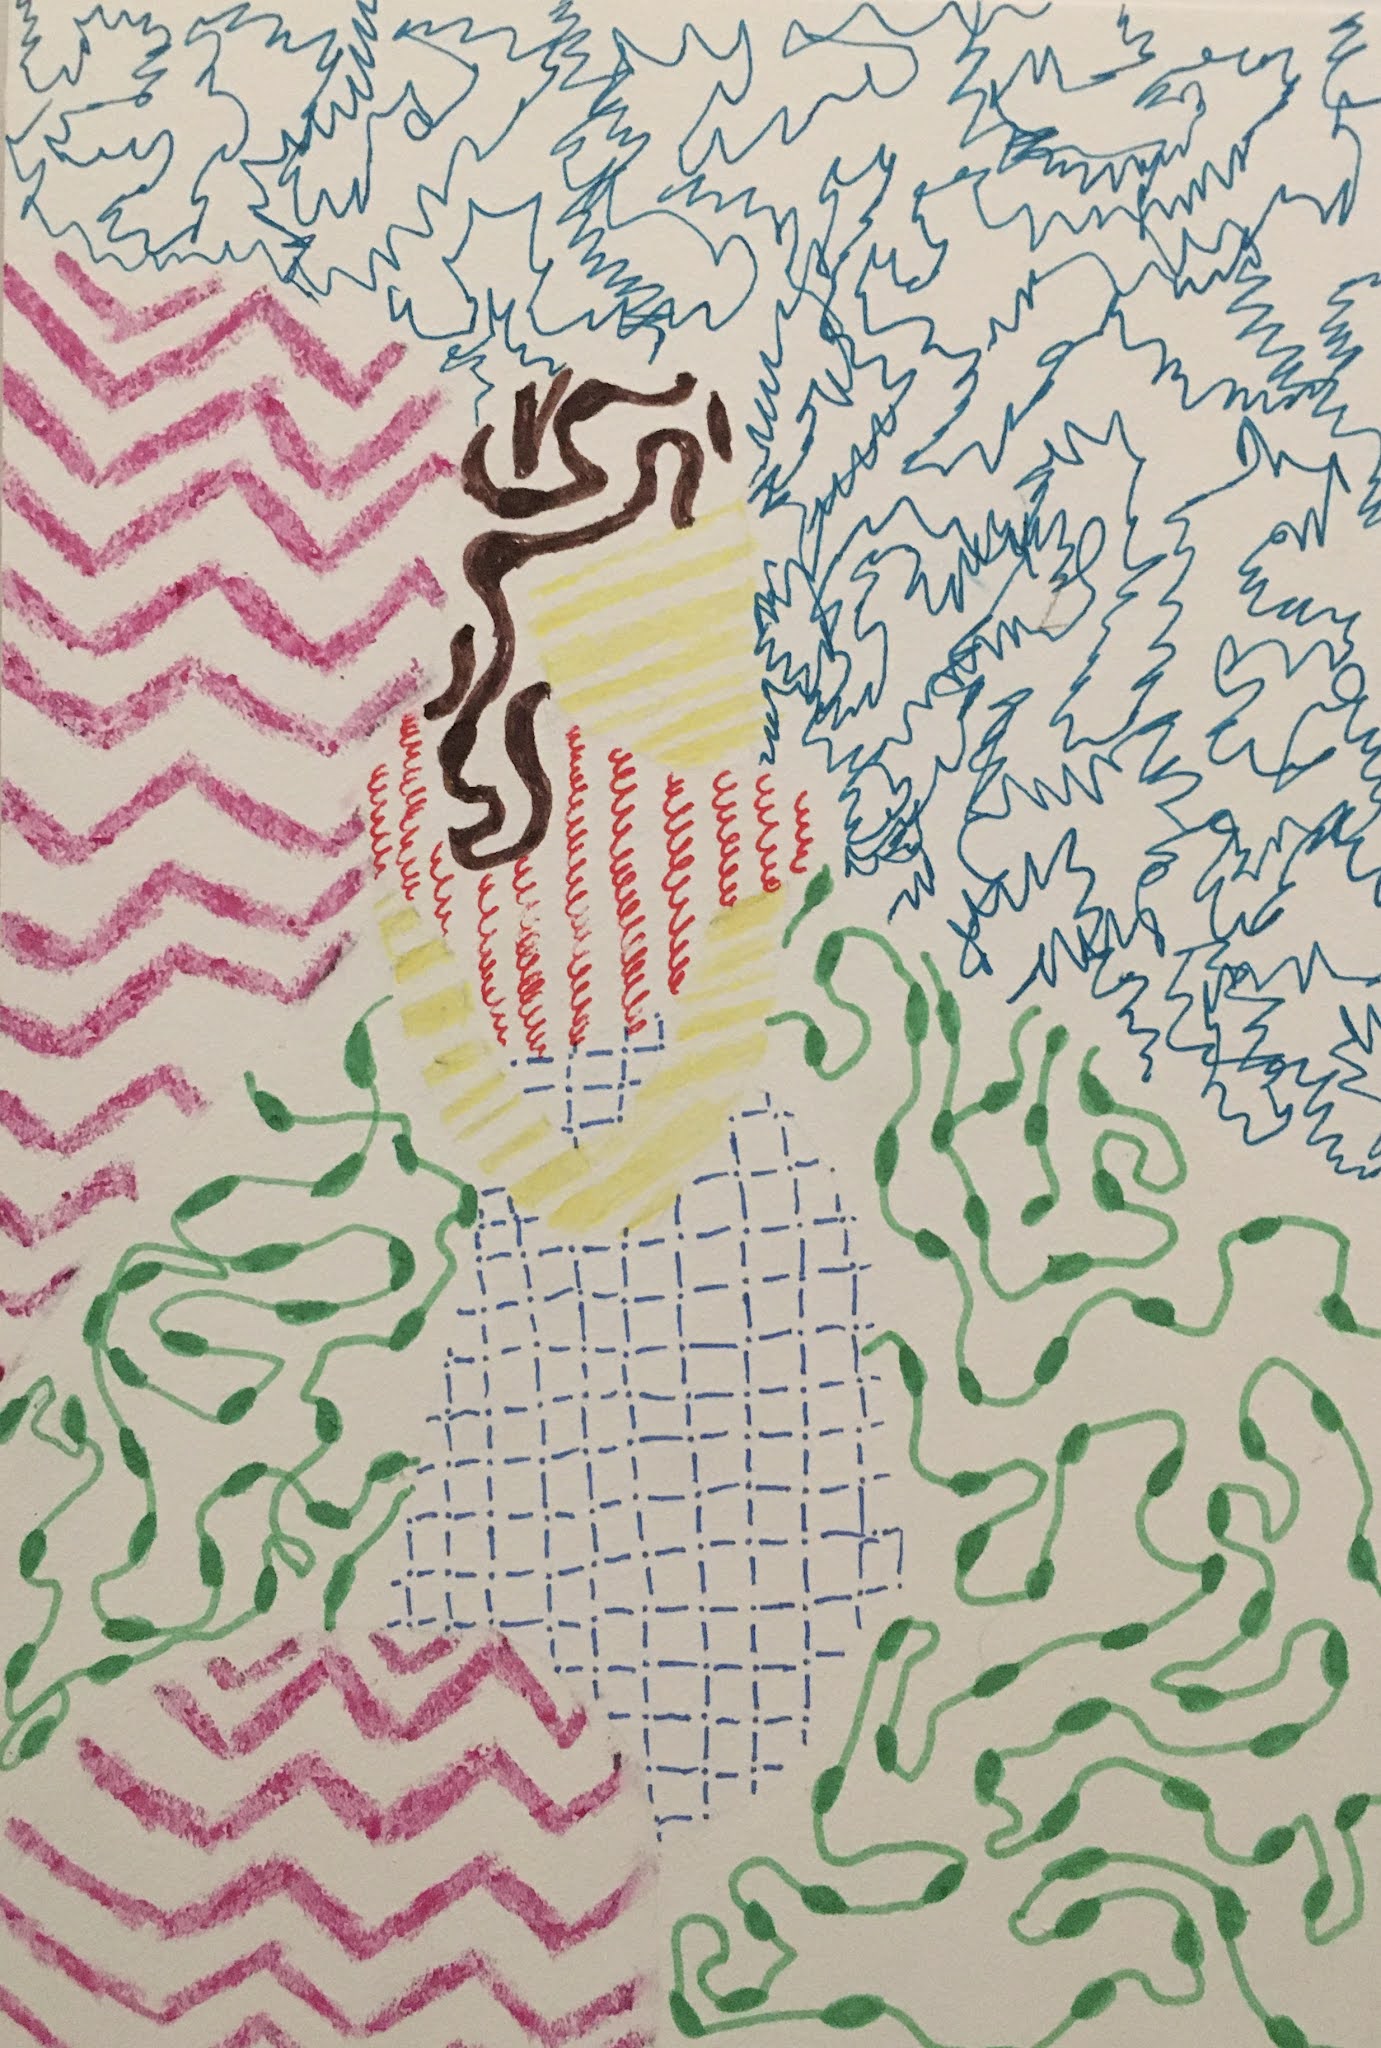
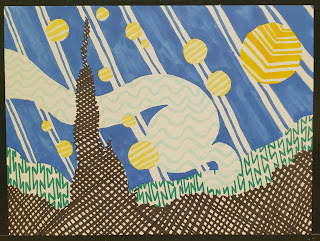
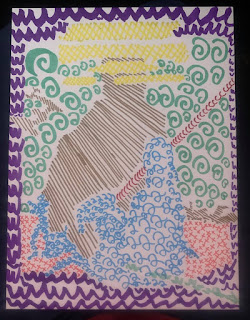
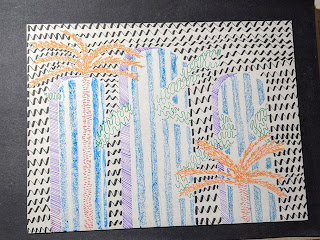
Lillian Davis, Winter 2021. It may not be entirely possible to distinguish Lillian's original found image, but the design is still interesting, with large and small shapes implied by the yellow and a disinct direction implied by the blue.


I don't use these walls myself because I haven't taught flat work in all that time, but I really enjoy seeing what students are up to. As I was uploading the images for this blog post, I realized how sad it makes me that these students' work can't be up together on display in a wall on campus.

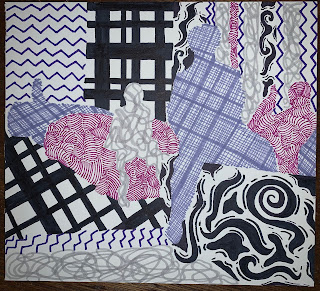
DJ, Winter 2021. In this case, the vertical and horizontal direction of most of the lines has flattened the image a bit. As with other examples, we see a consistency in the tones of lines, despite the contrast in color, shape and thickness.


During the year this year, I asked permission for students to let me show their work on my blog, but I was too busy and overwhelmed to actually get those posts written anywhere close to when the works were actually made. Putting the work up in the hall is a whole different game than posting the work online. Here I need to make sure I have the students' permission, check how they want their name, adjust the file name so that it doesn't contain a name I don't have permission to use, get the captions lined up correctly with the right artwork, and then write about the work (or, I guess in this case, whatever I happen to be thinking about).

Elias Reyes, Winter 2021. Students who worked with ads, book covers, or other found images with text had to decide how to treat that text. In many cases, leaving it out disrupts the original design. In this case, Elias has treated the text block in the middle as just another area to fill with his varied line qualities.


This design project was the culmination of our line unit. I try to focus on one formal element or principle of design each week. During that week students learn about the new design concept, practice a bit in interactive lessons, and demonstrate their understand with sketches in their sketchbooks. In the line week, the sketches demonstrated concepts like implied line, expressive line, and directional line. 

Erica Guadian-Riso, Fall 2020. Erica was one of the few students to dive into the idea that lines can be made from things that aren't pencils, pens, crayons, ro markers. The blue triangular implied lines are made of bits of tape. The different material creates a contrast in color, tone, and texture.


The project in week 1 focused on line qualities, specifically asking them to create a diverse array of different line qualities which might include thickness, length, color, tone, shape, and direction. Coming up with different lines seems, at first, to be an elementary exercise, but it's harder than you might think to keep varying line qualities beyond a certain point. When we try this on-campus, I have students work together to try to create varied line qualities. I walk around reminding them of ways their lines aren't yet varied. For example, they are all about the same length or thickness, they've used the same tool to create lines that are all black or grey. Eventually, I push them to make lines that aren't created with traditional drawing or writing tools.  Together, as a group activity in a shared shape, this can be a fun and even a funny excercise.

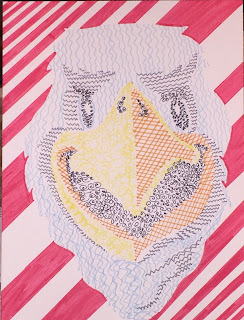
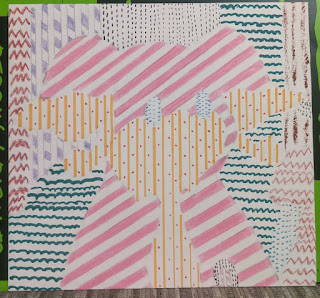
Marlen Hernandez, Winter 2021. A very recognizable subject here is make recognizable not through outlines or colored in sections, but with subtle tonal and color changes and lines kept closely spaces in the subject and more widely spaced in the background.


I tried to keep the same kind of energy in the online class, but joking and having fun are a little more contrived or awkward online and it's hard to tell if we end up at the same spot. When asking students to go back and try again in a group setting, it is easy to make it clear that the point is to push them outside their comfort zone, but asking the same thing online, asynchronously, can make it appear that they alone have made a mistake (which isn't the case). 


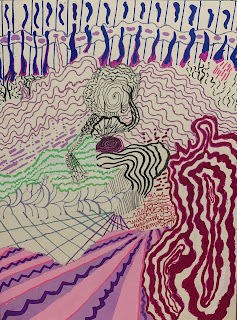
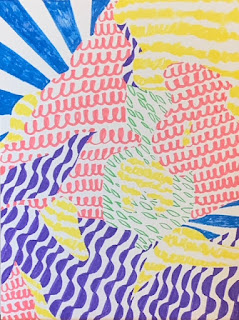
Julia Maldonado, Winter 2021. The subject may be less clear here, but the energy in the lines and the variety in not just length and shape, but also material make this an interesting design that rewards longer looking.


This particular project, as I said, was the culmination of week 1 and our line unit. This was a tough project in some ways, one of which was simply that they had a lot to do in the first week. The concepts weren't incredibly complex, but in that first week, they had to learn how to navigate Canvas for my class, get their materials, and learn how my class is run, all while managing their own time and working on a number of activities for the week. In an on campus class, a lot of this doesn't feel like work because it is done together as a class. We have 6 hours together in the first week, during which time we learn both concepts and the structure of the class together. Students have to get themselves to class and have homework tasks, but in an online class, students have to set aside ALL the time for class and homework, access everything themselves, and never benefit from an instructor looking over their shoulder in real time.

Kyle Win, Fall 2020. In the fall and winter I required students to meet with me to discuss their projects once every week or two. These conversations were fun for me, but they also helped the students think through design challenges like how to treat text in this first project. 


Additionally, a number of students may have been in their first online class and others who had been in online classes before might not have been in a class structured the way I structure my classes. Instructors have different ways os structuring classes in Canvas, but studios are also automatically set up a bit differently than reading/writing based classes.


Student Example, Winter 2021. One of the challenges for some students wasn't so much in doing the project, but in having confidence that the project was done correctly. I asked students not to worry about creating finished projects that were recognizable, because I wanted them to start thinking about design and not subject. I suspect this was easier later in the year when there were more student examples against which to compare their own plans.


To prepare for their line project, students were asked to create at least 6 distinct lines that featured different line qualities. They were also asked to work from a found image (an artwork, photo, book cover, or advertising image) to create their "found" design. The idea for this project was that they would use the contrast in line qualities to imply the edges of shapes or forms in their found image. They were asked not use use outlines, shading, or fill in shapes or areas of the design. 


Marvin Mendoza-Rosas, Fall 2020. It was helpful to pick an energetic design to start from, but the energy of the lines themselves matters too.  Some of the most interesting designs weren't necessarily ones where the original was recognizable.


The really successful examples, in my opinion, are the ones where the elements of the design are distinct, though not always recognizable, and the lines are striking for their contrasts. All of the examples I've shared here are good examples of both varied line qualities and those line qualities used to imply distinctions between areas in the design.


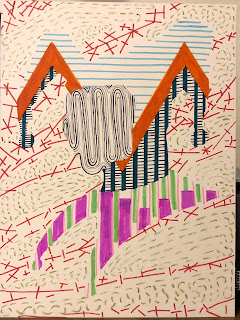
Chloe McDougal, Winter 2021. Bold contrasts in color, thickness, and tone usually resulted in a work that was striking, though creating line qualities that were similar in color, shape, or size, like those in the background, also made a difference.


These examples come from a wide range of found images and one of the big challenges in the first week was that student had to make some decisions about where one shape, form, or "area" of a design started and another ended. Should the face be handled separately from the hair or body? Should all the areas of the wall or floor be treated as one or should they change line qualities where they are interrupted by the figures?


Student Example, Spring 2021. Even and carefully crafted lines also made for successful designs. In this example the starting image was fairly complex, meaning the student designer had to decide which parts to treat as separate and when to combine elements into one.


Ironically, options like these are sometimes the most difficult part of a studio art class. Students who are accustomed to or comfortable with being told there is one correct answer can find it frustrating to be given options and told to choose what they think works best. This can be especially challenging when we acknowledge that some decisions "work better" than others.


Student Example, Winter 2021. Students were encoruaged to make decisions about how much detail to include. For a close up, an eye might be treated as a separate element, but often entire faces or heads could be combined with the rest of the person and the whole body could be treated as one element.


For this reason, I try to give students plenty of opportunities to try different options, discuss and get feedback on their reasoning, and then discuss both their choices and choices made by peers or other artists so they can observe, describe, and consider what works well and why. 

Student Example, Winter 2021. In some cases, where there was only one figure, it made sense to separate the body into separate forms. In this example I particularly like the green line with bumps on it.


In this line project, students were asked to sketch three different versions of the simplified composition from their original found image.  The idea was that in one of these students might separate smaller details, like facial features, limbs and clothing, furniture, or walls, floor, etc, while in another they might combine areas to create whole bodies, walls, or backgrounds.  They might also try different ways of identifying parts of the design. In one sketch they could separate light and dark areas. In another they might outline shapes or forms. They could try several ways of separating areas that gradually fade from light to dark. Three sketches gives them some room to try different approaches before they commit to one for the project itself. 

Student Example, Winter 2021. I find it interesting how the bottom of this figure seems to melt away. In deciding how to plan their composition for this project, students sometimes had to decide how to address areas in the original that blended together seamlessly through gradations in color or tone.

After the first class in fall, I asked students for their feedback on what worked well in class. I was happy to be able to provide winter and spring students with many more examples from classmates, as well as some comments from me on what worked well. I think those were helpful for students. In fall and especially winter I required more real-time (via Zoom) interaction with me than I did in the spring. Limiting how much they were forced to interact with me was a mistake. Students may not choose to meet with their instructor, but even a few 5 minute interactions throughout the quarter seem to make a big difference in both student's confidence and the work they create.


Student Example, Fall 2020. I really appreciate my fall students who dove into the project and accepted the parameters of the (slightly strange) assignment before there were finished examples to build on.


It has been such fun for me to look at all the works together from three quarters and four classes. I suspect my assignment directions and feedback became clearer and more helpful as the year progressed. I also think that the kind of artificial community we were able to build within classes and between classes where students could see their classmates' work helped a lot. A tiny bit in winter and a bit more in spring, I started to build in some of this artificial community by asking students to record or recommend videos explaining things that had confused them the first time around. I hope this will help student feel like they are not just in a class with me alone.


Note: All students whose work is featured above gave permission for that work to be shown. Students listed as "Student Example" requested to remain anonymous. 

Friday, June 25, 2021

Summer 2021, Week 1

bowls, mug, and part of a sculpture from earlier in the spring, out of the bisque firing


Summer started last week, at least for my home studio. Classes finished June 9, faculty were "done" June 11, and I was able to get into the studio quite a bit last week. I still had some union responsibilities, but I was also able to recycle clay, throw quite a few bowls, mugs, and planters, and build a sculpture start to finish.

my time-lapse sculpture, drying before firing

I documented the process of building the sculpture from start to finish, using time-lapse video. It's actually the third of four sculptures I built but haven't yet glazed this year. I was able to get started during the quarter and on weekend because I have a slightly reduced teaching load in spring. It helps to have a still nice and new home studio, and no commute to work. Working at home in my brightly lit, clean, and well--organized studio makes it more pleasant to work at home. The pugmill also helps speed things along. I threw some boxed porcelain at first, then cleaned out my pugmill and sent the boxed porcelain through with some reclaim. It felt a lot nice to thrown once it had been "warmed up" in the pugmill.


bowls, mugs, and planters drying before firing

I threw a bunch of bowls and some mugs and planters. The bowls, at least some of them, are for my friend who is getting married this summer. I'm hoping to have them glazed in time to send them to her, though I wasn't able to fit all of them in the last kiln load. I played around a bit with a stamp and some carved decoration to personalize the designs, but I haven't determined how they'll look with glaze. I'll keep some simple in case these don't work out well.

detail view of a carved bowl surface

I also threw some planters and some mugs with COVID decorations with the idea of having them ready for the Fresh Air Art Celebration this summer. I'm doing two shows this summer, the first is the Fresh Air Art Celebration run by the Larson Gallery and the Yakima Greenway. That show is on July 24 on the Greenway near Sarge Hubbard Park, from 10-3. I think that one is mostly a sale, but they also mentioned that there may be some kids' activities. It's their first year and their communication is a little uneven. Hopefully it will be advertised well. I'll also be opening my home studio to the public on Labor Day weekend for the Yakima County Artist's Studio Tour, September 5, 6 and 7, 2021. This event is also in its first year. There will be 6 or 7 artists studios on the tour, but several spots have more than one artist. This one is shaping up to be well advertised and I'll share the postcard and other info here later this summer. 

mugs, sculptures and bowls from the first two weeks of the summer

The studio tour is a tour just of studios, not homes or gardens, which is nice. Years ago my home was on the Larson Gallery's annual Tour of Artists' Homes and Studios and it was a lot of work to get the house ready for lots of people to walk through. With this studio tour, there's no pressure to get the house looking good, as I'm just opening the studio. I'm also not planning to have other artists at my house. I'm not sure if that seems harsh, but I'm hoping this event won't be an immense undertaking. I'm hoping to simply have my work out in the studio space and keep things somewhat simple.

the first layer of underglaze on a sculpture from spring

This week, the second week of the summer, I've been able to get a bit of underglazing done and I threw for one day. Getting images and text ready for the Labor Day event has used up some of my time, as has some union work, but I've also started updating my website, something I hadn't really gotten around to in several years. It had a bit of info updated in 2017, and my CV was from 2018, but nothing since then. I update the blog pretty regularly, so I usually direct folks here. 

the first (teal and yellow) and second (purple) layers of underglaze on a sculpture from spring

The few updates I did this week, kind of like the images I prepared for the Labor Day tour weren't that difficult, but for some reason I was just putting them off. I'm not sure if its the heat or just general summer feeling, but sometimes it's just tough to get started.

Monday, June 21, 2021

Time Lapse Coil Building Video Series

The finished (not yet dried and fired) coil built sculpture from the videos

Much of my work is coil built. I find this technique to be the fastest, easiest, and most enjoyable way to build up asymmetrical forms fairly quickly. Throwing is faster, easier, and more pleasant for functional work and symmetrical forms, but the extra setup and cleanup, as well as the effort to alter the forms to create asymmetrical pieces makes this technique less appropriate for these types of sculptures.

The first video shows how I build without a base. I started working on a board on the table thinking I could keep it steady for the video, but almost immediately I realized I'd have to turn it to work. Usually I work on a banding wheel.

But demonstrating coil building and communicating why it is such a great technique has always been a challenge. A throwing demo is quick and impressive. Students can quickly see why it would be a great technique to master. Slabs are also fairly straight forward to demonstrate, as long as you prep some slabs ahead of time so they are leatherhard for the demo. Coil building allows for endless variations and adjustments as you build, but also takes a long time.  And that time can't be all in one sitting. Once you've reached a certain height, width, or weight, the clay needs some time to firm up before you can continue adding to the top.

For the building, I used mostly my fingers and several ribs. A serrated rib allows me to quickly adjust the surface and shape. A smooth, flexible metal rip then smooths that rough surface, and a silicon rib smooths more. I sometimes use a paddle to help adjust a shape and I also score the tope edge(s) at the start of a new building session. I don't score each coil.

This is tough to communicate in a live demonstration, because a live demonstration would require several pieces all at different stages of the build. It seems like an online/video demonstration would help, but it would still require multiple videos at different stages and the technique itself is still repetitive and, frankly, boring to watch in real time. It is also both simple, in the "I get it, you keep stacking snakes on top of snakes" way and complex in that there are nuances in how those snakes get stacked and attached.

The sculpture partway through building, after I applied the first round of texture.

I've been pondering this problem for years, really, but even during this online year, I didn't feel like I got the demonstrations where I wanted them to be. I use a video playlist showing the basic techniques, including how to create visible coils, how to smooth the coils, how to adjust the shape or add "appendages" and showing examples of finished pieces.


A screenshot of the first part of the coil building directions for my online class.


I give the students some options as far as how they watch these demos and also include examples of finished work and some links to alternate ways of using coils. I have the students practice using coils and in the second week include some more advanced techniques for changing the shape, burnishing, and other techniques they might want to explore.


A screenshot of the top of my Tips & Troubleshooting page for my online class.


This spring, I added a troubleshooting page with tips and suggestions, including illlustrations, to try to help students work through the kinds of problems students often run into. This troubleshooting page is an attempt to capture some of the things that would be discussed in class. The format certainly isn't as nice as what would happen organically during class, when I would be able to show students a fix (or an error) in their own work, but I think it was helpful. I created one of these Tips & Troubleshooting pages for each of the building techniques we learned in the online class.

Some of the images in the Tips & Troubleshooting page for coils.


So this problem has been percolating for some time, but it wasn't until classes ended that I came up with a possible solution. Instagram was my inspiration, in fact.  Lots of makers on Instagram show their process using time lapse videos. Just the other week I watched a comparison video where the artist contrasted how fast the technique seems in the time-lapse with how slow the technique is in the regular speed video. 

The textures was applied using sprigs, and a variety of ball styluses. I have a small bisque mold for the sprigs. I use a scoring tool and brush to attach them and smooth their edges with a couple of rubber tip tools, followed by three sizes of ball stylus.

My problem is precisely that: if I were to record the videos in real time, they'd be tediously boring.  Coil building feels fast when I'm doing it, but that's because I enjoy it and I usually am listening to an interesting audiobook while I build. But watching me build with coils, I think that would feel akin to watching paint dry. I don't think it would be reasonable to expect students to literally watch hours of video to see me work through a sculpture from start to finish.

The texture combines old and new. I've had this gear sprig for years, but the large ball stylus is new and I'm trying it out here.

The timing of the videos has actually been a problem from both the watching and the making perspective. I've created videos in my home studio before, but because my camera is my phone and my audiobook player is my phone (and I don't have the rights to record audio anyway), I have had to choose between the two. This year my daughter is old enough to have a phone of her own (and old one of mine actually) which I borrowed for the time lapse video. I was able to listen to my audiobook and simply set up her phone/camera on a tripod and go.

Periodically I seem to stop moving. I think that's when I'm pressing clay into my sprig mold. I press the clay in, scratch the back to score it, then it comes out pretty easily because the bisque mold has soaked in some of the moisture from the wet clay. I would make a bunch at once, then attach a group of them.


I haven't tested these with a studio audience yet, obviously, but I am hoping that these videos, in combination with the regular speed ones where I explain my techniques, can help the students to see the process from start to finish. I worked on this particular sculpture on 7 different ocassions on 5 different days. All seven videos ended up around 30 seconds long, but each time I worked for close to an hour. I don't understand the iPhone timelapse settings (or math, apparently) well enough to know exactly how long each session was, but let's call it seven hours plus drying time, for the whole sculpture. I did do maybe 15 minutes of touchup on the top after the last video, but that's the only time I worked on it with the video off.

I am impressed that I managed to keep my head out of the view as much as I did. I knew I was leaning my head or my arm in front of the camera, but with a complicated form like this, it's tough to get the texture applied evenly all the way around and under each piece. It's importntt not to rush, too, which I would have done if this were a real-time video. 


I think the videos ended up working well, at least on their own. For some reason I don't care to find out today, Blogger made them square, but they're normal proportions on YouTube where I've made them into a very short playlist

Here the inside of the coils is pretty visible again for a while. Though it is less important to fully smooth the inside of a sculpture no one can see inside of, I do try to smooth the inside seams to prevent cracking and strengthen those joins. 


Of course the nature of the form and surface means that a lot of the movements in the videos, especially the middle videos are pretty repetitive, but I didn't want to cut something out that might be of note. The start and end are obviously interesting, but I imagine that students would be interested to see how the twisting shapes are created and how tall I build before taking a break. All or nearly all of the breaks between videos were necessitated by the clay becoming too soft to continue working.

I had to pull the camera back to show the whole form, so there's a lot more me in this video than I'd prefer. A lot more facial expressions from me, too, alas. And if you look carefully, some extra young people in the room, too. 

In the last video, I was very nearly done, but I was also distracted because someone came into my studio to pester me, stick her hand in front of the camera and then shine a laser pointer at the sculpture. I'm not sure you can tell in the time lapse, but I was able to find her when I slowed down the video to check. It's amazing how different it feels to work alone in a studio than to work in a studio with someone who wants to surprise you.

The finished sculpture.


Watching the time lapse videos, it's also kind of astonishing how quickly the process seems to go. The build did feel fairly quick in real-life, but the texture took forever. To see it compressed into literal seconds is kind of fun, but also kind of exhausting; an hour of concentration and care reduced to less than a minute of frenetic movement! 

You can watch the entire playlist here if you like (or above if the embedded playlist will start working again--this is the second time since March that I've had trouble with embedded playlists--last time YouTube fixed it. This time I'm not sure if it's Blogger's fault). 


I'm really curious to hear what folks think about these time lapse video demos as pedagogical tools. Do you feel like you have a better understanding of how coil building works? Have you tried coil building? Did I do or include things you didn't already know about?  What would you want to see more/less of if you were using this to learn?  Is this too complicated a form to be useful?

Sunday, June 20, 2021

Online Clay Student Pinch Projects

Student work, Spring 2021, This student added eyeballs and teeth to these planters/ring holders. I'd love to see these pieces glazed in bright colors. There may also be a bit of Instagram influence here (it's great to see student's using other sources besides what I show them in class).


This spring I taught my entirely online hand-building class for the third consecutive quarter. It really is a strange experience to teach a hands-on 3D studio class via a visual and mostly asychronous medium. Not alway getting to handle the work really changes how the class feels and makes it a little difficult to keep track of what's actually being made in the class.

Ashley Lawson, Spring 2021, These sculptures and face containers also have a lot of character and are a nice example of a set combining functional and scuptural forms.


Today's post includes pictures of student work from the pinch projects in these online classes. Students in all three classes were asked to create a set of six pinch objects. I also included some requirements for students to add attachments, like handles, and for lidded or closed hollow forms (sculptures).  Students went in a whole variety of different directions for their sets, creating tea sets and incense holders and planters and sculptural forms and even interactive stacking games out of the different parts of the sets. I've included some of my favorites, though I have at least 2 or 3 other favorites that I didn't get permission to show.

Ashley Lawson, Spring 2021. I particularly love the teeth on this cup. I have no idea where the idea came from but it was especially well executed.

I start with the pinch technique because it is immediate and requires no tools other than the hands, but it also helps students to really get a feel for the clay. Because they are pinching with their fingers and thumbs, they have to learn, fairly quickly, what too thin feels like (they learn this when they pinch all the way through the walls). Ideally they also learn what is too thick, but this is harder to instruct on online. 


Sophie, Winter 2021. The amoeba shaped saucer is the highlight of this set for me, but I also like the choices the artist made in photographing her work on the deck. Photographing work in a way that makes the work look professional, given students' limited spaces, was a challenge each quarter, and required me to do more intensive instruction on photography early on than I need to do on campus.


There are a number of barriers between me and the students that get in the way of my immediate experience and understanding of their work. I can't always tell the size of the work or thickness based on just a photograph on a screen. I did, eventually, get to see and handle the work of students who chose to fire, but firing wasn't a requirement this year. It couldn't be, really, because transportation and timing, as well as pandemic concerns, didn't necessarily allow students to get their work to campus.


Sophia McDougall, Winter 2021. Sophia's set has a leaf theme. She presented the work via video for her critique, which helped me and her classmates to understand the whol of each form, including leaf handles and the leaves under the tealight item second from the right.


Ocassaionally, I was surprised by the work that came in. In one instance, the lidded forms I took to be maybe 3-4" wide turned out to be closer to one inch wide. Thickness was also a major surprise. In an on-campus class, I spend a lot of time on thickness, helping students see, feel, and measure thickness. Often this includes simply telling them the work needs to be thinner. Work that is either too thick or has thick areas adjacent to thin ones is likely to crack or explode in the kiln. Not only is judging thickness difficult online, I don't necessarily see the work until students are done with it. Video meetings (via Zoom) are great for helping me gauge size and thickness, but it isn't really feasible to ask students to meet with me via zoom for hours each week (as they do in an on-campus class).  On one ocassion a student held it up her piece during a video chat. Suddenly the piece I had thought was about 6" tall doubled in size, as did my estimation of the effort she'd put into the work.


Harrah Hanson, Spring 2021. Harrah's stacking set was delightful. There are three heads, two bodies, and a bowl/bottom. The heads and bodies can be swapped around a bit like a ceramic exquisite corpse game.


As I am frustrated and distanced by the camera and screen's flattening and isolating of student work, I am sure that students are likewise frustrated by seeing demonstrations and techniques only via video or photo and text descriptions. Students are likely using fairly small screens, but even if they are viewing the videos on a large screen, there is something lost in trying to understand a three-dimensional process via a flattened medium.


Harrah Hanson, Spring 2021. The heads of the stacking set are particularly evocative with their textured hair.


As I write this now, I am actually fairly frustrated with Blogger's format, as the pictures seem too small (and I know if I increase the size of the images they won't show up correctly when I publish). The same kind of frustration happened when I worked on my school issued laptop (which I use when I go into the clay studio and also for Zoom and other work at home).  Sometime in the fall, I realized that I couldn't grade artwork submissions on my work laptop because it was unfair to the students to view their work on such a tiny screen.


Harrah Hanson, Spring 2021. The bottom and middle sections function on their own, but are so much more fun when seen together as a set.


But it was also fun to offer this class online. It was my only chance this year to offer a clay class, and I think that those students who enjoyed the class enjoyed the opportunity to manipulate a physical material, rather than stare at a screen all day. The format was more frustrating than an on-campus class, the class was also more fun than staying entirely digital for the whole day or the whole quarter. In the art program, we noticed that our usual online art history and art appreciation classes didn't fill as well as the studio classes we moved online. I think students of all sorts were looking for a change, a way to get off the computer and use their hands. I also think that students who never were able to take on-campus studio classes, because of work, family, distance, or other responsibilities were, for the first time, able to access some of our studio offerings.


Student Example, Spring 2021. This elephant teaset was one I got to see for firing. The thickness was very nice, but the ears didn't travel well. The wrinkles on the trunk are my favorite element here.


I kept the clay students' projects fairly similar all three quarters, though I made major adjustments in the order of the projects and other aspects of the class and lecture structures. Each quarter we started with pinch techniques and a pinch project. In fall, I introduced the technique but failed to require to the students to follow along with me, which meant the first things they tried to make were the sets. They didn't practice beforehand, which they would do with me in an on-campus class. 


Student Example, Winter 2021. This stacking set preceded the previous stacking set and may have had some Instagram influence. It is particularly well rendered and the stacking is both thoughtful and well-executed.


On campus, on the first day, I have students grab clay and follow along with my demo. I get them started, then walk around checking on each student to make sure they are getting it. After they work for a while, I stop them and show them all some ways to fix common mistakes and how to clean up edges, sides, and rims. The students have maybe an hour of supervised class time in which to complete 4 pinch pots. They have a chance for me to check the size, shape, and thickness and students are allowed to stay late after class if they like. Usually I stick around the studio after the end of class to clean up and have a chance to check on those who stayed a bit later. 


Sophie, Winter 2021. In winter I started requiring students to create pinch bowls for practice and also asked that they increase in size.


With the Fall online class, I foolishly assumed that the students would follow along and make the pinch pots during my video. I say foolish, because I didn't clearly tell the students to do this. So some may have followed along, but certainly not all. In Winter and Spring I tried to make this more explicit. I also required the students to make 4 pinch bowls in the first week with an earlier due date than their pinch set. 


Student Example, Winter 2021. I also provided students with some handmade stamps they could use for decorating the surfaces of their clay objects. In the YVC studio we have a ton of texture tools, but handmaking stamps for students was something I could do to give them a bit more to work with at home.


Timing is funny in an asynchronous online class. I want to give them flexibility to work in the morning or the evening and to schedule their class stuff around work, other classes, and family responsibilities, but I don't want them to try to do everything on the same day. Trying to do all the work at once doesn't allow the clay to dry in between working sesssions. Students are also more likely to get tired, sore, or frustrated working all at once. Additionally, I can't necessarily get help them troubleshoot if they're trying to do all the building on the same day, especially in the evening or weekends.


Sophia McDougall, Winter 2021. Students were asked to create the pinch bowls as practice, but they were welcome to decorate, add handles, and eventually fire them. They were a great opportunity to practice glaze for those who wanted to glaze their sets.


At the same time, I know that students work, have other classes and family obligations, so telling them all that step one is due Monday night, step two on Tuesday, and get help on Wednesday, and finish on Thursday doesn't given enough flexibility for folks who work Monday-Thursday and then have 3 days off. The students who have reserved the weekend for their studio time might do step 1 Friday morning, get help Friday afternoon, move on to step 2 Saturday morning, and finish on Saturday afternoon. Both timelines are fine, but depending on their schedule, one or both of these might be inappropriate for some students.

Alexis Gonzalez, Spring 2021. This melting set shows off some of the fun and creativity that came out online. One disappointing thing about the online class was that students couldn't see each other working in real-time, meaning that they had limited opportunities to see each other's ideas before they were completed. Seeing each other working can be a spur to creativity in a studio class.


I tried to spread out the deadlines and to explain why, but I still ended Spring with some students who said they didn't know why there were early progress deadlines--that they were confused as to why I wanted to see progress on their project before they submitted their project. And a number of students simply submitted a picture of their finished work into the assignment and the progress check on the same day.  I've been thinking about it this month and I think next time I might simply give them some example schedules. Maybe one that assumes they work daily and another that assumes they work for longer on the weekend. 

Mia Bautista, Spring 2021. This set suffers a bit in the photo becaue it is difficult to see the texture on the octopus, seastar, turtle and pufferfish. The student used a combination of carving, texture stamps/rollers, and slip to create these surfaces. 


The exciting thing, from my perspective, about starting with pinch techniques is that the students can build lots of different shapes and make the set fit their own interests. Pinch bowls are often round, but they don't have to be. They can be oblong or tall or narrow or even square. A set I don't have permission to show was created to be long wiggly rectangles, a pretty unusual shape for pinching, but clearly something the student enjoyed. Several students created plant or animal inspired forms where the plates, handles, or bowls themselves are twisted and curved to seem like leaves or flowers or animal forms.


Ryann-Elizabeth Fridley, Spring 2021. This smooth tea set was decorated with carved and sculpted mushrooms. The smooth surfaces and the well-positioned spout were both challenges to achieve.


The pinch projects in both the Winter and Spring classes went fairly well and I got some really exciting work out of a number of students. I didn't get around to asking the fall students' permission to share work on this blog, which is why I haven't included it here. I did have students do good work in that class, but I also lost a number of students in fall. YVC added the class late, which led to fewer students signing up. Students who add very late are generally more likely to drop, which also happened.


Jayleigh Butler, Winter 2021. This set of incense burners includes a house topper that was a challenge to create. This would be another one fun to see in color.


The biggest difference between the work in these online classes and my on-campus classes is that relatively few students chose to glaze or even fire their work. All students had the opportunity, but not all were able to or chose to bring their work in to fire. At the start of the quarter in Winter and Spring students were able to choose to get glazes or to get extra tools in their studio kits instead of glazes.


Jackeline Corona, Spring 2021. This fairly large teaset has well proportioned cups with impressively thin walls. The texture on the teapot was done with slip.


If you'd like to see more student work from YVC, check back here in the next few weeks/months and also check out the DoVA Student and Faculty Exhibition currently online at Larson Gallery (through July 2, 2021).