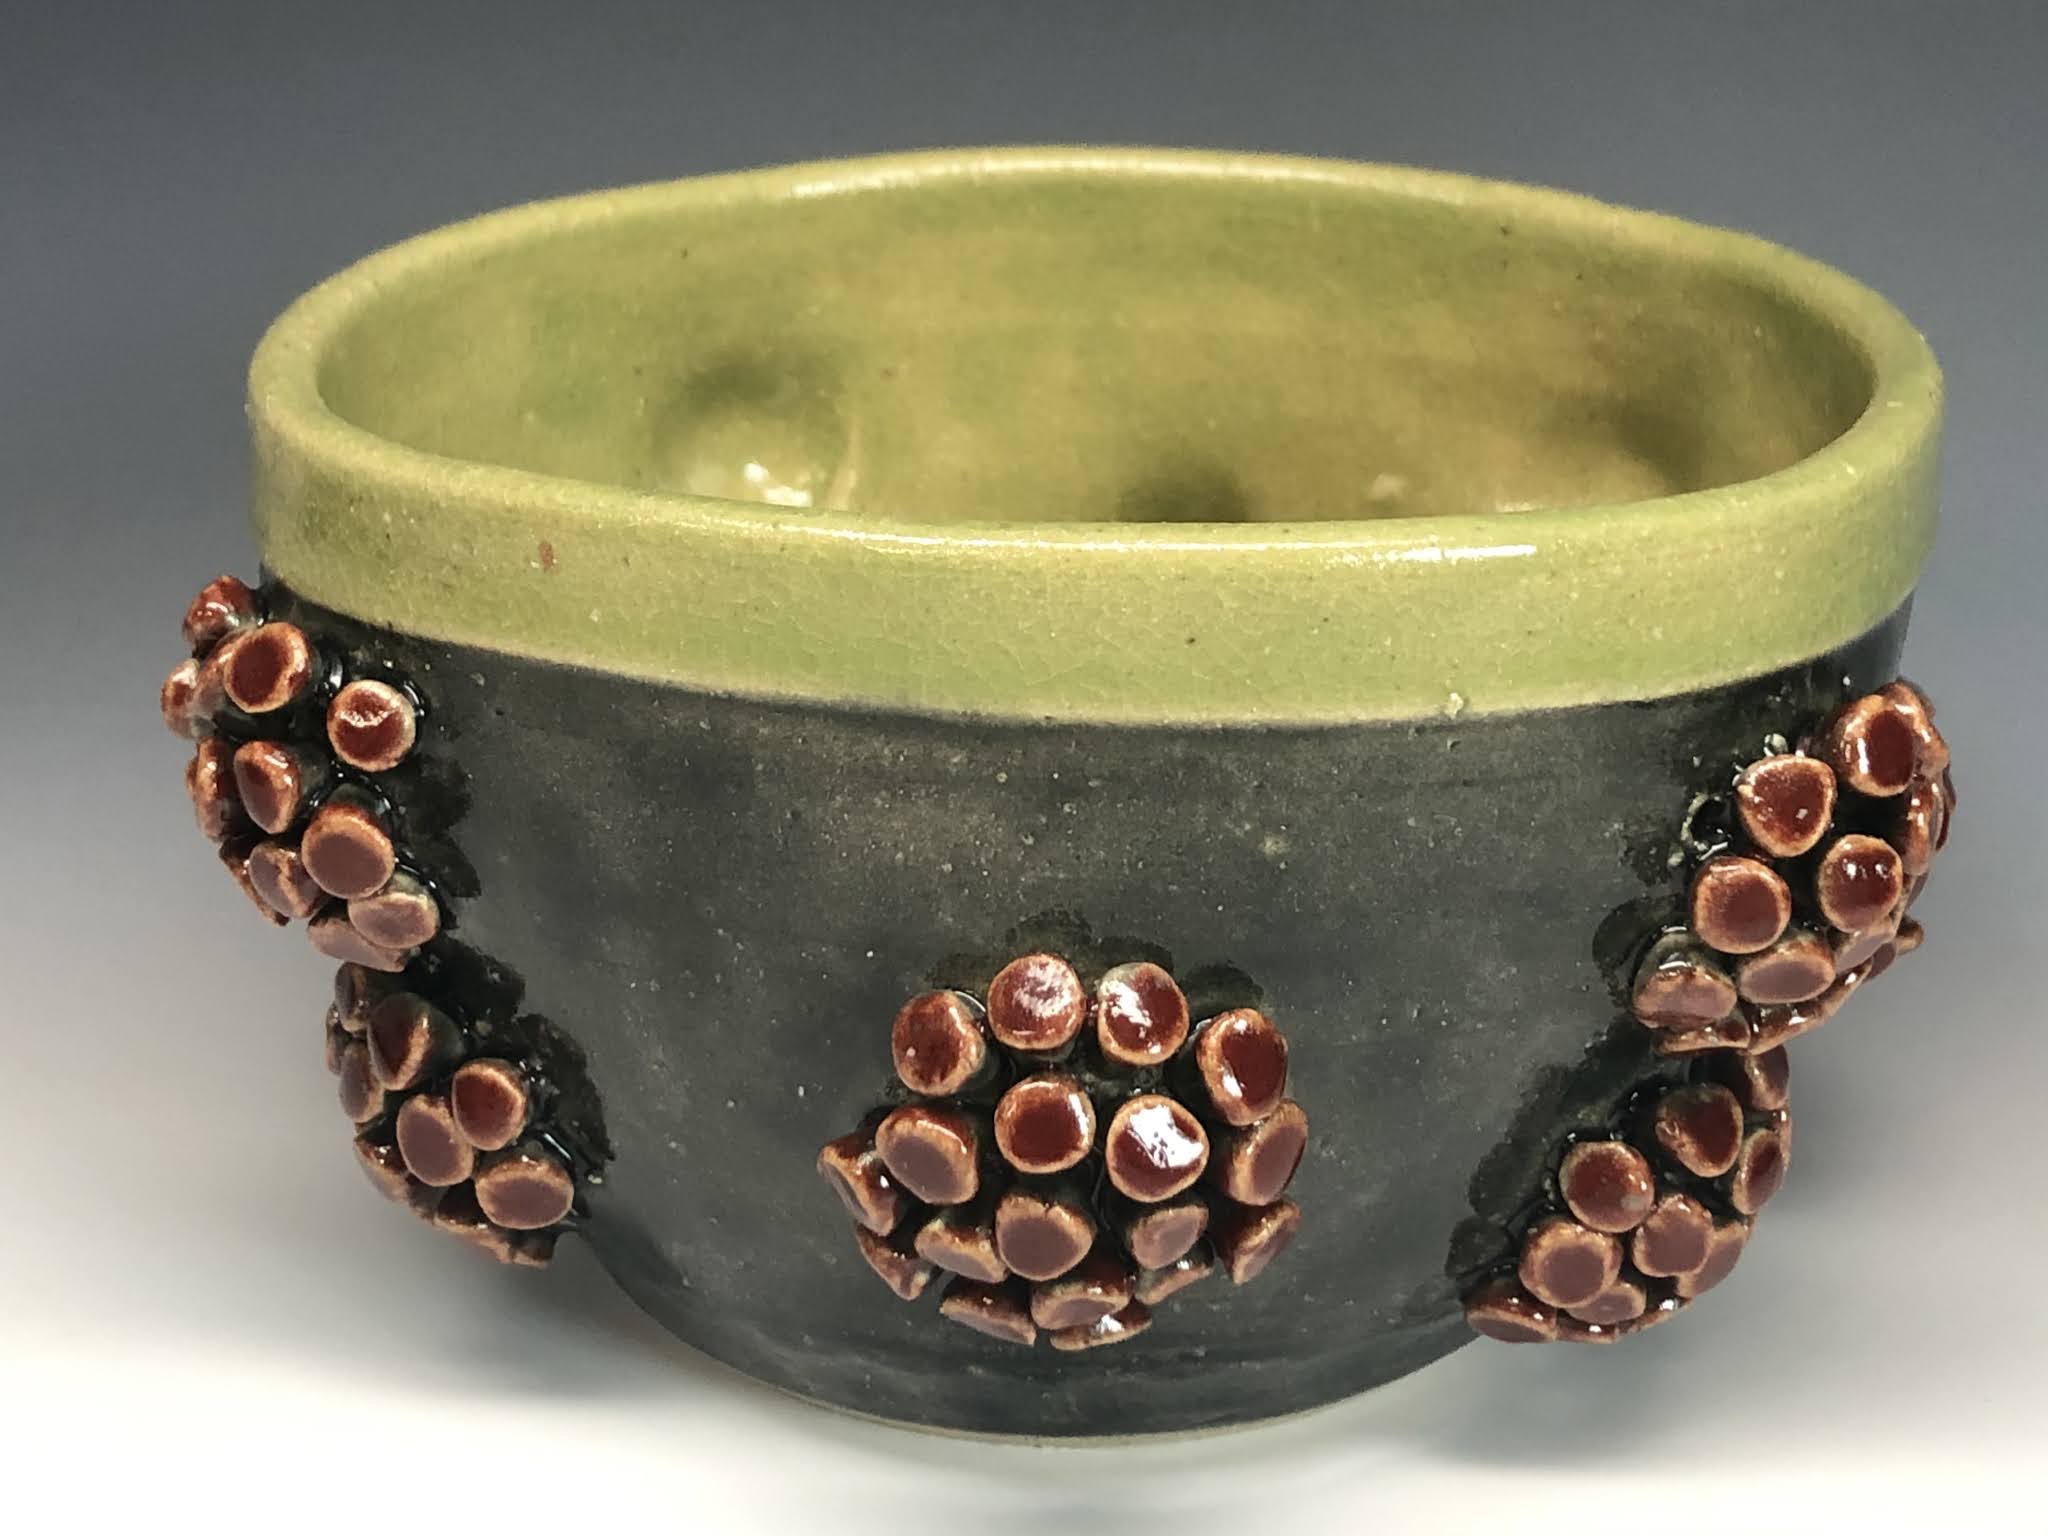
Monday, May 31, 2021

Cone 6 Covids

Blue, triangular and bumpy surfaced COVID balls

Earlier this month I fired a kiln load with a whole bunch of different items, including bulbs from last summer, planters and mugs with a COVID theme, and a batch of cone 6 glazed COVID balls.

COVID balls underglazed like the original batch


Blue and bumpy cone 6 celadon COVID balls

I thought I'd try these ones fired to cone 6. I've been using some cone 6 glazes, mostly celadons for my functional work, but haven't used them much for sculpture (I usually fire my sculpture to low temperatures with layered underglazes).

Martianware COVID ball

For the new year's bulbs, my approach was very much my typical color approach, bright and loud with chartreuse and red. I admit I was also thinking kind of Christmas-y colors, too. 

Underglaze and Mt. St. Helen's glaze COVID ball

When I made more bulbs to order, I kept these same colors but also added some of my Mt. St. Helen's Ash glaze from last spring. The Mt. St. Helen's ash is actually a cone 6 glaze, but I fired it to a lower temperature because that's what I had done last time for the Mt. St. Helen's show.

Martianware clay gives varigated colors, depending on either the drying or firing

After Seattle Pottery came out with their Martianware clay, I made some more COVIDs with that clay to test it out. These are low temperature bulbs because the clay basically glazes itself. 

Green/grey textured cone 6 COVID balls

The cone 6 COVID balls were done to test out a few things. First, in buiding them I was testing out adding little bits of dry or semi-dry clay to the surface of the forms to make a chunky, slightly icky surface texture. I also experimented with triangular bits sticking out from the balls instead of round. The triangles are harder to make, or at least take a bit more concentration.

I think these are probably closest to the famous photo

Part of the reason I wanted to fire these to a higher temperature was because I really like my red cone 6 glaze (Amaco's Deep Firebrick), and partly because I wanted the base glaze to have a little more variation to highlight the textures I'd added. The most familiar COVID image that we've all seen everywhere for the past year and a half is grey and red with orange, though I remembered it as blue and red. With this batch, I used light blue, dark green, and grey glazes to try out a few different options.

all the COVID balls in this post are looking for new homes, if you are interested

I don't know if I've decided which ones I prefer. I enjoyed the process of trying out the various options and I still have a batch waiting to be glazed and fired. I also just pulled the last three of the Martianware pieces out of the kiln yesterday. These ones sat around longer and at first glance the surface is different, too. I'll have to take some time to compare more closely. 

Martianware COVIDS

I think I'll be doing a show in September and I expect to have most of this stuff available then. If you need a COVID ball now, let me know.

Sunday, May 23, 2021

New Small Photo Booth for my Home Studio

My photo booth setup, installed in the studio, lights on, and ready for action.

Right before the pandemic forced YVC to move classes online and forced me to teach from home for over a year, my husband finished the extensive renovation on my home studio. The renovation gave me new walls, new floor, all new shelves and tables (except for the wedging table) and a lot more space for my work. I gained the extra space with better storage under my work benches and deeper shelves, but also by removing some awkward furniture and cleaning the place up quite a bit.

The photo booth needs both a deeper and taller shelf space than I had previously with my wooden shelves.

There was even new space for some significant upgrades to my studio equipment. In December I added a pugmill to the studio (which has proven to be a great studio tool!) and this spring I finally added a small photo booth to the studio. 

The photo backdrop has a gradient that provides a nice black to white range behind the work.

I've had a high quality large scale photo backdrop setup for years and I like it a lot. It replaced the lower quality backdrop I bought during graduate school and transported from Wisconsin. But that photo setup is quite large. It works great for large scale sculpture, but as I don't have space for it inside the studio (or the house), I set it up outside and try to take all the photos at once.

Photos of the work on the shelf look bad because of lighting, but also because of all the other stuff in the background or around the work.

The studio at YVC has a small photo booth that is permaently set up and gets used regularly (when students are on campus). This photo booth requires no setup, so students (and I) can just walk over, switch on the light and have quality images of their work without needing to clean a space, adjust lighting or move backdrops.

A plain white, grey, black, or gradient background removes all background distractions of texture, shape, and depth so you can focus on the work.

The photos may not be as high quality as those done by a professional photographer with professional lighting adjusting to get rid of shadows and glare, but they are head and shoulders above pictures taken on a work table. I encourage my students to really think about the quality of their photos because a poor quality photo can make good work look mediocre. I've also found that a good photo can actually make a work look better, or maybe it allows us to focus on qualities we might otherwise overlook in the work.

The small photo setup works great for small scupture and functional work like this citrus squeezer.

So, the upshot is that now that I have the space, I got myself the same photo booth for my home studio, complete with a vinyl gradient backdrop like the one we got for school. In my old home studio, pre-renovation, the photo booth would have had to go on the table or counter, eating up my valuable work space, but the new shelves are deeper and their height can be adjusted. 

I made a lot of citrus squeezers last summer. Many of them are still available if you are looking for one.


I've got the booth on a shelf, where it takes up a lot of space, but it doesn't take up work space. Since I had to put it next to the wheel or the glazing area, I was worried about it getting dirty. At YVC, the booth is way over in the corner of the main studio, away from wheels, sinks, and work spaces. At home I put it near the glazing area, but I've blocked it off when I'm not working on it by using this large whiteboard sign thing.

The whiteboard/image board keeps the photobooth clean and also gives me a visible storage space for inspiration/reference images.

My husband found the white board being thrown ow. It has a plastic front that can be lifted and posters or photos put underneath. Now the whiteboard is doing double duty for me, blocking stray glaze (and some of the dust) from landing on the photo area and also giving me a more convenient spot for reference photos than pinned up on the shelves themselves.

faceted mug and bowls made for student demos for online clay

The small photobooth won't work for my large sculpture and doesn't work great for work intended to be installed on the wall. I'll still have to set up the large backdrop for scupture, but this way I can take photos more often with less effort. My husband, whose pandemic career has become home renovator, is painting and renovating the laundry room. I plan to use the grey walls in that room as a convenient location for photos of work meant to be installed on the wall (shh, don't tell him about my ulterior motives. He thinks this is about laundry).

lots of citrus squeezers, let me know if you want one (or more)


Tuesday, May 18, 2021

Covid mugs and planters

COVID planters

At the end of last month, Gallery One in Ellensburg had a planter fundraiser event. I thought I might be able to get work made and fired in time, but I was just a bit too slow. Though I will point out that I got these done with plenty of time before next year's planter sale. 

COVID mug version 2

I had the idea to make some COVID inspired planters similar to the COVID mug I had made at the end of last year. That mug was fun, but not well engineered for other than very careful use. It is fairly delicate and the red parts risk breaking off if they get bumped into. This time around I build the red parts are closer together and shorter to help with their strength.

The other day my daughter mentioned that she can drink out of these now that she's gotten her first vaccine!

I tried several variations of the red parts, including little triangle shapes for which I had to make a mold for the bumpy top parst. These triangle pieces were super slow to make because of the mold and I found making them kind of annoying, but the textured tops show up much better with glaze. This is one of those ocassions where I actually like the fired work better than the wet work.

These mugs have the textured triangular sprigged decorations, which look better fired.

For the first COVID mug, I also sculpted hollow round parts onto the surface of the smooth mug. This was good for sculpting and inserting the red parts, but the result is that that mug has hollow hemi-spheres all around it. For this reason I wouldn't want to risk using it in the microwave. For this reason and the fragile bits, I wouldn't want to run it through the dishwasher. I don't even leave it in the kitchen to prevent my family from using it incorrectly.

Inside this planter you can see where I pushed the wall out to create the bumbs for the COVID balls

For this second-round of COVID mugs and planters, I made the bumps when the clay was wet. Most of the forms were thrown, so I pushed the wall out right after it was thrown and before they were trimmed. This made adding the red bits more difficult. In the first version back in November, I put the little red bits into holes in the hemispheres. 

 
A COVID mug in progress. I made just a ton of the little stick out red parts and then lots of holes, score, slip, slot in and clean up.

This time I couldn't do that because a hole would go through to the interior of the planter. The made the attachments a little more precarious. In fact, I think I actually lost one of the red bits from one of the mugs before firing.

The pugmill can be set to mix or pug. When mixing, nothing happens outside the pug mill. This day I forgot it was set to pug (push out the clay), so it puged some tubes onto the floor.

I used my pug mill extruder for a few of the mugs. I was using the extruder already to make some hollow tubes for a whole bunch of stuff. The extruder attachment is pretty great. I have an extruder already in the studio, but this speeds things up and makes it easy, too. Sometimes too easy as you can see above. So far this year I've used the hollow die extruder to make mugs for sample textures for class demos. I've cut open the extrusions for slabs for slab building, texture samples, and glaze tests, and I've also made biscuits (in case of glaze drips) which I've always been far too lazy (or otherwise occupied) to make for home.

This little slab pill box was made from slabs started from the extruder.

I also used the tube extrusions with my kid and her friends to make mugs. The extruded form is already the walls of the mug. We can cut another extrusion apart to make a slab for the base and a handle. The kids can spend less time building and more time decorating. Also good for short attention spans (or 9 year olds).

These two mugs were both made with extruded tubes.

The covid mugs made with the extrusions aren't great. The rims just kinda stop, which is disappointing, but the goal was to test some stuff out, so I did that with color and attachments. I was pretty disappointed with this glazing firing, mostly because I switched clays. I've been using my recycled clay which is a mix of whatever I used over the course of probably a decade. Before I got the pugmill, I had been using porcelain which looks different with these semi-transparent celadon glazes.

COVID planters

In fact, I took these out of the kiln more than 2 weeks ago and took pictures more than 10 days ago, but I couldn't get around to writing about them until now.  I'm feeling a bit better about them with some distance, though it also helps that I started working on something new.

Saturday, May 8, 2021

Mars (Martianware) clay, finally fired


Mars clay bulbs with small impressions (left) and flower stamp impressions (right)

I finally got around to firing some of the pieces I made last month with the new Martianware clay. In fact, I fired them a while ago and only just got around to taking pictures this weekend after my most recent glaze firing was completed.

Salty Mars covids and bulbs before firing

Since I wasn't sure about the clay, I didn't make a lot of items with it. Then, before firing I got concerned about the salts damagining my kiln walls or elements. The soluble salts show up on the oustside of the forms as the clay dries, and they also act like glaze mixed into the clay, creating the unusually texture surface. Firing a salt kiln can be hard on the walls and the elements. Though this was clearly a lot less salt than a salt kiln, I decided to play it safe and make some saggars in which to fire the work.

Saggars after firing

I threw and slab-built four saggars which I can reuse in future. Being extra cautious, I also fired the pieces on stilts which was probably unecessary, as it turned out. Based on how the saggars look inside after firing, I'm guessing these were unecessary, too. The floors of the saggars have a bit of spitting, little freckles of color, but the tops look just like the outsides, no damage.
 
Interior of a thrown saggar with salt speckling from the Mars clay

I fired the pieces in a bisque firing with a bunch of other greenware. This Martianware clay isn't supposed to get too hot. This bisque was cone 06 and fairly full. The Martianware ceramic surfaces have varied colors ranging from brown to red and a rough, crumbly texture. I can't tell how much their location during firing or drying or their building techniques impacted the colors, so I'll have to pay closer attention next time.

Mars clay Covid Balls

The surfaces feel crumbly, as is evident in some of the pictures where there are little dustings of crumbs that I didn't brush away. The bits that do flake off don't stain my photo paper and removing them from the surface doesn't seem to impact the colors of the original form. I haven't tried scrubbing these pieces yet, but they feel like raku work that needs to have the ash washed off.

Mars clay bulb (other side)
 
For a few of the pieces, I mixed the Martianware clay with my regular pugged reclaim and the result was underwhelming. Theese pieces just look like a bit of terracott has gotten into or onto the regular clay which looks white after bisque.

Mars and reclaimed clay Covid balls after bisque

In one case, as a test, I glazed the rest of the form (the part made of reclaimed clay) and left the inset Martainware clay circles unglazed. I then fired the piece to cone 6. As expected, the clay fluxed and bubbled a bit. I knew the clay wasn't designed for this temperature, but I was just curious what would happen. 

The black dots are actually the Mars clay fired to cone 6. The lines and yellow surface are glazed

I made COVID balls and Ericano bulbs out of the the Martinaware clay. On the COVID balls, I didn't do much to the surface, relying on the clay itself to create texture. For the bulbs I tried a few different things: sprigs, impressed stamps and a texture roller/stamp. The impressions look pretty similar after firing, as the clay sort of takes over and obscures the texture. The sprig additions are easier to see on one side than the other, based on the clay color and how it shows up differently in the higher and lower areas.

The front and back sides of the sprigged bulb made with Mars clay


The clay is fun, but working with something like this requires a really different planning process, especially for someone who is used to focusing on texture and color. I could see this clay working well for the darker, moodier work I did for my politics bulbs series, but I'd have to think about what can and cannot show up as far as texture. This clay could lend a gritty feel, but it could also obscured what I want to show. And, honestly, I've felt a bit exhausted in thinking about this work lately. 


Mars Covid ball


This past week I was a bit disappointed in my kiln results, which tends to be opposite of a motivator. But while I was photographing the work I realized that I had quite a bit of work. Some of it disappointing, but at least I've been making. Some loads are like that.