Showing posts with label Mount St. Helens. Show all posts

Thursday, March 11, 2021

Covid Bulbs, Again


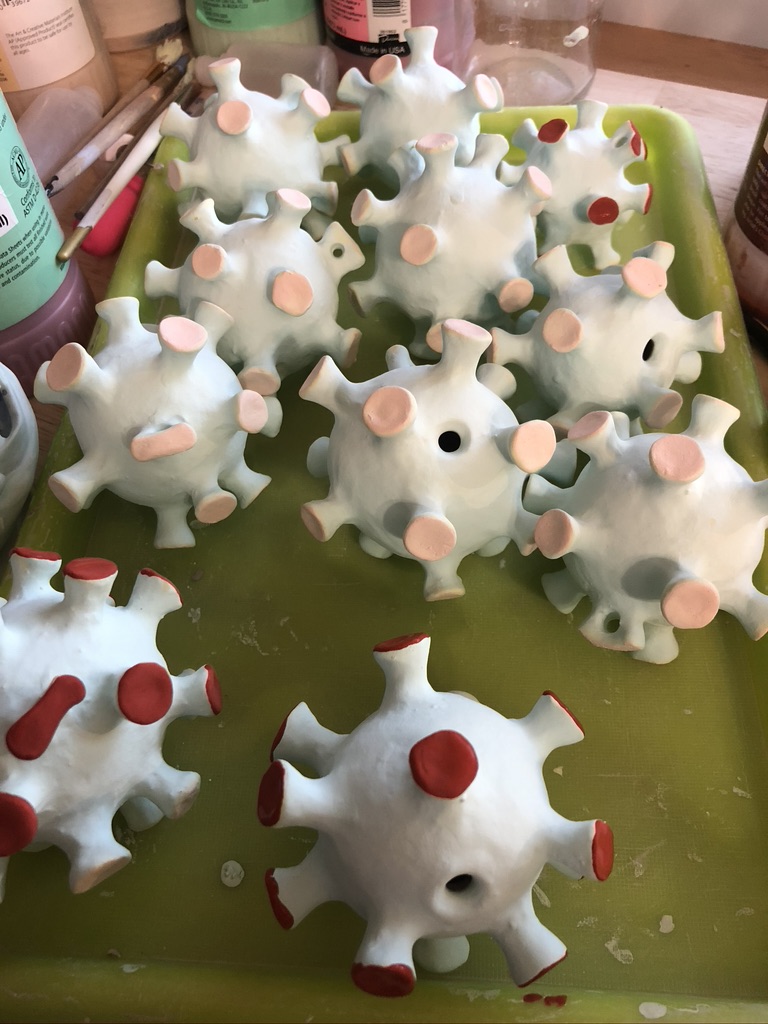
Covid balls from this last firing

In January I posted some Covid balls I made for New Year's gifts. A few friends requested their own, and I got right on making them (really! I sculpted the covids within a week or two), but it took me over 2 months to actually fire them. 

Covid balls partly glazed
 

I made about a dozen of these guys the second time around but was waiting until I finished some other work to get them fired. 

The most recent covid balls, before their strings and directions were attached

As it is wont to do, teaching kept getting in the way of finishing stuff, but I was eventually able to finish glazing some face bulbs from summer and a bunch of odds and ends that I made as demos for classes.

Some face bulbs from last summer

As I was glazing this batch weeks and weeks after making them, I got thinking it would be fun to use some Mt. St. Helen's Ash glaze to add some depth and texture to the ball. (I'd like to add some dimension to the bulbs too, but I made the first batch in a bit of a rush and the second to fulfill orders, so I figure I have room to experiment on the next batch.

Mt. St. Helens Boxes from last spring

The Mt. St. Helen's glaze comes from the set of boxes I made last year for the Mt. St. Helen's 40th Anniversary show at Boxx Gallery. I had some extra glaze leftover from that show. As I underfired it last time and was firing the covids to the same temperature, I figured it would work out ok.

Covid ball with ash glaze

I'm pretty happy with the texture that's been added to the green. But I wish I had mixed the low and higher fire glazes together a bit more like I did in the Mt. St. Helen's boxes, so I might do that next time.

Mt. St. Helens steam vent with ash glaze

Honestly, I forgot that I wanted to try the ash glaze until the last moment. At that point I had already added the red. When I got the ash on the red, I thought, no big deal, I'll see what happens, which means that some of the red parts that have the ash on them look a bit like they have a spill on them. 

Covid with ash glaze on red and green

But, to my suprise, no sooner had a posted pictures of the loaded kiln and fired work on social media, than I had sold nearly all of the covids. After I get these shipped or delivered, I'll be able to put the funds to good use: working from home makes me realize how much I miss the small photo booth setup at YVC. 

The small photo setup at YVC, a few years ago

At home I have a photo set up, but its really designed for big stuff. The small one at school can stay up all the time and is just the size I need for taking little photos like these (without setting up the table, backdrop, tripods, etc. And now that I'm working in this lovely remodeled home studio, I have space for it, too!

My home photo setup a few years ago

Next week is finals week at YVC. For once I've got my part of the studio kit stuff done (mostly done), I'll be teaching the same online studio classes next quarter. The online clay class, this second time around, went a lot smoother than when I taught it with zero prep time in Fall, so I don't anticipate having to spend spring break remaking it. All that to say, that with just over a week left to go, I'm really excited about getting into my studio during spring break!

My four ash Covids


Sunday, April 26, 2020

Finished Mount St. Helens Boxes


Eruption Box, 2020, low fire ceramics, 5.5" h x 7"l x 5"w

This week I finished glaze firing my boxes for Reminiscing On The Eruption: Mt. St. Helen’s 40th Anniversary exhibit at Oak Hollow Gallery, originally scheduled for April and May 2020. Now that we're all staying home, the show will have a virtual opening on May 18. Work is still for sale, and anyone interested can contact Oak Hollow Gallery for purchase and pick up.

Mount St. Helens Box Quartet, 2020

I've made five boxes, though two are really alternative versions of one another. The boxes show the mountain at different stages before, during, and after the eruption of May 18, 1980.  Each of my boxes is about 5-7" wide and the tables is almost 7" tall.

After box, open. The interior and underside of the lid are finished with a cinnamon underglaze and a low fire glaze

I finished the boxes using underglazes, low fire glazes, and some volcanic ash (or pumice) glaze mixed by some friends. After the eruption in 1980, Yakima, where I now live, was covered in a layer of volcanic ash. I've seen photos of people shoveling ash from the streets and the local museum has a display of various products where people apparently collected the ash and sold it in commemorative jar and other novelty items. In ceramics, ash glaze usually refers to wood ash, while pumice or pumicite is a name sometimes associated with volcanic ash in glazes. Anyway, regardless of the name, this experimental glaze has some volcanic ash in it.

Plume box (detail), with Mount St. Helens Ash glaze

I used the volcanic ash glaze for the Eruption and Plume boxes. In both cases, I layered the under-fired ash glaze over some underglaze I had used to stain the cavities and intents of the sculpture. The glaze was under-fired because I fired it to a lower temperature than it was designed for. 

Eruption box, opened to show the underside of the lid

The ash glaze has a distinctive texture, especially applied and fired as I have done. It is semi-transparent in some places (probably because I combined it in some places with a low fire glaze). and the texture feels a bit sandy in others. There is a slight purplish grey color that may be a combination of the glaze itself and the underglaze underneath.

Before box, with cats, 2020, low fire ceramic, 4"h x 7" x 6"

There was one piece that surprised me just a bit. I used a clear low fire glaze on the bottom of the Before box (with cats) but the lid of this piece has just a trace of the ash glaze mixed in. The difference isn't visible in the photo, but there is a very slight roughness to the glaze on the exterior of the lid when viewing or handling it in person.

Before box, without cats, 2020, low fire ceramic, 3.5"h x 6.5" x 5.5"

I made two versions of the before box. One with the 16 cats that perished in the eruption and one without. The without version photographs a little nicer because of the matte surface, but I think I like the with cats version better in person.

After box, 2020, low fire ceramic, 3"h x 6"

I didn't use any of the ash glaze on the Before boxes, but I did add a bit to the crater of the After box. This ash glaze is mixed with the low fire glaze, so the texture isn't so pronounced as that on the Plume, but the slightly purple/grey color is visible in the photo and the slightly rough texture can best be understood through touch.

Plume (1982) box, 2020, low fire ceramic, 6.5" x 5.5" x 4.5"

The Plume box was only finished after firing when I epoxied the plume in place. I fired the plume separately because I was afraid of damaging it during handling and drying. Inside there is a metal and wood support epoxied to the lid and inside the plume. 

Plume box, opened. This is based on a photo of Mount St. Helens from 1982

I'm happy with how the plume turned out. I may have lost a bit of applied texture when I covered the surface with the thick ash glaze, but I like the complicated color that seems to show up on the plume and the cracks or gaps that show up in the glaze surface. The texture of the sculpture is more visible in the solid cloud of the Eruption box, which is probably my favorite of the set.

Eruption box, the back side has underglaze color, the eruption itself has ash glaze, low fire glaze and underglazes together

I plan to take these over to Oak Hollow this week, but first I've got to do my least favorite part of the process, price them for sale. 

Sunday, April 19, 2020

Mount St. Helens Glazing

my mixed ash/low fire glaze ready to fire

Early this winter I was invited to make some work for a Mount St. Helens art show. The show date and location have been shifted to account for the pandemic. I was given a new deadline of last Wednesday which I have now missed. I don't very often miss deadlines like this. I think that with the spring quarter moving online, the general worries about the pandemic, and the specific anxiety of trying to work from home while my daughter is also home all day, I had reached a point of just not being able to make everything work.

bisque with two volcanos and some sprigs, ready to unload

I did get the work made and bisque fired by last week's deadline, but pure white wasn't really the look I was going for. I still have some serious uncertainty about the end results, but I glazed this weekend and I'm just about ready to fire the pieces. 

Mount St. Helens eruption box ready to fire

The reason I am uncertain is that I made a significant mistake when I began this project. I was anticipating being able to use some Mount St. Helens ash glaze made by some fellow artists, and though I knew this was cone 6 glaze, I started building with cone 06 clay. 

cinnamon underglaze on interiors and some box exteriors

I had the low fire clay out to make a batch of sprigs and I simply didn't think before starting to build. I'm going to chalk it up to trying to squeeze in too much thought into my week. Usually I work on projects in the summer when I'm not teaching. Occasionally I work on projects during breaks or on the weekend during the year. I can honestly say that I've never worked on ceramic projects during a pandemic while trying to adjust to a fully online quarter and preparing for contract bargaining as president of our faculty union while my daughter is also home with me all day, every day. My brain was (is) full. I couldn't cope.

my three glaze tests at cone 06

Since the work was made in low fire clay, I can't fire it to the higher cone 6 temperature without risking damage to the form. I also couldn't remake before the deadline, so I figured I should try some glaze experiments during my bisque firing. I had the cone 6 glaze, which I guessed was highly unlikely to melt at cone 06, but I figured I should test it anyway. I also tested a glaze that mixed one part of the cone 6 ash glaze with one part of a cone 06 gloss glaze. The third glaze I tested was equal parts ash and 06 glazes with some added red iron oxide. I used the sophisticated technique I learned in graduate school from my checked-out ceramics professor: scooping a random amount so that the results can never be replicated (see above re: no more brain space).

glazing and under glazing in progress

The results weren't particularly surprising. The Mount St. Helens ash glaze on its own didn't melt at all at cone 06. Cone 6 is roughly 2165 - 2232 degrees Fahrenheit, while cone 06 is only 1798 - 1828 (Cones melt based on time and temperature, so the range refers to a slower or faster firing), so the difference is significant. The mixed glazes also didn't melt correctly--again, not surprising. But the mixed glaze fluxed a bit, meaning the surface is starting to become glossy, and has a thick, semi-opaque texture. This texture reminds me a bit of lava, which seems fitting for this project.

peeling off the resist

Because I really want to use Mount St. Helens ash (pumice) in the finishing of these pieces, I'm happy to see what happens with minimal testing. If I were going to fire these pieces, as originally planned, to cone 6, I have a variety of colored glazes that I was planning to use. For cone 06, I have clear glaze in matte or gloss. So, I have used some of my underglazes to try to add some interest to the forms. 

glazing in progress

Did I take pictures of my work after I had finished adding the underglaze? Of course not. Thinking and planning are apparently not things I do anymore. Nor, according to the images shared here, do I take care to check that my images are in-focus, so this is what I've got. Done is better than perfect (I mean, assuming perfect isn't done, right?)


applying the Duncan Mask & Peel to the lid 

I used cinnamon underglaze for the interiors of all the pieces, as well as for a wash on the textured surface of the eruption and venting. I usually like to layer two colors of underglaze over each other, but I simply didn't leave myself enough time for this project, so this will have to do. 

I put a clear glaze over the underglaze on the interior of each piece, so the color looks pink (or white) before firing

Usually when I layer underglazes, I fire them in between, which means I can wipe the surface after adding the glaze. Since I didn't have that middle step, I used some resist which protects the underglaze from accidental drips of glaze and then can be peeled off before firing, taking the over glazed mistakes with it.

this box has both types of glaze on the outside. We'll see how it looks when I unload it.
I used underglazes alone in in combination for all of the pieces, but also left the bare clay color visible in several. I am concerned about how this will work, but time is passing and these are past due. I used a gloss glaze over the cinnamon underglaze inside every piece, then used a combination of my low fire glaze and the mixed ash/low fire glaze for the exteriors, leaving one without any exterior glaze for contrast. The underglazes I use are velvets, so they tend to look nice without a glaze anyway.


Thursday, March 26, 2020

Spring Break: Mount St. Helens Boxes and Thinking about Teaching Online

Darter, the cat, inspecting my work

This week, besides being the second week of schools being closed in Washington and the first week of Washington's "stay-at-home" order, is also spring break at YVC. Though I know I've got a lot of work to do for next quarter, since my clay classes were canceled and I'll be teaching something else online, I chose to spend this time as a break. I spent some of this break time in my amazing, incredible, clean, bright and slightly chilly new clay studio.

Mount St. Helens blowing off steam in 1982

A couple of years ago, I worked straight through spring break, what with presenting at NCECA in Pittsburgh during finals week and doing a multi-day ESCALA training when I got back. That quarter was awful. It really threw into relief how important a break is for my ability to function in the studio or classroom (or online classroom, as the case may be).

A stray cat knocked down this ceramic dish while he was climbing the shelves

So far this year, since my studio remodel was completed and the furniture and tools were moved back in, I haven't had a chance to make any actual work in the space. In fact, I might consider my making in the studio a net loss, since I've been tossing stuff that I realize I'm never going to fix, finish, or sell. And last week an unexpected visit from a skittish, stray feline reduced the work in the studio by one more piece.

The tray cat in question, stalking the new shelves.

Before the rollercoaster of COVID-19 related surprises began, I had been planning to spend some time in the studio making work for an upcoming show. A group of local artists are planning a show focused on the anniversary of the eruption of Mount St. Helens. Though I grew up in Wisconsin and I wasn't alive at the time of the eruption, I've always felt a fascination with the event because of its timing. The 40th anniversary this May coincides with my 40th birthday just 11 days later. 

Photos of Mount St. Helens before, during, and after the 1980 eruption

I found out about the show because some local ceramic artist friends were working on developing some ash glazes (or pumice glazes) using ash from the eruption. The plan was to develop and test recipes that could then be used by various artists. The artists were using the glaze studio at YVC for some of their work, but I'm not sure if they ever finished. The last time they planned to come in was after the March 12 school closure order.

two views of the volcano in progress

With the various closures and stay-at-home requests and orders, it isn't clear to me whether the show will actually be able to happen. I think the venue had changed in mid-March, but things are happening so quickly and everything is so uncertain just now, that I am choosing to only worry about what I can control.

three boxes mostly done building

One thing I can control is using this spring break time as an actual break. Often I spend some of my spring break time prepping my online classes, and I have done a bit of that work, but I've tried to limit that time. I spend a bunch of time during the weekend before finals adjusting my live final critiques to online critiques and thinking about how I could teach Functional Pottery online. During finals week (last week) I fired and unloaded kilns, graded, communicated with students, took pictures for students who couldn't collect their finished work, and worked on union issues related to the pandemic and our preparations. I also advocated for pushing back the start of the spring quarter so that my colleagues and I wouldn't have to spend the entire break developing online content.

the smoke plume in progress

I am pretty lucky, in that I have taught online before. I was scheduled to teach 3 classes, one of which is and was entirely online. I've taught this class online before and I spent time in August updating all the due dates and modules for my entire online series of 3 classes. Of course with the quarter being pushed back, some of this work will need to be revised. I also anticipate updating some of my requirements in light of the fact that students may not be able to use on-campus computers, may be "working at home" with children who aren't in school anymore, and generally to account for the fact that everyone will be extra anxious and stressed out this spring.

three volcanos in progress

Unfortunately, my clay classes can't be moved online. In my last post, I was thinking hard about how I could do this and I was feeling excited about the possibilities for teaching clay online and having the space accessible for students, but the insurmountable hurdle was the clay and the clean up and recycling processes in the studio. Even if I could keep the students 6 feet apart from one another and myself at all times (which would be challenging, even with the best of intentions), I just couldn't get my head around how to keep myself, my students, and my studio employees from handling wet clay, slurry, and wet towels or sponges that had been handled by other students. Not to mention all the other tools and equipment that would need to be shared in the space.

two volcanos and a smoke plume in progress

The stay-at-home order of this week, which might be extended, appears to preempt my ability to teach live anyway and seems like the best health advice coming from medical professionals is that we shouldn't try to do things in person. So my clay classes were canceled and will be replaced with either an online art history or online art appreciation class. One of these I have prepared, the other one I have not, but the delayed start of the quarter makes me fairly confident that I can get either class ready to go during next week when I am being paid for my work time.

the eruption box in progress

This week I've slept in most days and stayed up late watching movies or shows with my family. I've done a track workout with my daughter most days (the coach sent a list of workouts home with her before school was closed) and she's done a couple of boot camp workouts with me as well. Her consistent whining is just the motivation I need to stick with a tough workout! I've listened to far too many podcasts about Coronavirus and read far too many articles about teaching during a pandemic, but I've also read some real books and listed to several audiobooks while working in the studio. My daughter is doing a FaceTime book group with her grandparents, and she and I have had some time to sew "squares" for our Harry Pottery quilt. She's also baked chocolate chip cookies with minimal assistance twice during the two weeks she's been home from school.

this kitty is only friendly in the morning, so I only got a visit because I was building before everyone else was up

We've kept ourselves busy, but my earlier wake-up time has allowed me to take advantage of some quiet time in the studio to build. I only have a week, but I didn't have much trouble getting started. My idea for the Mount St. Helens show was to create boxes that capture the shape of the smoke and debris from the eruption and the change in the shape of the volcano before and after the eruption.

the steam and rolling debris of the eruption

The 1980 eruption (did you know there was another small eruption in 2008?) was mostly sideways, which impacted both the path of the destruction and the resulting shape of the volcano afterwards. I like the idea of representing the clouds of dust and smoke in solid (er, hollow) clay. Obviously the result lacks some of the wispiness of the original, but I kind of enjoy the idea of capturing some of the shape and direction of the eruption in a medium that is so stable.

the eruption and volcano box from the side, before cutting the lid

I've created four boxes, one showing the volcano before eruption, one during, and two after. All four boxes open, but the interior space is pretty different in all four boxes. The before box has the simplest shape both inside and out and I've left the surface fairly smooth, in part because the before picture I was using showed the volcano covered with snow.

the pre-eruption box, open

The after box is quite small inside and actually has a hollow section underneath because of how low that section was. The blast opened up both the side the and top of the volcano and I rendered this as a very low front, which make the interior of this low area almost inaccessible anyway. This box is barely a box, since the crater of the volcano is the focus and the lid is actually very shallow. 

 
The post eruption box interior and underside

I roughed up the texture inside and outside the crater to give a sense of the rough, craggy stone and the varied angles around the crater and down the sides. This one is the roughest of the four. I didn't initially intend the four different boxes to represent different seasons, but I realize that my pictures represented different seasons. This, and my interest in creating some variation in texture between the four, influenced the final results.

the post eruption box and lid

The next smallest box actually comes from a picture taken two years after the 1980 eruption. The steam blast is a more interesting shape in some ways than that the eruption itself, so I wanted to include it. I think it captures what we think a volcano looks like, more than an actual eruption. This is the volcano I'd draw in a game of Pictionary. The plan is to attach the smoke plume to a metal rod which will insert into the lid. The lid has a bottom that will hold the rod up and the rod will help keep the plume in place. I could have attached the plume permanently, but the risk of breakage would be greater.

the 1982 box and smoke plume, which will be attached and reinforced after firing

The shape I had the most fun building was based on a picture from the actual 1980 eruption. The blast came out one side and in the picture the dark cloud seems to roll along the bottom of the front edge. I've stylized this in the sculpture, but I kind of like the way I've done it. It seems to capture the movement and the mass of this thing. 

the 1980 eruption box, done building

There's no real reason these need to be boxes, except that I had a week to devote to building them and I figured the show will feature lots of fairly small work. The eruption box is a ridiculous shape for a box, but I enjoy the wiggly wobbly interior space of this one almost as much as the exterior shape and texture. Now to find out whether I'll get to use any of that pumice/Mt. St. Helens ash glaze.

the interior of the eruption box

There's one more wacky decision I made and I haven't yet decided if I like it. When I was researching the eruption with my daughter, I learned that a man named Harry Truman (not the president) died (or presumably died) at Mount St. Helens because he didn't evacuate in advance of the eruption, but his 16 cats also died because they didn't evacuate.

Truman's 16 cats

So I attached 16 cats along the bottom of the pre-eruption volcano box. This is the piece that I imagine would be complemented by a drippy and/or variegated ash glaze.


Truman's 16 cats along the bottom of the pre-eruption box

My daughter is also working on a piece for this show. She started her plan for an active erupting Lego volcano, which will, of course, erupt on just one side. She got a decent start early this week, but its difficult to say whether she'll be able to maintain her patience enough to actually complete the project. It is challenging and it isn't going perfectly because she's making up the design herself, but her response to adversity is to flail in frustration and erupt (see what I did there) in tears. I can't offer much help with the Legos themselves and I'm not entirely sure how to help her help herself calm down. My reaction is to tell her to do something else. I am interested to see if she will be able to cope next week while I am actually working from home most of the day.

the Lego volcano in progress (notice the conveyor belt with a single flame in place).