Spring Break 2021 vs 2020
 |
| Detail from the graphic syllabus or course map, showing the carving from solid project. I like the little carved bits that surround both weeks. |
This week is spring break. It feels good to take a bit of a real break, though today I spent the day crafting a graphic syllabus or course map for my online clay class--and then writing about it (instead of taking, y'know, a real break).
 |
| Set of Boxes carved from solid clay by Kristin Benjamin, Winter 2021 |
Last year most faculty spent spring break planning how to move everything online for spring. We were sent home for the pandemic on the Friday before finals week. I spent spring break negotiating a COVID MOU to try to account for all the complications of how faculty would move online for the pandemic. I was "lucky" that I'd taught my art history class online before, so I only needed to modify the class to account for the shortened length of the quarter (we traded the first week of the quarter for prep time so that faculty who hadn't been online before could get online). I wasn't able to teach my pottery class online (and haven't taught it since, either).
 |
| My new graphic syllabus for online clay (I wonder if this will be the last quarter I need it) |
Clay 1: Handbuilding, Online
I have been teaching my hand-building class online since fall. That's the class I begged to teach in September and then got sudden permission about a week before the start of that quarter. The fall class went ok, especially considering how quickly I moved it online and how little time students had to sign up. Looking back at the work, it looks better than I remembered it did at the time (I think I was really focused on what I wasn't able to do online, rather than what was going well).
 |
| Detail of the graphic syllabus, showing the studio kit and glazes students will get at the start of the quarter |
In winter quarter I made some changes and improvements and the class felt a lot smoother. It went well enough that I felt comfortable polling my students at the end of the quarter to get their feedback on a number of issues (I didn't want to poll my fall students because I knew there was a laundry list of changes that needed to be made). One thing that suprised me (but that I think was good advice) was their understanding of how the order of projects could change so that parts could build on each other in a more useful way. I had essentially arranged the order based on easiest to hardest, with adjustments to allow time for drying. Today I spend most of the day moving projects around so that things show up in different order next quarter.
 |
| The real studio kits, as they were getting put together in the studio (I don't have to do all the work, Gina, our awesome Project Assistant for Humanities orders, collects, divides, and distributes all the kits for art and music). |
New Project: Carving from Solid
Last quarter I had them start with pinch pots, then move on to a new solid carving project that I hadn't done before. It worked really well and I'm definitely keeping it. I'd literally never done this project before I recorded the demo videos, so it was delightful that it worked so well the first time around. I got the idea from some articles I found in a couple of old Ceramics Monthly magazines (featuring the work of Elena Renker and Zak Spates) and thought it would work well for students working from home.
 |
| Some of the tools for the studio kits, including 16 PVC pipes I cut for rolling pins |
It did work well. I shared the articles with them, but I also created my own improvisation, in creating segmented forms, and recorded video demos of some, but not all of the techniques. All the carved forms worked really well, but especially the segmented forms and boxes. I also had students facet or flute the surfaces and the results added some nice visual variety. It's often challenging to get the students to carve deeply, so these results were nice to see.
 |
| One of my segmented example pieces |
At the end of the quarter, the students pointed out that at week 3, when they started the carving project, they didn't really know much about how lids work or how to apply textures. I think some were intimidated by the project at first, too. In week 7 and 8 last quarter, I had a slab project in which they experimented with a bunch of textures and I showed them (more clearly) how to make lids. So for this quarter I moved the slabs before the carving project. I also anticipate that slabs will seem less intimidating (at first).
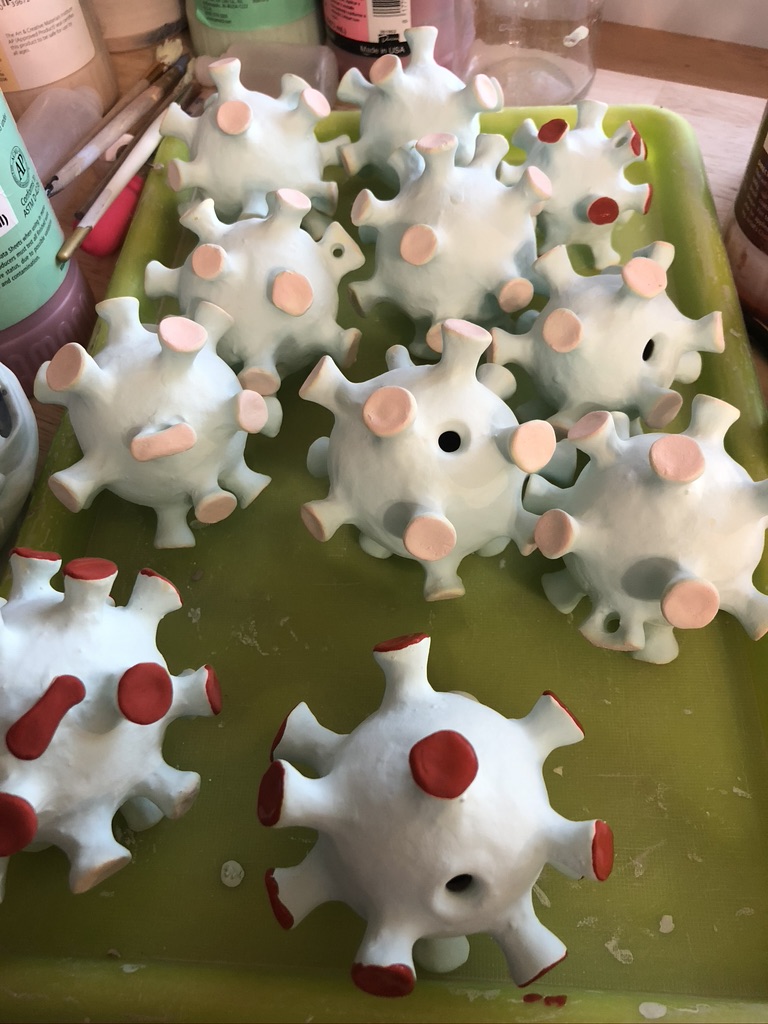
 |
| Carved Segmented Box by Sophia McDougall, Winter 2021 |
The project that the most people had trouble with was coils, which really surprised me. I always think of coils as being the easiest project and I figured it would translate most easily to students working from home. What I think happened, however, is that my confidence in this project led to fewer demos and less focus on troubleshooting and anticipating problems. Additionally, this project has always been the one that has the most in-class demos (that I don't have replicated online) because the demos feel so easy to me. I'll have to work on this for next time.
 |
| Glaze kits ready for pickup |
Final Project: Two Tracks
Another adjustment I made this quarter was to create two options for the last project. In fall, all students researched and then made a site-specific installation. My motivation was that students wouldn't need to fire this work and it could be a fun way to sculpt with clay without any plan of keeping the work. I also thought we could take advantage of the fact that the clay might change with weather if it was left outside, and we could document that change.
 |
| A solid chunk of wet clay I left outside in the snow during freezing temperatures to see how the clay would look after freezing (it isn't a good idea to let your clay freeze) |
As it turned out, when I experimented with trying to make stuff change by leaving it outside in the snow, the change is pretty subtle if there's not a lot of snow, or if the work isn't thick and wet.


A leatherhard clay tube I left outside in the snow showed basically no changes from the top
The students in the fall maybe didn't fully understand the project--or maybe they were just wiped out at the end of the quarter. One complaint was from a student who thought the work needed to be outside, though one of my examples was an indoor installation. This quarter I added some FAQs to this project, but I also added an alternate "track" that students could do instead.
 |
| Cover of the Nicole Seisler's book |
The alternate track is to create two stop motion animation videos. I got this idea from Nicole Seisler's "Recipes for Conceptual Clay in the Time of COVID-19." This little "recipe" book actually had several projects that I thought about borrowing elements from, but the stop motion animation idea seemed like a good fit for the time frame and expectations for this class. I also just though it would be fun to see what they came up with. I guessed that some students would have a lot of fun making the animations, and that they could do this project even if they were running out of clay.
stop motion animation example (by my kiddo)
However, I also guessed that some students would balk at the idea of learning yet more technology. I had the students download an app to do the animation, and the app was pretty easy to use, but I didn't want to pile on more tech for a hands-on clay class, so I left students the option to do the installation instead. I myself never figured out how to do some of the things the students did with the videos (like add sound). One student's feedback was that they didn't think there were enough videos demonstrating how to use the different features on the app (Yeah, that's because I had no idea how to use them and was letting the students figure it out).
stop motion animation video by Sophia McDougall, Winter 2021, I find this one absolutely delightful
As expected, the students who did them seemed to enjoy doing the videos and others did the site-specific installations. Happily, winter students did well with the site-specific installations. I enjoyed having the two options, though I suspect it might be a little strange to students to have to decide which path to choose before they really begin. Next quarter they'll be able to see more examples from the start.
 |
| Site-specific installation view of clay apples in an orchard by Nevaeh, Winter 2021. Nevaeh set up the work in two different installation arrangements, which was a nice variety. |
 |
| Detail of a site-specific installation by Jayleigh Butler, Winter 2021. Jayleigh's installation had many complex little sculptures (not all fingers) coming out of all these plant pots, it was great fun! |
Graphic Syllabus
The graphic syllabus I made today is meant to help the students visualize the organization of the class. The idea is that they'll be able to see how each project is organized into 2 one-week segments and they'll also be able to see the kinds of projects that fit in each project. I found illustrating the stop-motion animation for track 2 of Project 5 really difficult. I also now realize that I didn't actually identify these projects in the drawings.
 |
| detail of my graphic syllabus, showing the two tracks that students can choose from for Project 5 |
Even though this one page has eaten up my entire day, I had fun making the graphics. I particularly like the little clay figures I've put all around, since most of them are either my class examples or things students made last quarter. Though in week 8, when students will be making artwork inspired by an artist, the drawings are meant to reference Magdalene Odundo, George Rodriguez, Jomon pottery from Japan, and Moche pottery from Peru.
 |
| The course map again |
I like this graphic syllabus enough (and I'm also a verbose enough instructor--I mean obviously, I'm writing a blog about creating a drawing), that I created an intereactive version that gives more explanation for each part of the graphic syllabus. It doesn't look like the embedded version will work, so here's the link: Interactive Course Map for ART 202 Online.