Showing posts with label molds. Show all posts

Sunday, March 15, 2015

Molds & Cleaning

This weekend went by pretty fast with family activities and a textbook I'm trying to read for class. I got into the studio for just about two hours total. I did some cleaning, made a plaster mold (that still has to dry before I try it out) and used all the molds I made earlier for almost the first time.

my new box with molds (and other stuff)
The biggest achievement, I suppose, was vacuuming the studio, but that never looks very exciting. I also used some boxes from my mother-in-law to set up a little raised station for the molds I plan to be using in the near future. Getting that counter space cleared off took some doing, too.

The slip mold that failed (it was the slip's fault)

I had mixed up my casting slip pretty well a couple weeks ago, but it had already settled pretty badly. I tried casting with it but mostly made a mess. I probably need to find a funnel and a better way to get the slip remixed; the thick stuff on the bottom of the jar is too deep for my immersion blender.

press mold before smoothing seam

The press molds worked fine. I need to make a little more slip to go with this type of clay, but that shouldn't take long after I let some of the clay dry.

press mold during the smoothing process

A week or two ago I had fired a load of my bulbs and the kids' bells. They're waiting for spring break to be glazed and refired. I'm hoping to get a few done before my installation goes up in South Lake Union on March 26 and 27.

box of bulbs waiting for glaze


Sunday, February 22, 2015

Mold Making

I'm planning to make a great number of these sorts of shapes for an installation I'm thinking of doing. To help speed up the process, and because some of my students were curious about the process, I thought I would make some molds for casting the shapes.

Wheel-thrown forms

I started by throwing an example of the shape I wanted. For the first mold I made, I fired the form in the bisque kiln. For later molds, I used a leather-hard form I made the day before.

wet clay form in half a plaster mold

I made the first side of the first mold at school so I could show my students, but didn't take pictures of the process. I later broke the bisque form I was using and had to replicate it in wet clay to make the second half of the mold.

leather-hard clay forms in wet clay bases

To make the first half of any of the molds, I inset the leather-hard or bisque form into a flat base of wet clay. I tried to place the form so that widest part was exactly lined up with the top edge of the wet clay. I did this so that the mold won't have any undercuts that make it difficult to remove the cast form.

ready to cast the first half of this mold (except for that puddle of oil soap in the key)

I then pressed the end of a round tool into the wet clay base to create indents that will eventually be keys for the two-part plaster mold. I rolled out a slab of clay and wrapped it around the wet clay base with the inset form to create a well into which I would later pour plaster.

making a mold for slip casting

I want to try slip casting with one of the molds, so I created a hump of clay to take the place of the opening through which I will eventually pour the slip. I haven't created a slip casting mold before, so I'm not sure if my "sprue" will be wide enough.

second half ready to cast

For the second half of the mold I created earlier, I wrapped a new wet clay slab around the already-set first half of the plaster mold. I then brushed both the plaster and wet clay surfaces of all three molds with Murphy's oil soap so that the new plaster will come apart from the old plaster and clay.


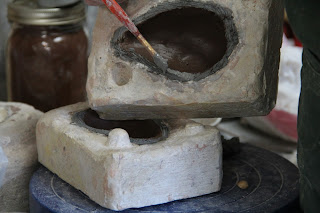
Earlier in the weekend, I had left my oil soap at school and decided to use baby oil as a replacement. That is apparently a terrible idea, as it didn't act as a release at all. The baby oil experiment led to an incredibly strong attachment between the fired clay and the set plaster. Even smashing the bisque form with a hammer didn't break it apart from the plaster mold. 

bisque form stuck in the mold

After the clay molds for the plaster were made and coated with an effective release agent, I mixed the plaster. I found that coating a bucket with a plastic bag is a nice idea and helps make cleanup easier only if one uses a bag without a hole in it. An unnoticed hole results in water dripping mysteriously onto the poured plaster and confusing the mold maker for a while until she noticed the puddle under the bag.
easy plaster clean-up

The plaster sets fairly quickly and then the clay can be peeled off easily. Ideally, the plaster and fired clay both come apart easily, too.

plaster setting in molds

The plaster needs to be thrown away after use and any clay with plaster stuck to it should also be thrown away since plaster looks like clay then bursts in the kiln, leaving a hole in the side of whatever was being fired.

the first half of the slip casting mold, set and almost ready for the second half of the mold

Thursday, November 7, 2013

So...many...bulbs!

Though it is always a bit sad to stop building, there is one form I'm ready to be done with for a while. I made just over 100 bulb forms this summer and fall (and last summer). They are taking over the studio in at least 4 boxes and stacks around the studio. Of course 100 bulbs built does required 100 bulbs to be glazed, ah well. 
a tumble stack of bulbs ready to glaze
another tumble stack
As I've mentioned before, I experimented with mixed media in a few of the bulbs. Some are made of only clay, others have non-ceramic materials to be added after firing. For a few I included metal or glass before and during firing.

glass and bolts before firing

glass and bolts after firing

Eventually the bulbs will be hung in a grid on the wall. I have an old iteration of this on my wall at home. Anyone who came for the Tour of Artists' Homes and Studios would have seen the smaller installation on the way into my studio from the house.

bisque fired bulbs from summer
partially glazed bulbs from early summer

Thursday, October 31, 2013

Happy Halloween!


It's been a busy Halloween season. Working in the studio I found time to make some pumpkins and skulls from some molds I already had. The skulls are slip cast (and fragile), the pumpkins come from a press mold I made myself years ago from a gourd.


A few weeks ago we had friends over to decorate skulls. We had quite a few left over, so my daughter and I painted some too. A couple of the paints glow in the dark I am looking forward to hanging them or setting them out for the trick or treaters.


The kids also made beads for necklaces out of glow in the dark Sculpey.


Of course we carved some pumpkins too. The big one has a bit of a multiple personality problem with it's Cheshire smile and Harry Potter scar.


Wednesday, July 31, 2013

Press Mold Bulbs

One of the potential problems with writing a blog about my process in the studio is that much of my day to day work is pretty repetitive. Yesterday I make almost a dozen pieces, but each one was made using a press mold of the same form. So, basically, this is what I did all day.


I have a couple plaster molds I made years ago to simplify the process of forming these "bulbs."


I pushed a thin layer of clay into both sides of the two-part molds, which are keyed to line up the halves together.


I added a layer of dark slip to the interior of both sides before closing the mold.


I scored and slipped the edges of both pieces of clay before pushing the molds together. Roughing up the edges and adding liquid clay (slip) helps the two pieces of clay to stick together inside the closed mold.


Once the two halves of the mold are together, the porous plaster absorbs some of the moisture from the wet clay, causing the clay pieces to shrink inside the mold and pull away from the wall of the mold slightly.

When the mold is opened up, the "bulb" form should pop out easily.


The seam is visible and needs to be smoothed, but the form is strong and can be decorated and altered. Lather, rinse, repeat.


My goal this summer is to form and fire 100 bulbs to use for a wall installation in a show next year. I've formed roughly a third of the pieces I need to make. I am waiting for most of the pieces to dry and be fired. I have two more in the mold drying right now.

an older iteration of my "bulb" installation