Wednesday, August 22, 2012

Pre-School Clay Results

This week I unloaded my first (partial) glaze kiln of the summer. On the top shelf were the pre-school bells made by my daughter's class at the start of the month. The students had painted underglaze on the bells during their class. After bisque firing, I painted a layer of clear gloss glaze over their bells. 


glazed bells in kiln before firing

 The clear gloss glaze made the underglaze colors darker, and shiny, of course.

glazed bells in kiln after firing (with a couple extra pieces)

All the bells worked after firing, though one sounded like it had only one small noise-maker inside. I'm not sure what happened, but the bell was made by one of the youngest students in the class. She either put only one noise-maker ball into the bell or she had too much slip inside and all the noise-makers are stuck to the interior of the bell.


I brought the bells in to the class earlier this week. I didn't get to see the kids' reactions since I just handed the box of bells to their teacher to distribute. My daughter helped me unload the kiln and then delighted me my pointed out all the features of her bell and the bell made by the girl sitting next to her. I hope the other kids did this for their parents as well. Or maybe it just delights a potter/mother.


this multi-colored bell was decorated with a flower arranging frog (basically a poky thing like a cat brush) on the side. The wad of clay on the top is reinforcing a crack or covering a too-large hole the kid punched in the bell. 

this bell has a rectangular slot in the middle probably made by pushing in a popsicle stick or similar tool.

I think the green underglaze on this looks like a dragon or jumping lizard

the slab base of this bell was pushed up after the excess clay was trimmed off so that it isn't sharp

a couple of the kids were very careful about applying one even coat of underglaze color

this piece has several indents around the body made by pressing clay stamps into the wet clay

the white part of this bell is the naked clay without underglaze color. The clay body is slightly speckled under the shiny clear glaze
The same piece from above has a tiny rip on the wall at the bottom and an added piece of clay made from a mold of a seashell 

the kid who made this piece really enjoyed layering wet clay bits and lots of underglaze, after he sliced the walls of the bell

this piece has tiny noise-maker balls added to the top. The plug of clay used to close the top of this bell was so thick I was worried it would explode in the kiln.

I believe this kid used a scoring tool to scratch the wall of the piece. there is also a seashell sprig on the side

After the kids had made their bells, Teacher Toni used some leftover clay to make one herself


Saturday, August 18, 2012

Pre-School Bell Project

At the beginning of August I visited my daughter's pre-shool class to do a clay project with the kids. The project was to make and decorate a bell. The kids in the class range in age from about 3 to 5 years old. Half the kids were in the class last year when we did a different clay project. During this year's project I noticed that the kids who did the project last year had a higher level of comfort with the clay and were better able to follow the directions. Of course these are also mostly the older kids.

I prepped this project by throwing some hollow shapes on the wheel. I originally tried the project at home with my daughter and discovered that open-topped forms would work better for the younger kids than closed forms. It is easier for the kids to put in the little noise-making bits of clay from the top than to fill in the space before attaching the base. 

thrown test forms for pre-school bell project
During the project each kid picked a clay form and also got a slab of flat clay for the base and a ball of soft clay for the top and for decoration. The thrown form and the slab were both leather-hard so they would keep their shape when the kids handled them. I also prepared some tiny balls or bits of clay to put inside. Once the clay dried, the little bits would rattle around and make noise. 

The first thing I had the kids do was score the bottom edge of the thrown form and the top of the slab. Scoring means scratching the clay where it will attach to another piece of clay. I provided some scoring tools (like tiny forks) as well as knives for this task. With older kids or adults I would have them measure the bottom slab first and score only the edge where the top clay form would actually touch. Given that this was a one-time project, I just told the kids to score the slab generally. My daughter, of course, measured and scored just the edge because she's done this before. In general the older kids scored a solid circle or hollow ring on the top of the slab. The youngest kids scratched fewer random marks on the slab or cut the slab.

kids scoring slab and bottom of thrown form
After they scored both pieces, I had the kids put slip on the bottom edge of the thrown piece and stick it to the slab. The slip acts like glue for the scored clay so we only wanted it on the bottom ring or the noise-makers would also stick (and not be able to rattle around and make noise). Only one kid slipped the entire bottom slab but she came in late, so she missed some of the directions. Luckilly I caught it and was able to cover the wet clay slab with a small circle of paper so that her noisemaking clay bits wouldn't stick to the floor.

scoring the slab and bottom of form
Before we started the project, I explained to the kids that clay needs to be scored and slipped when attaching one part to another. I also explained that slip is wet clay and that scoring means scratching with a scoring tool, knife, fork or whatever is available. Between each step of the process I kept asking the kids to repeat what we needed to do to attach clay pieces together. One of the kids very excitedly pointed to the slip each time I asked this. After they attached the slab to the bell form, I held up one kid's bell and asked all the kids if it looked okay. They said we should cut off the extra clay sticking out around the bottom (which is what I was hoping they'd say).

kids cutting off excess clay slab after attaching thrown form
Once most of the bells had bottoms and were somewhat cleaned up, I asked the kids to put in the noise-makers. I'm glad I prepared these bits ahead of time, since some of the younger kids seemed to be nearing the end of their ability to follow instructions. I don't mean they were misbehaving, they were just very excited and ready to play. My daughter and another boy were both very excited to put the noise-makers inside the bells. They finished preparing their bells before the youngest kids were ready.

kids cutting slabs and tearing off cut clay
Earlier, before we moved to the table, I introduced the kids to the clay and the project, I shook some different bells for them and asked them to listen for the different sounds made by a few balls of clay or many balls of clay. These example bells had already been fired. I also brought in a jar of unfired balls of clay and asked them to listen to the different sounds made by the raw clay. I explained that their bells probably wouldn't sound like anything until they were dry and fired. Interestingly, later in the project when their teacher pointed out that the bells weren't making any noise, the kids were quick to explain to her that they wouldn't until they were "cooked."

a tray of texture and surface decoration tools
Once the balls of clay were in the bells, they used a (hopefully) small amount of clay to close the top. I then brought out a tray of various items with which to decorate their bells. The results were quite varied. One boy sliced his bell almost to the point of breaking apart. Another stuck many many small bits of wet clay all over the surface of his bell. The girl below collected all the little balls of clay that were left-over from the noisemakers and stuck them on the top of her bell.

a bell decorated with lots of noise-maker balls on top
I didn't give the kids a lot of guidance on using the tools, though I reminded them how to attach clay to clay (score and slip). For function, there was only one more requirement they needed to know before they finished. Some of them fulfilled this requirement on their own. During firing clay shrinks. Air, on the other hand, expands when heated. If a clay piece contains a fully enclosed bubble of air, the clay piece is likely to explode during firing. All the kids needed was to put a tiny hole into the enclosed section of the bell. Some kids punched multiple holes in the bell. Others had to partially cover their holes because they were so big the noise-makers would fall out. 

some plastic tools stuck into the bells at the right
A few kids understood that that they could use any tools but didn't understand that they were supposed to take the tools out of the clay. At once point I walked to the end of the table and discovered a couple of plastic tool and clay porcupine bells. I laughed and then had to ask the girls to remove the knives and scoring tools before firing or they would have a burnt plastic bell. Another kid on the other end of the table inserted a small plastic disk into a big hole in his bell just before I reached him. I had to cut apart his bell to retrieve the plastic disk. 

punching a hole (or decoration) with a wooden "knife"
This project had quite a few steps for a big group of very young kids to follow, especially when most of the information was new to them. Last year I explained to the kids about forming clay shapes, attaching wet and drier clay and firing. I also warned them against using clay pieces that were too large because they can explode in the kiln. This year I needed to to tell the kids about attaching wet and drier clay (scoring and slipping), using tools to decorate clay, adding clay inside to make sounds, leaving an air escape hole, and firing. I didn't have time to explain why they couldn't use thick pieces of clay. One girl  did add a thick piece of clay on the top, but I was able to fire it very slowly so it didn't explode.

bells with incised, added and stamped decorations
The kids all completed functional bells that were ok to fire. The teachers were a little worried about one of the bells that had been sliced during the decoration stage. The bell had started to collapse a little bit during the project, but it dried and fired in the right shape. It was actually a neat effect the kid achieved with his excessive cutting.

adding surface decorations and cutting or scratching the bells' surfaces


After all the kids had a chance to finish and decorate their bells, I put away the cutting and stamping tools and brought out some underglazes and brushes. Underglazes are like paints, in that the color in the jar is the same as the color after firing. They don't get shiny on their own like glazes because they don't flux (or melt) during firing. They also don't stick to the shelf if kids paint them on the bottom of their bells.

applying underglaze
applying underglaze
After the project, I took the bells home to dry and fire. I let them dry for several weeks (since we went on vacation after the project). After the first firing (bisque firing) the bells were stronger and the underglazes were adhered to the clay. I painted a shiny coat of clear glaze over each kid's bell. The glaze will make the bells shiny and the colors a bit darker. (I will post results soon when the bells are out of the kiln).

applying underglaze
applying underglaze
All the bells drying and ready to fire


Wednesday, August 15, 2012

I'm back, and my computer works

I've been pretty much off the computer for about 2 and a half weeks and haven't posted in at least that long. It feels like quite a long time after a year of twice-weekly blogging.

I do have a couple posts in the works and they will be up soon. The temporary interruption was due to a combination of factors. I finally took my computer, which hasn't been working all summer, in to the computer hospital (aka EfCom). I had been having trouble with it ever since changing the OS so that I could switch from MobileMe e-mail and website hosting to iCloud. Diagnosis and repair meant that I didn't have access to my computer (or our wireless internet) for a week. Remember when none of us had  internet access and we didn't use our computer every day? How did we live like that?

Anyway, the computer hospitalization happened immediately before a family trip to Michigan and Pennsylvania. The trip was busy and exciting and though there was plenty to write about, I didn't have internet access in Michigan and somehow I just never got around to opening the computer (except on the plane to play a "Tangled" DVD for my daughter).

I used the computer hospitalization week to finish building what is probably my last big piece this summer. I have a few more SRAM supports to finish for it, but then I should focus on glazing and firing for the rest of the summer.

last big SRAM bike part piece

On Friday I finished the piece, covered it in plastic and immediately started to pack. We visited my mother-in-law in Seattle and saw the Blue Angels (from a distance) before flying off to Marquette, MI in the Upper Peninsula. My folks recently bought a house on the big lake and our first visit overlapped with my brother's visit. We did a whole lot of playing on the beach and in the water and also ate a ridiculous amount of ice cream. It was one of the most relaxing trips I can remember, very enjoyable.

a view of Lake Superior from my parent's cabin

We then met my husband and his side of the family in Pennsylvania where his sister lives. The PA visit was excessively busy and the highlight for me was visiting Hershey's Chocolate World (I've always wanted to go and I was not at all bothered by the crass commercialism or the huge crowds. In fact, by all my usual measures, I probably should have hated it, but I loved it and basically just giggled the whole time). I think my daughter also liked it, but the highlight of the trip for her was seeing my sister-in-law's parrots. She has two large (loud) macaws, a snuggly cockatoo and an elderly conure.

I don't know a lot about birds and didn't realize that the adjective "snuggly" was appropriate for a cockatoo. The cockatoo also plays chess. The disadvantage of four parrots is that they also serve as loud, permanent and inflexible alarm clocks. The first morning my daughter, not yet fully conscious, groggily asked why the dinosaurs were waking her up. All you need to know about macaws at 6am: they sound like dinosaurs.

playing chess with Zeenah (the cockatoo)

Various groups of Dorns also went on a Harley-Davison factory tour, drove to Maryland for a really hot seafood festival (humidity, yuck), took a scooter tour of covered bridges, rode on an Amish buggy and visited plenty of playgrounds (with and without parrots).

After a lazy week in Michigan that seemed to zoom along, a jam-packed weekend in Pennsylvania that felt like a whole week (in a good way), we flew home via a route that seemed to last a month and took us to 4 different states, 6 different cities and involved us with three different airlines. We ran through two different airports and actually caught the flight we were running to in the second airport. We flew over a huge wildfire on the way to Seattle and didn't realize it was near Yakima until we discovered it again driving home at 3:30am. It was a strange, surreal sight. I was half-asleep so it took me a while to understand what I was seeing; scale and distance were hard to judge. Since the fire was so vast, it seemed like it must be closer to us than it was.

After passing the fire, we were even more thankful to spend that night (morning) in our own beds.

Coming soon to this blog: finished work, glazing and pre-school kids' clay projects. Today I am firing a kiln and maybe I'll have a chance to throw a bit.


Friday, July 27, 2012

Sloooow and Distracted Progress

In keeping with my summer so far, my progress this week has been slow and I have allowed myself to be distracted by various obligations and curiosities. I finished a couple pieces late last week and on the weekend. Unfortunately they aren't pieces that have many bike parts, so maybe I shouldn't have spent so much time with them.


I also played around this week on the wheel. Monday I threw a bunch of pieces, both parts for sculpture (that I hope to start today after I do some unrelated and nagging paperwork) and for some functional pieces I wanted to try. I ordered some new clay at the start of the summer but hadn't yet gotten around to testing for maturity at cone 04. I made a couple plates, a berry bowl and a set of mugs with false bottoms that rattle or open to reveal a separate open section. I saw a similar open-bottomed mug online--or maybe a student shared it with me--that was designed to hold a cookie in the open section below the tea vessel. I'm not sure the result is ergonomic, but I wanted to try it. 


After the first cookie mug, I realized that for a right handed drinker, the handle should probably be to the left of the opening or the cookie (or crumbs) would fall out on the drinker's lap as he or she lifts the mug to drink. Maybe the left-handed cookie mug can be part of a sociological experiment in my kitchen involving tea, cookies and messy laps. We can look for those who subconsciously realize that cookies will fall on their laps and adjust accordingly and those who discover the flaw only when the cookie falls.


I also spent an inordinate amount of time working on a multi-layer vessel which is intended to function as a cosmetics holder in my bathroom. I feel silly for the amount of design that went into the project (which looks like a scented wax burner) but if it works, several hours of studio work will be soon outweighed by the pleasures of eschewing a daily rain of broken powder and projectile mascara when I open the medicine cabinet.


I also under-glazed too much this week. The glazing process can expand or shrink to fit the time allotted. I should really just underglaze 30 minutes a day during the year, so I can stop wasting hours on this mindless task during my summer studio time. I might have to lock up the glazes, though, because the alluring idea of getting some glazing done always tricks me into spending more time than I initially planned; I sit down for 20 minutes between tasks and suddenly its two hours later and all I've done is laundry and under-glazing.


Before it got too hot, I took several nice walks with my daughter to look at flowers (and other detritus). I keep seeing forms that make me want to work in the studio (but I somehow keep lacking the motivation to actually get them done).


Monday, July 23, 2012

Combining Clay with Bike Parts


I just unloaded a set of work from the kiln including some small under glazed pieces and some large bisques pieces. I can't attach the bike parts yet since everything still requires at least one more firing with glaze, but I can set them together to test shrinkage and fit. I was pretty close on my measurements for the most part and there are just a few bits I need to remake. 

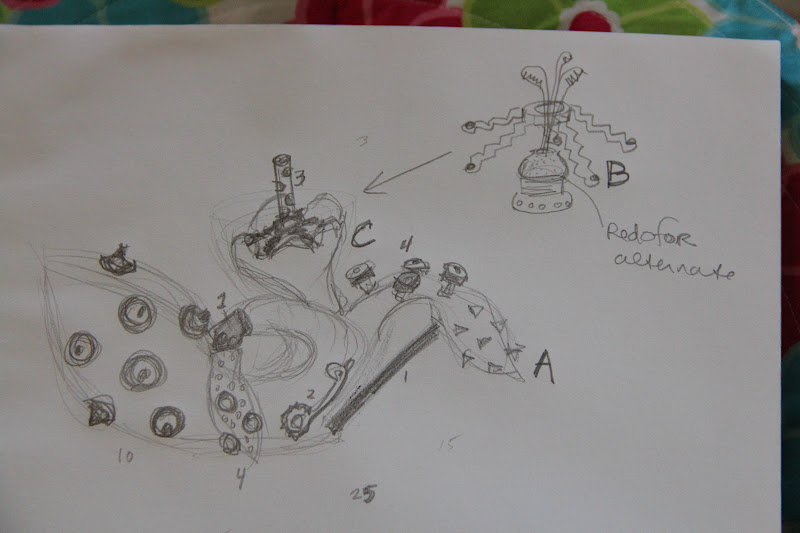
This project is proving to be quite a different cognitive puzzle than I am used to. I would say the planning for one or two pieces is proving to be more difficult than all the work I did last summer. The challenge is to incorporate 25 bike parts--or, as I perceive them, colored metal forms that won't shrink--into my grey/white soft and shrinking clay. The pieces have to be "integrated" into the design concept before I finish the wet building and forming with the clay. If they are to fit precisely, I need to measure the metal pieces in the wet clay, but being accurate is a little tricky, since I am trying to fit round or irregular forms that will shrink around 10%. If I were mathematically inclined, I might actually calculate the percentage, but I've never been a big fan of precise measurements in clay. Even when I do measure, I have a terrible tendency to alter the surface after the measurement has been made. Then the altered surface is no longer whatever shape it started as. 

work in progress
After forming the wet clay, it needs to dry and be fired, both of which cause shrinkage. Last night, after I had finished the firing, but before I had opened and unloaded the kiln, I dreamt the main piece had blown up because the piece next to it was too wet. I always have things-exploding-in-the-kiln dreams, but this one was particularly scary considering how much planning and work had gone into it.

Speaking of math, proportionally, I feel like I have accomplished less this summer than last year at this time. I truly believe this is due, in part, to the bike parts and the new difficulties of working them into my pieces. I even had to draw myself a map/diagram of where the pieces were to go. The good news is my map seems decently accurate.

my sketch for the exterior and top/interior view of this form

Today, not entirely trusting the map, I pulled the piece out of the kiln and arranged the bike parts more or less how I planned them to be. Most of the pieces fit relatively well. I made a measurement error on an inset piece that was to hold something at the top interior bowl shape. This I can remake. I can't arrange all the pieces now because some need to defy gravity. (the yellow and red shiny circles will be spread around the large bottom bulbous shape.

you can see 10 bike parts. two rare invisible from this angle and several aren't arranged because of gravity

naked sculpture with a layout of (most of) the bike parts

I can easily account for 21 pieces on this form. I have a couple other plans that may or may not work well. I do plan to make at least one more version of the SRAM bike parts piece, so I will not attach my limited bike parts until both pieces have been fired and glazed. 

 two options for the attachments on this part of the sculpture. This part of the sculpture attaches to the larger form with a bike part as a hinge or joint

two options for the metal parts on this smaller form

I made a few other pieces that incorporate some bike parts. The pieces above were made just a bit before I had completed the bigger 25-piece plan. The piece below has gone through a first round underglaze firing. The bike part between the upper and lower forms does not fit as well as it should. This was my first attempt and I erred too small so the bike part is loose. The metal is also less well integrated on this first attempt