Tuesday, December 18, 2018

Fifth Grade Clay

Fifth grade "polychrome" bowl

In November and December I did a two-day clay lesson with my daughter's fifth grade class. Since the kids are now 10 and 11 and many of them have done a clay lesson before (just with me, since the school doesn't have art classes AT ALL), I figured this was a good year to do both building and glazing. 


To align with what they're learning in class, I based the clay project on Pueblo pottery, the coil built, burnished and often pit fired pottery of the Pueblo region, including Arizona, New Mexico, and Northwest Mexico. 

finished bowls by three fifth graders

On the first day the kids used fired bowls as pukis or molds for the bottom of their coil built bowls. I used this method because of the connection the Native American tradition, but I regretted it early on.

two bowls with evidence of the ledge from the puki

Many of the students found the pukis distracting and often ended up pushing too hard on their walls both inside and above the edge of the puki. When they did this, they thinned out the bottom so much it became weak and/or created a ledge above the edge of the puki. 

two students decided to decorate the bottom of their wide dishes

Once I realized how many students were struggling, I had the students remove their work from the pukis. Some students were able to work with or without the mold, some had repairs to do once the clay was removed, and some ended up flattening their pieces into wide shapes once out of the mold.

two students with different bowl shapes

On the first day of the lesson, because of a miscommunication that was my fault, I didn't have any student helpers from YVC for the lesson. I usually bring assistants for these lessons and the assistants can give some attention to those who are struggling. This time around students struggled and I wasn't able to get to them or spend as much time with each student.

heart shaped dish, for Daisy

Plenty of students did fine and only one student had piece undergo such damage that it needed to be entirely rebuilt. Lots of students successfully made bowl shapes and a few controlled the shape more than that. One made a heart shaped dish.

wedding vase by my daughter

My daughter had been looking in the books with me the night before and really wanted to make a wedding vase form, so she did. She had talked with me a bit the night before about how to separate the two necks and how to join them. She finished all of it during class and I didn't let her work on it after class.

two dark colored coil built pieces

All of the kids would have benefited by having another hour or two to work. If this were a real art class, they could have practiced, planned, built, and revised. It just goes to show that these kids are sorely missing art classes as part of their elementary school curriculum. One lesson a year doesn't make up for the fact that these kids get to opportunity to learn about art making in different cultures, learn the hand skills that would allow them have control over the clay, or learn about the process and materials used for different techniques. 

some of the more complicated underglaze decorations

Once we brought the clay back to the studio for firing, several of us spent some time fixing a few cracks in the students' work and making adjustments to pieces that were too thick or too thin. I don't like to do this to students' work, but with the time limit the students were only able to do so much and I didn't want their work to explode in the kiln.

triangular patterns and dots inspired by the original images

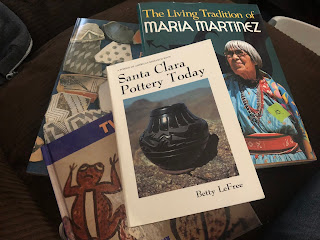
After the pieces were fired, I brought them back and led a glazing/underglazing lesson. The inspiration this time was San Ildefonso polychrome pottery. I had the students use just two underglaze colors, terra-cotta red and brown. They also had the white clay body that could be incorporated into their designs. Instead of pit firing, I had the students apply a clear glaze over their underglaze decoration and then fired the work again.

the zigzag pattern on the bottom came from the inspiration images

I was able to give the students homework this time. I left my resource books with their teacher and each student got some time to look through the pictures. Based on their observations of the decorations on the pottery, they drew plans for their decoration the week before they actually had the underglazes and the bisque fired pieces.

the strong contrast here works well

Some students closely followed their original designs and some did not. Overall, though, when looking at the whole group's work together, it is easy to see the patterns of lines, zigzags and repeated shapes inspired by the images of Pueblo pottery.


Thursday, November 29, 2018

Looking Back: Year in Review

Annual Photo Album

Every year before Christmas I made a photo album featuring photos of my daughter with family and friends. I've been doing this since 2011. I make the photo album online and order copies for our family, the grandparents, and the aunts and uncles. Making the album feels a bit like working out. I dislike starting but feel better after it's done. I do enjoy some parts of actually putting the album together, but the process is exhausting and often frustrating. The biggest stressor is always trying to make sure that all the family is represented equally.

7 years of photo albums

I don't remember to take photographs very often at family events and only one side of the extended family consistently does remember. So the photo album always has candid photos of our family, usually featuring cats, and a bunch of posed and candid photos taken by my Dad and brother, who remember to take photographs. This sometimes leaves a gaping hole where all the visits with the other side of the family should be. It stresses me out because it makes it look like I've excluded part of the family when really it's just down to who remembers to take out the camera.

Our big family project of the past few weeks--Legoland Yakima

Most years, with my family far away and my mother-in-law close by, we remember to take photos for the big event of traveling to see family and forget to take pictures the many times we visit with Grandma. This year Grandma moved away too, so maybe we'll remember to take enough photos of everyone for next year. I guess that's a silver lining.

There were an extraordinary amount of cat pictures this year.

This year, without any family in-state, we didn't do much for Thanksgiving, so I had time to start on the photo album early (usually I panic and start it right after the quarter ends). The first step is going through all my photos from the year (or since mid-December when I made the last album) and looking for the family pictures in amongst pictures of my work, my students work, and the cats. I was really surprised by what I saw when looking back at the photos from last year.


Busy Quarter

This quarter has felt exceedingly busy, busier than most quarters, for a variety of reasons that mostly matter only to me. I'm always busy, but this year the busy has been heavily focused on school-related stuff and I've spent very little time making my own work, doing shows, or even applying to or planning shows.

Also we're getting ready for the fall Clay Sale at YVC (November 29 from 11-7)

Whether the busy quarter is just a normal thing that is only noticeable in the moment, or whether this quarter is unusual, the feeling has been that I'm busier with my day-job than usual. I've felt like I'm working hard and still barely keeping up. When a break comes, like it did over Thanksgiving, it feels great to do very little.
I do have excellent support at YVC, our Program Assistant made this t-shirt that we'll be selling at clay say for $15.

During this summer, I felt strange and didn't even make work in my studio during most of August. This fall I have neglected this blog a bit, both because I feel like I spend too much time already on the computer doing grading, and because I haven't felt like I've done that much worth writing about. (Who really wants to hear about the nuts and bolts of my attempt to gamify my classes? Me!)

Last Year in Review

plates for my brother

When I looked back at my pictures from December, I was surprised to see how much I'd done last year. Actually, I was surprised at a how much I'd done from December through March. Last December I was finishing both a custom set of cat nesting dolls for my nephew AND a set of dishes for my brother and sister-in-law. How did I find the time to do that? 

nesting cats for my nephew

In January I had new work at a Nasty Woman exhibition at Yakima Maker Space and in February I had work at an Art as Activism show in Hood River. I also undertook a major studio clean-up project in January that I finally finished in May. Why did I have so much extra time?

planter commission for my aunt
In February and March I finished and shipped a commission of planter sculptures for my aunt. In February I also installed new work at Yakima Maker's Space and at the end of March I presented twice at NCECA! Also, though I haven't written about it, I did finals and finals grading at NCECA and the day I came back, then immediately spend my Spring "break" doing an on-campus ESCALA training before beginning both the Spring Quarter and my ESCALA project.

NCECA 2018
But it didn't even end there, I had work in yet another show in April at Boxx Gallery in Tieton, in May at  Gallery One in Ellensburg, and immediately after the quarter ended, I made two sets of new work for an Art a Day show in Hood River in August. Then I joined a new gallery in Yakima. And during this time made a bunch of demonstration videos for hand-buildingflipped my classes, our cat died and we adopted three more, and I made a set of 3D printed work for the YVC Viticulture program. I didn't make any work in August, in part, because I was exhausted (also, I wanted to do all this gamification and rewards for my online class).

Political Bulb from one of the installations last year
I'm exhausted even now. I guess I went full speed ahead through Winter break, through Spring break, and even skipped my usual "buffer week" in June. No wonder I haven't felt like doing anything this fall.

Best Friend at 20 years

Sunday, November 25, 2018

YVC Clay Sale

YVC's Clay Sale (Thursday, November 29)


YVC Clay Sale Poster (Fall 2018)

The annual pre-Christmas clay sale at Yakima Valley College is coming up this week! The sale will be held in the Palmer Martin Hall lobby (building 20) on Thursday, November 29 from 11am - 7pm. This is the first time we've run the sale all day and we're hoping it will be more accessible for both on-campus and off-campus shoppers.

Palmer Martin Hall


The clay sale features pottery and sculpture made by current and former YVC clay students and some work made by me, too. We take cash, check and credit cards and prices are always very reasonable. The proceeds from the sale go to purchasing equipment, supplies and tools for the clay studio and this year the proceeds will also help us pay for our hourly employee in the studio.

An old photo of work for the clay sale, colors and shapes are similar to what you might find this year.


The Joys of Having an Hourly Employee

I have to take a moment here to crow about how wonderful it is to have an hourly employee in the studio. During my 12 years at YVC, I've almost always had work study students, but the quality of work-study students can vary dramatically. Over the years, I've had four extremely talented, hard-working, and reliable work studies, but I've also had a number of work studies who've added to my work load by being unreliable, unable or unwilling to do certain tasks, or even disruptive in the studio. 

Our studio is enormous, come check it out on Thursday before or after the sale.

This year I was able to hire an hourly employee whose duties include regular studio maintenance and upkeep (just like the work studies), but this employee also is able to both train new work studies (it seems like we are constantly gaining and losing work study students throughout the year, so training might need to happen in August or November or March, when I have time and when I do not) and oversee what needs to be done and who can do it when.

Palmer Martin hallway, looking towards the lobby

My incredible hourly employee, Betty, has taken on the kind of organizational role that I didn't realize was lacking in the studio. There are a number of tasks that always need to be done in the studio (cleaning, laundry, cleaning, putting tools away, cleaning, and more cleaning) and there are a number of tasks that need to be done when there is time by someone trained in how to do them (recycling clay, mixing glazes, and restocking materials). There are also some tasks that need to happen some days and not others (loading or unloading kilns, emptying sinks, organizing supplies).  

our new t-shirt design (see the next section)

Betty understands the big picture and has taken responsibility for assigning the tasks on a day-to-day basis. She makes sure that all the work studies (I have three now) are trained in how to do the interesting tasks (like mixing clay and glaze) and makes sure that everyone gets a fair share of the boring or tedious tasks (cleaning everything, everyday). It has been incredible this quarter to come into a studio where the employees are always working on what they should be doing. I never walk in to see a mess and I never have to search for a work study to do the thing that should have already been done. I can check in with Betty once and assume it will be taken care of. We've gotten a lot more done done his quarter than we have in the past few years, and it is large part because I have an empowered organizer on the team.  Now we just need to make sure we can afford her all year.


Our studio, a fish eye view

I do have to say, this is not the first or only time I've had a studio with employees who are on task and getting things done without me having to remember to assign every little task, but it has been quite a while since I had a whole studio full of folks who were on task all the time.

YVC Clay T-Shirts

Besides keeping the work studies on track and making the studio run smoothly, my hourly employee has been helping get us get ready for the clay sale. Betty, as well as Les, my community helper, and some of my continuing students (in intermediate and advanced clay classes) and one of my work studies (who has taken a clay class before) have all been making and glazing work for the clay sale. Besides the usual assortment of cups, bowls, lidded jars, and strange beginner sculpture, we have made mugs, ornaments, planters (some with succulents already in) and hopefully a few yarn bowls (if we can get them done in time) specifically for this sale.

The text is a pun. A kiln is the "oven" in which we "cook" clay to make ceramics. Or, to put it another way, its the hottest piece of equipment in our studio. 
Additionally, this year, for the first time, we are selling YVC Clay T-shirts at the clay sale. They are each $15 and we have sizes S - 4XL. Gina, our talented and patient program assistant for Humanities created the imagery on the t-shirts and got them printed. Again, I am extremely lucky to have this help getting ready for the sale and keeping folks on task in the studio. I remember not so many years ago when I was in charge of everything to do with work studies and clay sale prep and-set up. Needless to say, we didn't have t-shirts or planters with succulents or a sale open 11-7 back then. It is much nicer to have help!

Friday, October 26, 2018

New Artebella Gallery in Yakima and YVC Clay Sale in November

While I've been running ragged keeping up with big changes to my online classes, a 3D printer that stopped working, new educational technology and preparing curriculum for our upcoming accreditation visit, I've neglected pretty much everyone online that doesn't involved Canvas.


Artebella Gallery

I have small work like this on display in Artebella

Though I'm barely keeping up with any kind of studio work since my August show in Hood River, I do have some work in a new gallery in central Yakima, south of Astria (Regional) Hospital. The new-since-this-summer space, Artebella Gallery is nestled amongst the cozy little medical buildings and offices on West Spruce Street, right next to Taste and See Deli.


This gallery is owned and run by Pamela Searcy and she and Meghan Flynn both have studio spaces in the small gallery, which is open from 10-4 Thursday, Friday, and Saturday and by appointment. I have smaller sculpture on display at Artebella.

Another piece at Artebella Gallery

Oak Hollow Gallery

Though Oak Hollow Gallery, between Wrays and Inklings in the Chalet Place Mall, is now under new ownership, I still have work in their regular sales gallery section. Stop by to purchase some cat mugs before Christmas.

Cat mug, like the ones I have at Oak Hollow Gallery

YVC Clay Sale

Speaking of holiday pottery, the Fall Clay sale at YVC is coming up in November. This year the Thanksgiving holidays fall early, which means we've moved the clay sale time back a week to November 29. 

The only official clay sale photo I can find (from home, because I forgot to photograph the new poster at school)

Not only that, we've also extended the time of the sale. Stop by Palmer Martin (Building 20) on the Yakima Valley College campus anytime between 11am and 7pm on November 29 to stock up on pottery made by current and former YVC students and faculty. Proceeds from sales go to support studio operations. 
Palmer Martin hall (which we now are supposed to call 020)

We can take cash, checks, or credit card and while you're on campus, stop in and see our beautiful clay studio!

The clay studio, pre-students

Sunday, October 7, 2018

Badges? We Don't Need No Stinkin' Badges

This week I have a recommendation for all my fellow teachers, especially those who teach online: Don't try to make all the changes in one quarter.

Of course I don't like to take my own advice, so this quarter I have significantly reorganized two of my classes and I am trying to learn two brand new tools and one or two additional new-to-me features in Canvas as well. Unsurprisingly this is all taking me longer than I hoped.

The tool window for adding a badge in Badgr.


I've written before about SoftChalk, which I am continuing to use this quarter. I now have required students in all 7 of my Fall 2018 classes to complete at least one SoftChalk lesson. Two classes, my online Art History and my Intro to Clay, have had several lessons in SoftChalk, and between all the groups, I'm pleased to say, I've had relatively few accompanying tech problems in the first two weeks of the quarter. I'm happy with the SoftChalk lessons, and I think they improve the students' experience or learning in class, but they are an awful lot of work to set up. Luckily, many of them will be entirely reusable, and some will be adjusted to fit other classes.

My Unit 3 badge. Pay not attention to the crooked text.

Another new tool, Badgr, is really pretty quick for me to set up. This morning I timed myself as I made new badges and it took me just about half an hour to make and import two badges from "scratch" using Photoshop and some stock badge designs I purchased online. 


My Section 1 badge (for a test covering 2 units)


The Badgr tool is designed to add a competition feel to the class by awarding badges and allowing students to see how their progress/badges compare to their classmate's. The students names are not shared, but they can see a "leaderboard" of where they stand compared to other anonymous students in the class. 

I thought the badges/competition it would be a good fit for the online Art History class I am attempting to "gamify" this quarter. So far I haven't gotten any feedback from the students as to whether they like it, but my view of the Badgr tool shows me who has completed both the required and the optional modules so far. It actually serves as a quick visual reference for who is behind (and who is ahead) in their class progress.

My Ancient Egypt (Unit 4) badge.
Though there is probably a correlation between how far students have progressed in the class and their overall grade, the badges really don't show or indicate grades themselves. Right now I am only able to award badges for module completion. As I am also using module completion as prerequisites for moving forward in the class, the badges only show that students have completed the required tasks.

For example, there is information in the first module that sets the tone for all the rest of the class. I need the students to understand the organization of the class and requirements before they proceed through the class. Therefore, the first module requires students to view to pages, contribute to a discussion and score at least 0 points on their first quiz. I keep the quiz scores at 0 because I don't want students who have done poorly to be blocked from continuing, especially since a computer problem is occasionally responsible for a low grade. I also don't want the students to proceed to chapter 2 until they have at least attempted to finish chapter 1. This means that the badges are awarded for going through the motions, not necessarily for mastery.


My Ancient Greece (Unit 5) badge

My original grand plan for badges and this competition between students included awarding special badges for students who submit early, catch typos or errors early enough so that I can fix them, or ask really great questions in the discussion forum. Since these sorts of things should be celebrated, but aren't directly tied to test scores, these would be both fun to reward with a badge and would celebrate the right sorts of things in a class, but I would not end up comparing scores directly and students who are struggling, but doing the right things, could feel good about their progress. Right now YVC has only a more basic package for Badgr, but it sounds like, later this year, I might have access to awarding badges for other these other sorts of things, too.

My Section 2 badge (for a test covering units 3 and 4)

Like I said, this morning I made up a batch of badges. Because they are meant to be fun, but they aren't central to the class and don't impact the students' learning process, I didn't fuss about the look of the badges too much. The ones I've made aren't as professional as they could be, but the Badgr leaderboard tool only allows them to be seen at a pretty small scale. I figure they are at least more interesting than the straight clip art badges that come standard, and students won't be able to see that I've trimmed the edges of the border crooked or that the curve of my text doesn't quite match the curve of the banner.


My list of badges in Canvas (so far).


Most of the badges I've made are simply a stock badge shape surrounding an image from our textbook chapter. This approach offers me a reasonable balance between my fairly rusty Photoshop skills, the fact that I need to not spend a ton of time on this task, and the fact that the students can barely see the badge detail anyway.

On the other hand, the badges might be a complete waste of my time if students don't find them useful. As I said, the original idea was to reward not just module progress, but actions and skills that are used by active learners. Before I learned about Badgr this summer, I was seriously exploring how to (automatically) reward students for excellence by unlocking or sending them Art gifs that would be a reward they could strive for (related to but separate from a test score). 


I even collected a bunch of art gifs like these dancing prehistoric female statues. I am still considering how I might use them this quarter (in, uh, my free time). Maybe I should just email the top scorers or something.

My thinking was that rewards of this sort are often used in silly little iPhone or video games and then tend to make these sorts of simple activities addictive. It would be nice to add enough competition and "addiction" to my class to make students want to keep coming back and interacting with their class.

Monday, September 10, 2018

So Much Soft Chalk

Interactive Tools In Soft Chalk

I've been making lots of interactive tools in SoftChalk for my online and hybrid classes during the last few weeks. It's both great fun and, apparently, never-ending. I'm both exhausted and excited by the project (um, yeah...projects). I was going to say I'm making lots of progress in getting the classes, ready, but that doesn't feel quite accurate right now.
a screenshot of the HotSpot Activity in the SoftChalk lesson

But I am enjoying what I am creating. One of the neatest features, in my opinion, in SoftChalk, is the "Hot Spot" Activity. This tool allows you to bring in an image, then identify areas in the image that are interactive in some way. In one version of the activity, one can roll over the areas of the picture and text explanations will pop-up. In a scored version of the activity, the text will show up below the image and the student needs to click on the location in the map that matches the text prompt.


a screenshot of my graphic syllabus activity being developed in SoftChalk

So far I've used this activity three times in the stuff I've made for Art History and for my clay classes. For Art History, I used the roll over activity to create an interactive graphic syllabus. In this activity, the students roll over the different sections of the graphic syllabus and a text bubble pops up with more information about what that unit entails and when, during the quarter, it will happen.


Clay Studio Safety Manual

I've also been developing a safety manual for the clay studio. I created a text document that is 14 pages long, but somehow I don't think students are likely to read the whole thing. Since I was already playing with SoftChalk, I thought I'd turn an slimmed down version of the manual into an interactive lesson that could be used in all of my clay classes and by the work study employees in the studio.

graphics in the interactive version of the safety manual

Unlike the Art History lessons I've been developing, the goal here is not just successful completion of the class, but physical safety for students and the studio. In most of the pages I've emphasized the major concerns: silica dust from clay, chemical and fire hazards, and general safety. I've also interspersed interactive "Knowledge Checks" throughout the lesson so that I can check that students are actually reading the lesson and to reinforce the most important issues. In the current draft form of the lesson, there are brief interactive "test" elements on five separate pages and information and pictures on the other 11 pages. 


highlighted areas indicate the clickable spots in the clay studio safety interactive map (this is the edit view)

Of course my favorite SoftChalk feature is the hot spot activity. In this clay safety lesson I've used a map of the clay studio (all 4 rooms) and turned it into a test. Students see an image without the color that shows up in the edit view. At the bottom of the image is a text prompt, skip button, score, and reset.

student view of the interactive map
Students have to click on the area of the map that matches the text prompt. They'll get a reward sound when they correctly identify areas like hot kilns and fire extinguishers. The tool also makes a disappointed "bonk" sound when they do it incorrectly. It can be set to offer retakes or not.


Class Character

I'm hopeful that all this fun stuff I'm developing will be fun for the students, too. The new tools really do offer some flexibility I'm happy to have. The other day I finished off a lesson with a feedback question. This is a multiple choice quiz question, but none of the answers are incorrect. All of the answer offer feedback and the students can explore the different options like a choose your own adventure test.

The spacing and image options in SoftChalk made it fairly easy to add this textbook next to a picture of a person, making the lesson page feel a bit like a comic book panel (I hope).
Today I went back into Canvas to edit some pages and assignments in there and felt a bit frustrated that I couldn't adjust the arrangement of elements or use "tooltips" in Canvas. SoftChalk is spoiling me. However, I absolutely can't move the whole class (or classes) over to SoftChalk before the quarter starts. I estimate I could make over the whole class if I worked on it for about 30 hours a week for 10 weeks.


Tooltips

I was wrong when I said that my favorite feature is the hot spot activity. My absolute favorite feature in SoftChalk is the tooltip. If I could import one feature into regular Canvas this would be it. (Also I really want the hot spot and sorting activities in Canvas quizzes, please.)

The picture of the kilns is not on this page--it's in the tooltip: when you hover over the word "electric"  the picture pops up


Tooltips are just hot text with a pop up feature. I love this! As regular readers may have noticed, I frequently use links in my blog writing to link to previous posts where I've discussed a topic, or to link to pictures, definitions of terms, or artist's websites. A simple link does less to interrupt the flow of the text while also offering the kind of parenthetical additions I enjoy. 

The little brown box is the tooltip pop up box for "preparatory work."

Tooltips are like these blog links but without having to open a new page. Students simply hover their cursors over the text and a little box pops up with more information, a definition, and even a picture. This allows me to define stuff for folks who need it, add images and information that might help them understand, but leave the main text relatively concise.

This is a screenshot of the same page with the cursor moved away from the tooltip text.