Pages

Friday, July 31, 2015

Bubble Plates

This weekend my daughter was playing with bubbles in the backyard. Earlier this year at CORE Gallery, another artist, Keunae Song, had an exhibition of bubbles on glass. Her exhibition included glass objects with evidence of bubbles on them and videos of the bubbles popping on the glass.

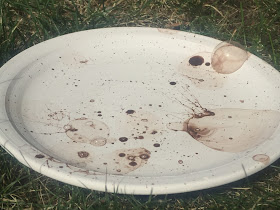
iron bubble plate

I assume her bubble mixture included enamel or frits or paint because the result was a permanent record of the bubbles on the glass object.  After seeing Song's work, I wanted to try recording bubbles too. I've done bubble paint projects with kids before, including my own (this stuff is unbelievably messy--stay away).

bubble plate production set up

When I taught kids art classes for the Ambroz Center in Cedar Rapids, we put paint and bubble solution in old film canisters, inserted a straw into the film canister and popped a hole in the top of the lid. The kids blew into the straws and bubbles poured out of the top of the canister. The kids caught the colored bubbles on paper and traded papers to capture a rainbow of bubbles.

first bubbles popped

Initially, I tried mixing some underglaze into a small canister of bubbles, but it was grainy and wouldn't stay mixed. Once my daughter got involved, I added some iron oxide to a small cup of bubble mix and just kept stirring. I blew a few bubbles but my control of the bubble cup was quickly usurped. I was relegated to bringing more plates out to the bubble blower.

more bubbles falling

This process was fun to watch. I tried to take some pictures to capture the fun of the bubbles landing, then popping. It seemed that big bubbles that stayed on the surface for a while before popping yielded the darkest circles of color. (Perhaps because the color had time to settle to the bottom of the bubble, rather than being sent up into the air with the force of the early pop?)

bubbles landing

The plates collected their fair share of extra splatter from the iron and bubble mixture. We tried some cups but they tended to have lines running down the sides when drips landed on the surface and weren't able to dry quickly.

the one in the middle popped

What I don't know about this project is whether there was enough iron oxide in the mixture to show up well after firing. I have a few plates in the kiln now, being bisqued. I assume the iron will be visible without a glaze, but to make the plates useful, I plan to add a clear glaze over the top. It may be that the iron is too faint to show up through the clear glaze, but I plan to try anyway.

the set on the top popped

This process could conceivably work with other colorants, but I would question the inclusion of a kid once the colorants became more potent. This kid was old enough to know not to suck on the bubbles, but there was still airborne iron/bubble mix in the air when they popped and knees and hands still needed to be washed afterwards. Iron speckles are almost indistinguishable from freckles, by the way.

iron bubble wand in action

Tuesday, July 28, 2015

Glazing at Archie Bray

One of the most surprising things about the workshop I took in Montana, a workshop ostensibly focused on the form of functional pottery, was that we spent the first day and half glazing.

my glazed work from the workshop

The idea was to think hard about glaze so that we will be thinking about glaze later when we are making work. Many potters tend to think of form first and forget about surface. Talk to pottery students and sculptors alike and many, myself included, will prefer, or at least appreciate the look of leather-hard work, before it has dried, before it has been fired, before glazing. 

a pitcher by Jeff Campana (used at the workshop for cream)

For someone who is focused on the making of the work, the glazing can feel like an afterthought, or a tedious chore that needs to be done but isn't fun. I wholeheartedly agree that I'd rather not go through the process of applying glaze at all, even though I like the end-result of a glazed piece.

runny glaze on carved pieces by Adam Field

Glazing is an essential part of most pottery. Peter Beasecker, our workshop instructor, started the workshop by showing images of different pottery pieces and discussing the glaze application rather than the form--or, more accurately, he discussed how the form and the glaze worked together. He showed drippy glazes, layered glazes, matte glazes juxtaposed with high gloss glazes, and complex painted, carved and resist decorations.

one of my bowls with latex partially applied

Our first assignment was to draw on our bisque ware, identifying places we could use liquid latex to resist glaze application. After applying latex to these marked areas, we dipped our bisque ware in glaze, peeled off the resist and reapplied the latex over the glazed sections to resist the second application of glaze.

one of my pieces with a layer of latex (around the rim and the cloud shapes) on top of the just-applied glaze 

I've used latex before with little success, but I suspect I used an inferior brand. When I used it at home, it didn't peel off or took all the glaze off with it. The latex we used at the workshop worked well without much hassle. The instructor dyed the latex with food coloring so it would be more visible (green) and it was fairly easy to use--stinky as all get-out, but easy to use.

one of my mugs with latex resist (left) and glazed with latex removed (right)

The process of using latex was very different from how I usually glaze. For my functional work at school, I usually use a minimal-effort combination of dipping and dripping. I rarely plan my glazes before I start to apply them and often use whatever glaze happens to be open. (Students, if you're reading this, don't do as I do.) Of course, this works mostly because I'm making fairly simple work, I don't usually have much time to glaze, and I know the studio glazes fairly well.

the dipped and dripped glazing I do in the YVCC studio (the pitcher used a tape circle to resist underglaze)  

At home I tend to use layers of underglaze, but on highly textured sculpture. With my functional work I have been experimenting with tape resist recently, but the results have been mixed.

A cup by Andrew Gilliatt (among the studio coffee mugs) illustrates a beautiful use of a thick white glaze over a matte blue. The clouds are thicker at the bottom, their dimensionality contrasting with the flat bird decals.

The great thing about taking a workshop at the Archie Bray Foundation is that there are lots and lots of example pieces to look at while working. In the studio classroom, the mugs for coffee and tea  were done by artists who had residencies at the Bray. It was helpful to look at the glazing done by other artists when planning the surfaces of our own pieces.

This piece was just dipped; the dark colored areas have latex resist which is causing the glaze to dry more slowly.

A lot of the examples shown by the instructor and quite a few pieces in the galleries at the Bray used glazes with more flow or movement than I am used to using. Melting lines, runny color and drips collecting on lines of the pot seemed to be a theme in the work. 

a plate by Sean O'Connell--in my house now
I didn't take advantage of the movement of the glazes in my own work, in part because I didn't apply the glazes very thickly. Mostly my glazes stayed where I put them in this batch of work. However, the discussion of how the form interacts with the glaze was valuable and I can see how a form could be made to fit a runny glaze, a la Doug Peltzman. I can see how introducing glazing early on, and in a considered way, could be useful for my students.

some of my work with one or two layers of glaze and some green latex

I spent Monday afternoon and most of Tuesday morning "glazing". Most of the time was actually spent applying or removing latex. We loaded the kiln Wednesday and unloaded it on Thursday. The Bray has a Blaauw kiln, which circulates the heat with a blower system and can be fired more quickly than "normal" kilns. 
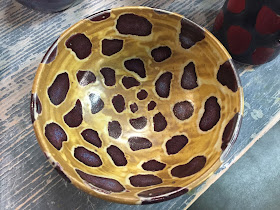
one of my bowls after firing

I was mostly pleased with the results of my glazing, though I could have applied the glaze more thickly in most cases. The glazes are similar to those we have in the YVCC studio, meaning I could anticipate how they would look. I did bisque the work to cone 04, which means the pieces were a bit less porous than usual. This or and excess of caution was the reason my application was light.

My favorite piece from the workshop, I used latex to block out the shapes, then dipped in a matte black glaze. I then peeled away the latex, reapplied latex over the black glaze and dipped a second time in oxblood red. The reduction in the kiln was surprisingly even, given the size of the load.

The glazes were not similar to the glazes I have at home and I will have to try new glazes if I am fire the rest of the bisque ware from the workshop to cone 6. The instructor offered an interesting suggestion for glazing in a small studio with limited glaze options. He suggested planning one's glaze around a black and a white or clear, with one other color. It is a useful way to think about choosing glazes and a nice way to build a glaze repertoire without trying to have every color option available. 

A mug by Sunshine Cobb (in the Pottery classroom) doesn't use runny glaze or resist .

In general I found the latex to be interesting and useful for some applications, but stinky and tedious. Partway through the glazing process I decided to play with a tool I've always called a slip trailer, but instead of using it for slip application, I used it for glaze. I applied the glaze in lines directly on the bisque ware or on top of a layer of glaze.

one of my mugs before firing (no resist used here)

I mostly skipped the latex at this point, using it only to keep the clear glaze off the dots of color. This method was significantly faster and the results seemed good. 

I do not know the artist for this mug found in the pottery classroom.

I didn't realize until after I had started using this technique that one of the mugs in the studio had a similar design on its surface, probably done using similar techniques to mine. I'm guessing I saw it early on and it inspired my approach, but I didn't consciously notice it until I was done.

The pieces on the left have clear glaze applied over the black glaze lines, but resist was used for the colored circles.

Now that I am home from the workshop, I have quite a bit of work to glaze. I bought some new glazes for cone 06, though I've never actually tested my kiln at that temperature. I brought home a respectable amount of bisque ware made with cone 6 clay. I also have some pieces I made with low fire clay before the workshop. I plan to finish both sets of functional work in the next few weeks.

My mugs after firing: the center piece has black glaze applied over another glaze, the others have clear glaze applied over the black. 

Saturday, July 25, 2015

Two Busy Weeks: Archie Bray and Seattle

A little over a week ago I was in Montana for a workshop, "Pots, A Studied Approach" with Peter Beasecker at The Archie Bray Foundation in Helena. It was a week long workshop focused on throwing on the potter's wheel and functional pottery form. 

a wall made of ceramic pipe at Archie Bray

I signed up for the workshop with my students in mind. My own work is sculpture, but the majority of my students are generally focused on functional pottery. 

the view of Montana from the B&B where I stayed

The Archie Bray Foundation was an absolutely amazing place to be. Our workshop took place in the old pottery, about in the center of the campus. The Bray was originally a brick and pipe making factory and the old beehive kilns and some of the buildings are still around, though mostly in disrepair.

old buildings at Archie Bray

Walking around the Bray there is always something to look at, be it the old buildings, the new buildings, the site-specific artworks, the new artwork by resident artists or the abandoned work of the "boneyard."

ceramic pipes at Archie Bray

The Bray has had residents artists since the 1950s, and perhaps the studio where we took our class had been around since the beginning of the residency program. It was certainly an old and less cared-for space.

The Pottery (classroom studio)

Just outside of the pottery where we had classes is an area with a few picnic tables and some landscaping that seems superficially like flowerbeds, but instead of flowers, the beds mostly contain damaged pottery and ceramic sculpture from past resident artists and others who have made work, unsuccessfully, at the Bray.

the boneyard

These accumulations of cracked pottery, sculpture with glaze faults and teapots with lids glazed permanently shut are called the boneyard and can be found piled and stacked and hidden in locations all around the different buildings of the Bray.

cracked work in the boneyard (Jason Walker?)

At lunch and after class on the first day of my workshop I walked around the picnic area and later, the whole Bray campus looking at the abandoned or donated artwork. I continued to walk and look at most of the break times through the rest of the week and each time I noticed something I hadn't seen before.
wheel thrown and altered forms by Martha Grover and (Can somebody tell me who made the pice at the top?)

Of course its also lots of fun to play the artist's name guessing game. So many of the pieces are by well-known ceramic artists and there are so many pieces, that this game could be a fairly extensive one. Unfortunately I didn't discover an answer key while I was there.

the "railing" in front of one of the galleries at Archie Bray

On that first evening I also took a walk around the edges of the Bray to see the site specific installations by different artists. The most immediately noticeable of these is the round "shrine" across from the pottery classroom.

the Pottery Shrine at Archie Bray

 another fun game for Archie Bray: find all the tops (left)


Several of the large-scale works incorporated bricks and pipe that may have been from the original pottery business that pre-dates the Bray as an arts space.

 two large site-specific installations at Archie Bray (behind on the left, an old beehive kiln)

The space was almost overwhelmingly interesting. I would have been happy to visit and just spend several hours walking around the grounds, visiting the resident artist spaces and looking at the work in the three gallery spaces. I took far more photos than I could possibly share without boring my audience.

These things are neat, they were stuck into a gap in a building wall--I didn't see them until the third day.

However, the experience was also exhausting for a variety of reasons.  By the time the week was over, I was too ready to come home. The view of Mt Adams and a familiar valley as I cam down I-82 was a welcome sight after eight hours of driving, the last three through the monotonous flat brown landscape of Eastern Washington.

going home

Sadly, my driving break was short as I had to drive to Seattle twice last week. On Monday I de-installed my Storefronts exhibition on Mercer Street in South Lake Union. And on Thursday I went back to Seattle for my shift at CORE Gallery.


 my work at in South Lake Union

Tuesday, July 21, 2015

Tessellating Puzzle

For my Dad's birthday, I decided to make him a puzzle based on a tessellation by M.C. Escher. I got the idea from a trip to the Yakima Maker Space. Someone used a 3D printer to make tessellating lizards as a puzzle. I bought the version at Yakima Maker Space. It was a very satisfying puzzle, as it can be rearranged in multiple ways and the feel of the 3D printed plastic is pleasant when the pieces are fit together.

Dad's puzzle, completed

I was curious whether I could make a similar puzzle from clay. I figured the lizards would be too difficult, to cut, so I found a simpler form in these birds. At first I printed an image of just one bird, but as I traced the paper image, the edges I traced no longer lined up correctly, due to inaccuracies in my tracing techniques, I suppose. (I've never been comfortable working with slabs because I tend to measure or cut badly.)


the tessellation pattern during the tracing process

 I ended up printing a larger copy of more birds and This I laid over the clay slab and traced in its entirety before I began to cut.

the outlines from the paper pattern, with some partially cut out

My traced markings and cuts were still not perfect, but they were close enough that most of the finished pieces fit together reasonably well.
completed birds, ready to dry
After I cut the pieces, I cleaned up the edges with a sponge and other shaping tools, then drew lines on the top edge of the birds. (I somehow put the lines on the wrong side of one single bird. I thought about sending this one along with my Dad's other birds as a joke to see how long it would take him to realize it was a misfit, but decided to try that trick on my kid instead.)

fired birds after unloading the kiln

I dried and fired the pieces together, laid out in a grid, just in case there might be some strange heating in the kiln that made them warp during firing. After firing, I added different colored underglazes into the linear designs on the birds surfaces so they would be more interesting to look at and added glaze to their surfaces.

glazed and fired birds, including the reversed bird and one broken bird

Since they are really just a copy of an existing artwork, I don't plan to make more Escher puzzles (except maybe for my nephew), but if I were to make more, I think an accurate M. C. Escher cookie cutter would speed up the process considerably. I couldn't find Escher cookie cutters for sale, but I did find that you could make your own with aluminum foil or a 3D printer. I wasn't up for the challenge of the foil and don't actually own a 3D printer. Sadly, it appears cookies warp too much to tessellate well after baking anyway.